
You are using an out of date browser. It may not display this or other websites correctly.
You should upgrade or use an alternative browser.
You should upgrade or use an alternative browser.
Wing Assembly Jig
- Thread starter fabricman
- Start date

Enewton57
Member
Probably on the old Yahoo group someplace. Its still open for searching - but good luck searching for it though. Yahoo made changes that made searching quite difficult AND pictures that are sent through email are not saved on theyahoo site like they are here on the forum That will be the advantage of this new Forum once its been active for a few years, much, MUCH easier to search for things.
Glenn Patterson
BH-4 #727
Fabricman,
I sent Mike Nault photos of our set up for wing jigs & Mike put together a sketch with a set of 2" angle frames. I had this in my sent file so I can help some by giving you the photos. Mike may be able to post his sketch for you. The main point was to make a sturdy set of jigs that would allow us to easily move around the wings during construction. Mike was looking for comments so I replied with the following:
" "The drawing looks good but recommend a couple changes.
It is better to use 2" square tube as square tube will resist twisting and give a much stiffer construction than angle iron. The braces from the floor was some 1-1/4" tube that we had on hand. Use square steel plate feet instead using the full angle as the plates will pull tight where as the angle on the floor may rock if there is any unevenness. Once the wing frames are to be retired then the tapcon screws can be removed and they leave 3/16" dia. holes. Build it similar to your drawing with sq. tube and it will work great.
The wing jig frame drawing is similar those used to build the wings for our Bearhawk 727. I sent pictures of the frame arrangement to Mike as he was questioning jigs or table. So I will add a little more to the conversation based on the experience.
These worked extremely well and allowed reasonable working room to build the wings. Our partner Bob wanted to build frames that a person could walk through and that would be easy to get around. It is a builder friendlier method compared to some methods used. It was 14' to the shop ceiling so we opted for a rigid frame which used less material and kept all the framework at a manageable work height. The end frames can be cut, squared up, tacked on the floor and then stood up, tacked to the floor plates and checked for level. The braces then can be tacked from their floor plates to the frames to hold them vertical in the other direction..
The frames were anchored to the floor with tapcon screws which are heavy duty self tapping concrete screws. They held the frames securely and the frames had zero movement. For some reason the countersunk heads on the Tapcons seem to be stronger than the hex head. The heads on the hex head Tapcon sometimes snap off. Use some soap to lubricate the screws. If one were to move these frames while riveting then they would be destroying the wings. The energy is lost in the bucking bar and absorbed in the wing. These frames fully welded up and anchored will easily support all the loads & weight with zero movement.
One could add small upper corner braces similar to the back frame but if it is 2" x 3/16" thick square tube fully welded then it will be solid.
We used a builders or survey level to set the heights for the spar attachments. 3 ft between wings is generous space & is the std. width of hallways in a lot of residences just as a guide plus your wings hang outside the frames. The back frame had corner braces because we were at the end of the tube and needed to reinforce the corners. Set the wing so the tip of the full rib is about 4 inches off the floor and the majority of the wing will be at a comfortable wing height. You spend little time close to the floor. Clamp a kick board to the frame to keep from bumping or kicking the wing tips at the floor. " "
Hope that helps some.
Glenn
BH727
I sent Mike Nault photos of our set up for wing jigs & Mike put together a sketch with a set of 2" angle frames. I had this in my sent file so I can help some by giving you the photos. Mike may be able to post his sketch for you. The main point was to make a sturdy set of jigs that would allow us to easily move around the wings during construction. Mike was looking for comments so I replied with the following:
" "The drawing looks good but recommend a couple changes.
It is better to use 2" square tube as square tube will resist twisting and give a much stiffer construction than angle iron. The braces from the floor was some 1-1/4" tube that we had on hand. Use square steel plate feet instead using the full angle as the plates will pull tight where as the angle on the floor may rock if there is any unevenness. Once the wing frames are to be retired then the tapcon screws can be removed and they leave 3/16" dia. holes. Build it similar to your drawing with sq. tube and it will work great.
The wing jig frame drawing is similar those used to build the wings for our Bearhawk 727. I sent pictures of the frame arrangement to Mike as he was questioning jigs or table. So I will add a little more to the conversation based on the experience.
These worked extremely well and allowed reasonable working room to build the wings. Our partner Bob wanted to build frames that a person could walk through and that would be easy to get around. It is a builder friendlier method compared to some methods used. It was 14' to the shop ceiling so we opted for a rigid frame which used less material and kept all the framework at a manageable work height. The end frames can be cut, squared up, tacked on the floor and then stood up, tacked to the floor plates and checked for level. The braces then can be tacked from their floor plates to the frames to hold them vertical in the other direction..
The frames were anchored to the floor with tapcon screws which are heavy duty self tapping concrete screws. They held the frames securely and the frames had zero movement. For some reason the countersunk heads on the Tapcons seem to be stronger than the hex head. The heads on the hex head Tapcon sometimes snap off. Use some soap to lubricate the screws. If one were to move these frames while riveting then they would be destroying the wings. The energy is lost in the bucking bar and absorbed in the wing. These frames fully welded up and anchored will easily support all the loads & weight with zero movement.
One could add small upper corner braces similar to the back frame but if it is 2" x 3/16" thick square tube fully welded then it will be solid.
We used a builders or survey level to set the heights for the spar attachments. 3 ft between wings is generous space & is the std. width of hallways in a lot of residences just as a guide plus your wings hang outside the frames. The back frame had corner braces because we were at the end of the tube and needed to reinforce the corners. Set the wing so the tip of the full rib is about 4 inches off the floor and the majority of the wing will be at a comfortable wing height. You spend little time close to the floor. Clamp a kick board to the frame to keep from bumping or kicking the wing tips at the floor. " "
Hope that helps some.
Glenn
BH727
Attachments
Last edited:

mikeno
Well-known member
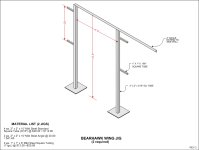
I sketched up what I thought an assembly jig should look like based on a few discussions on the old forum. Eric, Glenn and others made suggestions and I incorporated them into a revised sketch (attached). However, I wouldn't consider this a finished design. There were other suggestions made after the last revision that need to be incorporated. I'm willing to keep revising the drawing based upon input from the guys that have actually built one as I hope to start mine soon.
Attachments
Glenn Patterson
BH-4 #727
Thanks Mike.
I would recommend the braces to the floor as shown in the photos to brace it in the direction that the wings run. The way the sketch is shown it can sway as there is no bracing to prevent movement in direction that the wings run & it may sway. If the vertical frames are about 32" apart and full welded out at the top and braced they will not move in any direction. The wall brace can be eliminated. Corner braces could be added if you thought it needs more stiffness. The back frame in the photo had the corner braces added as the material over the top came up short. The wings hang on the outside will 3 ft apart which leaves a comfortable working space.
Glenn
I would recommend the braces to the floor as shown in the photos to brace it in the direction that the wings run. The way the sketch is shown it can sway as there is no bracing to prevent movement in direction that the wings run & it may sway. If the vertical frames are about 32" apart and full welded out at the top and braced they will not move in any direction. The wall brace can be eliminated. Corner braces could be added if you thought it needs more stiffness. The back frame in the photo had the corner braces added as the material over the top came up short. The wings hang on the outside will 3 ft apart which leaves a comfortable working space.
Glenn

fabricman
Member
Thanks, guys...just what I needed. I am used to fabricating stuff and would have noodled out a design, but this gives me a head start. I tried searching the old files, but as Eric said, good luck! Just brought up stuff that did not resemble what I was wanting to find. This just saves me from reinventing the wheel! Thanks for the quick response. I have copied and pasted everything and printed out the photos for the start of my "builders log".