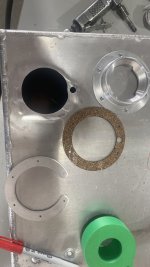
New Fuel Caps

Mark Dickens

Companion QB
Anyone got a photo of the new caps? I'm in the middle of the wings and need to assess what changes if any I need to make to accommodate the new fuel caps

Thanks
 
I didn't get a photo, but I did see them (and order them) when I was in Fairfield a couple of weeks ago.

This is what I remember from my discussion. I could very well have some of these details wrong. I do have a great memory, it is just very short:


The vent is now part of the flange and not the cap. It sticks up about 3/4" or so, and the opening is much larger than on the original fuel caps.

They have 3D printed jigs to help with the drilling. The jig fits into the fuel neck and you drill through the skin. There is a small bump out where the vent goes as well.

If you have aux tanks, the jig needs to be rotated away from the side of the tank. The filler is much closer to the edge on aux tanks.

After that, you have to drill the tank. They mentioned that it is much easier to do with the tank removed.

After the holes are drilled, the installation looks pretty straight forward.

It is much more robust looking fuel cap and vent.
 
I didn't get a photo, but I did see them (and order them) when I was in Fairfield a couple of weeks ago.

This is what I remember from my discussion. I could very well have some of these details wrong. I do have a great memory, it is just very short:


The vent is now part of the flange and not the cap. It sticks up about 3/4" or so, and the opening is much larger than on the original fuel caps.

They have 3D printed jigs to help with the drilling. The jig fits into the fuel neck and you drill through the skin. There is a small bump out where the vent goes as well.

If you have aux tanks, the jig needs to be rotated away from the side of the tank. The filler is much closer to the edge on aux tanks.

After that, you have to drill the tank. They mentioned that it is much easier to do with the tank removed.

After the holes are drilled, the installation looks pretty straight forward.

It is much more robust looking fuel cap and vent.

Thank you. Aux tanks aren't an issue for me since I'm building a Companion. If I understand your description right, it sounds like it would behoove me to stand down on the tanks for the moment and see what the final caps look like. I hate redoing work.
 
At the Tuesday dinner Peter said that the new caps require removing the tanks from the wings and a couple of hours of work. I'm not sure if that was two things or one thing. It takes me a couple of hours to drain and remove the tanks. It would seem smart to postpone tank work if you want to use the new caps.
 
At the Tuesday dinner Peter said that the new caps require removing the tanks from the wings and a couple of hours of work. I'm not sure if that was two things or one thing. It takes me a couple of hours to drain and remove the tanks. It would seem smart to postpone tank work if you want to use the new caps.

That's what I figured. It would be lovely to see a photo of them and perhaps a draft of the install instructions
 
AWESOME...exactly what I wanted. Thanks so much! I can see why I need to put them aside until I need to get the new caps!
 
Rationale for the new design? Aesthetic, improved venting, ease of operation? I've yet to final install my fuel tanks or get to experience refueling over the wing with the old fuel caps received with my kit (2023). Wondering if worth doing? I like the idea of not losing a fuel cap inflight, but not sure if that is a continuing issue with our aircraft? Discussion welome.

Dave (from Maine)

500AGL Pete, two questions: Do you have to upsize the wing skin penetration hole diameter and what's your plan for "finishing" around the filler neck and wing skin? Thanks!
 
Last edited:
98% of those that use the original cap design hate the operation. It’s often hard to get the caps out unless they stay lubricated and are used often. The longer they stay in place the more chance you’ll use tools to extract the cap. When you re-install the cap you have to clock it correctly so that when it tightens up it ends up with the vent facing forward into the airflow. If not you have to remove, re-clock it and try again.

The new cap is an aviation standard fuel cap. Flip up handle and quarter turn removes the cap. The vent with a larger opening remains attached to the filler neck, ensuring positive pressure and less chance of freezing up a small vent hole.

On a retrofit installation the “C” clip that is the backing plate is threaded. The filler neck screws to this clip, sandwiching the tank and gasket between the two.

Edit >>> Op ed on this ; I used the caps in 186BP for about 500 hrs and they worked fine in the northeast. (except when they froze) And they got used alot. Here in Oklahoma Virgil's caps can not be removed by hand, they are just that tight. The LSA and the Patrol could be troublesome as they fly less here, and the caps get used less. (my opinion). The first two factory built five's have the same issue as Virgil's - I need pliers to get them removed. Best solution all around is to stop fighting with something that isn't working by design. Everything now has one that works, by design.
 
Last edited:
I kind of think they they should improve the tank vent design by allowing for cross venting between the two tanks. My understanding is RV's have an internal vent that terminates at the inboard edge of the tank, but runs internally to the outboard end.
 
These new fuel caps look great. Nice work, guys.

For anyone with an existing aircraft, I modified my original fuel caps about four years ago using Graham Johnson’s roll-pin method. It’s a relatively straightforward modification that completely solved the issue for me.

After four years and 400 hours of flying with the modified caps, I’ve had no problems at all. I mention it simply for the benefit of anyone considering updating the caps on an already flying aircraft. Graham’s approach is simple, proven, and worked very well in my experience.

If I were building a new aircraft today, though, I’d definitely fit the new fuel caps.


Forum link

How to mod
 
Last edited:
I did what Nev did. I must say I never had a problem with my fuel caps. I used a sharpie to put a mark to know which direction to clock them. I also occasionally put oil on the O-Rings for lubrication. I absolutely knew they were secure. Not sure I would have altered my fuel tanks. But I am a bit of a chicken and a worst case scenario thinker.

That being said, Virgil is awesome and is constantly gonna make things better.
 
The following data points might help those with old caps.

Of all the reasons mentioned for designing the new caps, the inability to remove them is top of the list. A diffacult to remove cap causes us to lubricate them and Fuel Lube is a choice lubricant BUT it WILL lead to loosing them in flght. I fixed the "diffacult to remove" issue with my caps by removing and replacing the O-rings with a different size to reduce the OD dimension (when not compressed) of the O-ring.

Since then I have 1) never felt a need for a tool to remove them 2) never used any lubricant on the o-ring. I also marked mine with the alignment marks to clock them.

Re: new caps. I like them. If my tanks come out I'll install them.
 
  • Like
Reactions: Nev
Getting the caps to work properly does require some craftsmanship. Shifting builder tasks away from craftsmanship is probably a good thing, sort of like Vans making prepunched kits.

But for folks who want to use the old caps and don't know how to make them work well, it's not a mystery. There are a few specific steps.

If anyone is replacing the old caps, please don't throw them away. I'm happy to send you a shipping label.
 
500AGL

Pete, my wings are finished (painted and stored in the wing cradles) without the fuel tank installed. Will the wing skin hole for the fuel filler neck need to be enlarged - if so, final diameter? If a template is available that would be great. Thanks!

Dave (from Maine)
 
Dave, et al,

The process to retrofit is the same for existing flying aircraft and current builders.

With the tank installed in the wing, there is a template that fits over the filler neck to trace the cut line on the wing skin. This ensures if the tank is slightly offset from the skin hole that is matches the new filler neck location.

The tank is then dropped out and using a second template you will drill out the tank filler neck. The wing skin is be drilled at this point, and then you can use a rotary sander or die grinder to curve out the filler neck protrusion as shown in the photos.

The templates are clocked to provide alignment with the filler neck vent protrusion as without it will simply provide ill-fitting misalignment.

Everything a user needs to install new necks and caps is provided in the kit, but not separately. As I am as Oshkosh I do not have pricing on it but email or call the shop this week for pricing and orders.​
 
Ditto what others have said about the original fuel caps. I did modify them with the roll pin and used the different O-rings. I haven't had any issues at all with them. I remove and tighten them the same way every time and they are secure. They even work in the winter when the temps are well below freezing. Do I like them? Not really, but only because they don't look and function like other fuel caps that I have seen on other aircraft. Not my first choice, but I don't hate them either. They work. Another data point: I do have my main tanks cross-vented, so any blockage to the vent shouldn't cause a stoppage.

If I was still in the initial stages of my build, I would probably use the new caps. But, at least for me, it's not worth the trouble to modify what I have. YMMV
 
I did the Mod as well from day one. I marked the tanks for 12 oclock and where I loosen them for removal and installation. So far zero issues. But the new caps look nice as well.
 
Count me as someone who is not a fan of the current fuel caps. I lost one on first flight, and have done all the recommended mods (roll-pin, one of which apparently I didn't do just right and is rolling around down in the tank after falling out, also did the slightly smaller OD o-rings, sanded the neck, sanded the cap, etc etc etc), and I still fight the fuel cap each and every time I fuel. I keep a tool on my keychain for loosening and tightening, and I have this nagging feeling when flying that I have lost a cap again and the fuel is just flying away.

I am also not a fan of cork gaskets, I assume pro seal could be used in this application instead? Unlike an RV tank, there really isn't a way to get in there after the fact, so I guess that could be a concern? Either way, leakage seems inconsequential since it's the very top of the tank.
 
EDIT: Corrected info -
>>The fuel cap gasket is the rubberized cork, as it's on top of the tank. The ones I ordered for the fuel senders are Synthetic Nitrile Rubber (NBR, Buna-N).
...and, no longer up in the thin air.<<

…update from 10,600 ft.
 
Last edited:
For a scratch builder. With a regular gravity fed fuel system, and carburetor. Other than maybe a small weight or drag penalty. Is there reason not to use a regular fuel neck and vented cap? Am I over looking something in going this route?
Thanks
 

Attachments

  • IMG_9925.png
    IMG_9925.png
    1.1 MB · Views: 18
Hey Rob, personally I think technically that cap or other off the shelf ACS fuel caps would work for a given set of environmental parameters or requirements. What are your requirements? How much venting is enough? What material/corrosion resistance do you want? The ACS fuel cap you posted has a .062” vent hole, while Bob’s design has a .130” vent hole. These latest new fuel caps from Bearhawk have an even bigger vent? That ACS cap/neck is also steel with some type of coating, so there may be some coating quality or corrosion exposure you’d have to deal with as well, etc. I like the simple functionality of it and not making it complicated, but it comes with some caveats with the price point. I too am interested if anybody has any other comments on this as I’m ready to pull the trigger on something for my scratch built wings.
 
As I'm back south, to answer the previous question, new fuel cap kits are $390/pair.

This includes everything for two tanks.
- New Filler Neck with vent.
- New Aluminum Fuel Cap
- Printed templates to provide precise drilling out of the existing filler neck and wing skin.

When ordering you will specify if these are for Main tanks or Aux tanks. Both are available.
The Aux tanks use a template/jig that is offset to move the hole slightly inboard away from the corner, to provide enough room to install the new filler neck.
 
We installed the first set in the Patrol in August 2025 as a proof of concept for both viability of retrofit installation and usability in the real world. I recorded it even though it was the first time and we were learning how to do it ourselves, with an idea and a few parts. So longer then we'd do it today, but you'll get the idea.

 
These new fuel caps look great. Nice work, guys.

For anyone with an existing aircraft, I modified my original fuel caps about four years ago using Graham Johnson’s roll-pin method. It’s a relatively straightforward modification that completely solved the issue for me.

After four years and 400 hours of flying with the modified caps, I’ve had no problems at all. I mention it simply for the benefit of anyone considering updating the caps on an already flying aircraft. Graham’s approach is simple, proven, and worked very well in my experience.

If I were building a new aircraft today, though, I’d definitely fit the new fuel caps.


Forum link

How to mod
I copied Nev and got slightly smaller o-rings, mine have been perfectly fine since as well. Three years going. They WERE a total pain before that mod though.
 
Back
Top