Astro John
Well-known member
I bought the kit from Bearhawk. It's a relatively simple design. You drill a 1" hole in the leading edge of the wing roots, attach a 3D printed bracket to backside, scat tubing with a y adapter, and 2 eyeball vents that mount in the wing root closeout.
The bracket is attached with screws or can be riveted in to the wing skin.
I am a little apprehensive about using a hole saw on the leading edge, so I decided to make a jig to help position and drill the holes.
Last week, I ordered a new 3D printer, the BambuLab H3C. While I have been 3D printing for 10+ years, this is my first enclosed printer that I can use to print more engineering grade materials. Since I have that, I decided to make a bracket that would be an easier change if it were ever required.
I stared by downloading the specific DXF file for the Bearhawk wing. I scaled it close, and narrowed it down by printing and testing a small piece to fit to the leading edge.
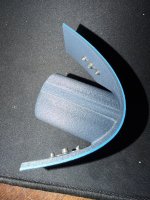
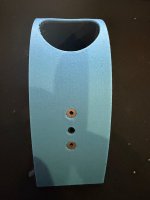
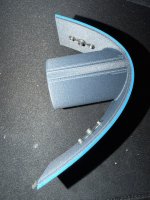
From there, I drew up a bracket very similiar in size to the one Bearhawk provides in the kit. It centers the hole about 1/4" below the peak of the leading edge. I used Carbon Fiber ASA filament, and also designed an interface layer that I printed with soft 65A TPU. TPU and ASA bond relatively well and it was printed as one piece. My thinking is that I wanted to have a barrier between the carbon fiber in the filament, and the aluminum wing skin to prevent any galvanic corrosion. It should also help as a water barrier too.
The part was designed with holes for nutplates, and should be very easy to replace if I ever need to.
Once I have used the drill jig, I will upload the file to the 3D print section. I don't plan on putting bracket portion up because it is too close to what Bearhawk provides.
Any input is appreciated.
They grey filament is ASA-CF, and the blue is the TPU.
The bracket is attached with screws or can be riveted in to the wing skin.
I am a little apprehensive about using a hole saw on the leading edge, so I decided to make a jig to help position and drill the holes.
Last week, I ordered a new 3D printer, the BambuLab H3C. While I have been 3D printing for 10+ years, this is my first enclosed printer that I can use to print more engineering grade materials. Since I have that, I decided to make a bracket that would be an easier change if it were ever required.
I stared by downloading the specific DXF file for the Bearhawk wing. I scaled it close, and narrowed it down by printing and testing a small piece to fit to the leading edge.
From there, I drew up a bracket very similiar in size to the one Bearhawk provides in the kit. It centers the hole about 1/4" below the peak of the leading edge. I used Carbon Fiber ASA filament, and also designed an interface layer that I printed with soft 65A TPU. TPU and ASA bond relatively well and it was printed as one piece. My thinking is that I wanted to have a barrier between the carbon fiber in the filament, and the aluminum wing skin to prevent any galvanic corrosion. It should also help as a water barrier too.
The part was designed with holes for nutplates, and should be very easy to replace if I ever need to.
Once I have used the drill jig, I will upload the file to the 3D print section. I don't plan on putting bracket portion up because it is too close to what Bearhawk provides.
Any input is appreciated.
They grey filament is ASA-CF, and the blue is the TPU.