Boot skin access panels?

DBeaulieu

Patrol Q/B Kit #79
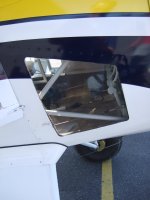
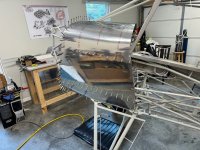
Thinking it would be nice to have easier access to brake/rudder pedals, rear of instrument panel, etc. Thoughts and opinion putting a flush fit panel both side of the boot skin. Approximate size and location as depicted with tape lines. Maybe have a NACA vent on the panel as well for ventilation...All thoughts and ideas appreciated.

boot skin access panel location.jpg
 
I like the idea. Our boot cowl right now is fastened with screws and nutplates, but it is tedious to remove the sides. Will get worse once the landing gear leg fairings are installed. And of course once the windshield and fairing is attached it is not coming off for anything simple.
 
Check out Stefans (Noema) build...he made a couple of blade cuts lengthways on the boot cowl to make removable middle sections utilising some t - shaped alluminium ; think I'll mimic Stefans idea on the Patrol
 
Thanks Paul for the shoutout. I'll add a link to my boot cowl writeup. I have tried to maximize access for maintenance. I was partially successful. One issue that I didn't see fully (and that you may want to solve better) is the order of panel overlaps. Basically to take anything off on the boot cowl requires me to take off the cowl panels first. This is fine during 50h service but is very annoying when I simply want to take one panel off.

Using more butt joints (instead of overlaps) along the bottom of the cowl/boot cowl transition would probably already make a significant improvement. Something to think about. As always it's about tradeoffs.
 
Last edited:
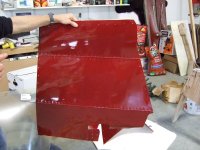
I made the side of the boot cowl removeable. From one inch (ish) above the top door hinge, down to just above the landing gear fairing. I do have to remove the lower door (easy) to remove the panel. So far so good, and it makes working under the panel/pedals a LOT easier. I would do it again.; I have a largish CF NACA duct on each side, with a vent on the duct itself to adjust airflow. Works great.
 
Your build posts have been helpful for helping me visualize many aspects of my build. Inspirational as well!
 
Unless I have to (major damage) that boot cowl is not coming off once I get the windshield final installed
 
Last edited:
I will take a couple pics and send them. I think Brooks did something similar on his Patrol. It wasn't that hard to do. I would do it again.
 
I echo this sentiment that a removable boot cowl is worth the effort.

My top boot cowl and windshield are all nut plated too. On one occasion after everything was attached, I decided to remove them all instead of spending time on my back inside the cockpit with my torso under the panel. I questioned if it was worth removing everything and so I timed the top cowl/windshield removal.

40 minutes.....it only took me 40 minutes. That data point alone is worth considering.

I imagine me my back under my cowl, alone, and then get up to get a tool....back and forth...up and down. Nope, not for me. I'm 61. In 15 or 20 years from now I can't imagine being on my back under it.
 
I'm going to emulate what you did Stefan but hoping to make either side panel removable leaving the wheel fairings in situ with a second lower but joint. Loved your idea using the 't' section in Aluminium so just picked some up!
 
Ken Scott did his Patrol boot cowl with hinges. You can just pull the hinge pins and remove a few screws and you have full access to everything. I decided not to do this, but no idea why. It seems like a great idea! I did make the top of the cowl above the instrument panel removable though.

Mark Scott made a cool window in his boot cowl. That would be a neat idea to combine the two...make a removable window!

052.jpg

136.jpg Boot Cowl window.jpg

Kens Boot Cowl.jpg DSCF8552.jpg
 
Last edited:
I made mine with removable sides like Brooks and several others have. I feel like the access for maintenance/ inspection will be very much worth the effort. I’ll upload some pictures shortly.
 
Last edited:
I fabricated some aluminum channels to stiffen the sides of the boot cowl, and then installed nutplates into those channels so that both sides are fully removable. Makes for great access to the forward cockpit area for maintenance and inspection.
 

Attachments

  • photo19189.jpg
    photo19189.jpg
    358.3 KB · Views: 3
  • photo19192.jpg
    photo19192.jpg
    344.6 KB · Views: 3
  • photo19190.jpg
    photo19190.jpg
    323 KB · Views: 3
  • photo19191.jpg
    photo19191.jpg
    343.9 KB · Views: 3
  • photo19193.jpg
    photo19193.jpg
    334.4 KB · Views: 3
For an additional data point, mine are also fully removable, including the lower curved sections. They all have nut plates installed. I don't tend to remove them for most 50/100 hour checks. However on occasion it has been very helpful to gain full access when chasing down an issue in the footwell or underfloor area.
 
I fabricated some aluminum channels to stiffen the sides of the boot cowl, and then installed nutplates into those channels so that both sides are fully removable. Makes for great access to the forward cockpit area for maintenance and inspection.

I did mine like Viking, including overlapping panels. I used .025 angles that I made on a brake. Works great. In hindsight, I might have a slight preference for "flush" mounted. Only because it would make removing them slightly easier. But just slightly. I have no plans on changing it. The lower piece is also removeable, but have no plans on removeing them, and haven't so far.
 
Plan on cutting in this shape and making backing rings out of 0.025. Same method as the wing access panels
 

Attachments

  • Boot cowl access.jpg
    Boot cowl access.jpg
    587.4 KB · Views: 2
The logic that you can never build a shop that is "too big" applies here. You can never make an access panel too big! Except in a wing...you can make one too big. Boot cowl? Make it as big as you can.
 
I chose to make a full size panel removeable. All four sides are held on with countersunk #8 screws into nutplates. The TOP of the panel has a joggle such that it slides up underneath the glareshield skin. This approach gives me a TON of working space under the panel from the outside and you can't really see that it is removeable once it is all together.

In one of the pics below I have outlined the area where the panel is attached in red

image.png
image.png​
​
 
Back
Top