Casting Lead Balance With Profiled Elevator

Archer39J

4 Place Kit Builder
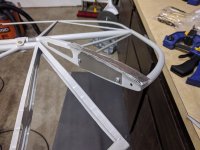
Looking to get my elevator balanced and I'm wondering what's a good way to close out the section with the profiled rib so I can pour the liquid lead in and not have it leak. All the examples I've seen have been on the flat elevators which is easy to clamp a piece of plywood to, but it doesn't look like that'll work with mine. Thought I'd see what others with the model B profiled elevators have done.
 
To bad cerrobend melts at 158 degrees..you could use heavy card board or similar..maybe mix in additional bismuth to increase the melting point..
 
Maybe a couple layers of thinner plywood stacked together, so that they can follow the contour? I don't have model B plans, but I was thinking the curve of the airfoil was pretty small out there.
 
I don’t have the airfoil ribs but I over balanced my elevator, then covered them with an opening so that I could remove weight then closed the opening. Perhaps you could over balance before the wood and fabric are installed?
 
I didn't know the elevator was profiled on the 'B' Thats pretty cool. I wonder if there is a significant difference.

I'd think a sheet of 1/4" plywood would do the trick.
 
I was thinking about thinner plywood too but the sheet metal could work as well, I have plenty of spare around after swapping my firewall and floorboards. Was thinking of layering aluminum foil to make a kind of gasket, the ribs are fluted too so I need a way to get a good seal. Oh, I also have to plug the lightening hole in the rib web as well...

Quite curious as to how other 'B' kit builders have done this.

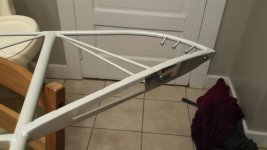
Attached a pic, you can just see the section. The rib is easy to bend too so it can't take much force.

Click image for larger version  Name:	IMG_20171220_233828.jpg Views:	1 Size:	2.51 MB ID:	34526
 
Last edited:
Just the part of the elevator fwd of the hinge point is profiled to match the horizontal stabilizer, the rest is flat.
 
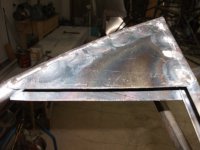
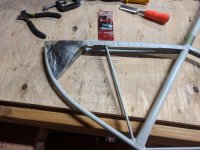
On the patrol I skip welded an upper and lower triangle shaped piece of thin steel to the rib and tube at the front. I flanged the open/rear edge and the pieces were flush to the structure. Poured the lead in. If I need to remove some I can drill through the rib and chew out some for correcting the balance if I had to. I am a little on the heavier side of what was suggested. Not sure how it would look with the profile rib but I can't see the assembly under the fabric.
 
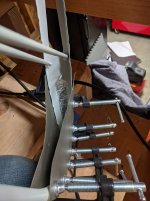
I bought a profiled stab set and poured lead a few months ago. I clamped aluminum sheet on top and bottom and screwed a small piece on the inboard side. I also put some screws in the curved leading edge for the lead to grip but in the attached picture the aft screw wasn't inside the lead and the middle screw was barely inside the lead.

This method worked ok, but sheet aluminum obviously doesn't do compound curves and the resulting lead profile didn't perfectly match the desired fabric profile. I don't think it will be particularly noticable in the end result, but that is a couple years away...
20170107_045048.jpg20170107_040804.jpg
 
I have the Model B wings and tried cardboard and plywood and both times it leaking onto the hangar floor. I tried several things to stop the leaks with no luck. I finally welded some thin steel plates as a trough to hold the lead and that worked well. I just had to use slightly less lead to balance the elevators.
 
I have the Model B wings and tried cardboard and plywood and both times it leaking onto the hangar floor. I tried several things to stop the leaks with no luck. I finally welded some thin steel plates as a trough to hold the lead and that worked well. I just had to use slightly less lead to balance the elevators.

Thats a good idea. Looks like what Steve W did just above your post.
 
I did very similar to Steve on my BH 4plc.with the tapered rib and it should work as well with the profiled rib.
On my Patrol I plan on doing the same as it allows you to remove the lead and paint the area.
The lead is held in on final assembly by bending the open edges into flanges and staking the hole edges used to balance.
You could also put a couple of flush rivets in as an extra if you wanted.
 
Maybe it's just the engineer in me talking, but it sure doesn't make any sense to put a lightening hole right where you know you're going to be deliberately adding weight later - ESPECIALLY if that lightening hole makes it harder to do it.
 
Well I just finished casting my elevator balances, what a cluster....

That lightening cutout needs to go, it makes an already difficult task just that much more fun.

AL foil gaskets worked somewhat, but I still poured plenty of molten lead on the ground. Just reheat and re-pour...

Added a quite bit more than I needed. I'll need to sculpt the lead surfaces more to not bulge the fabric when it's stretched, it's easier to remove lead than add it after the fact. Also the paint filter mask I got didn't work all that well, if you can smell it it's probably not doing the job you need it to. But I think I'm ok, things finally stopped tasting purple ;)


​​​
 

Attachments

  • photo4276.jpg
    photo4276.jpg
    1.8 MB · Views: 0
  • photo4277.jpg
    photo4277.jpg
    2.1 MB · Views: 0
  • photo4278.jpg
    photo4278.jpg
    2.1 MB · Views: 0
I'm actually considering making some sort of receptacle to hold the lead and attach with nutplates and screws.

Can someone give me an approximate weight of lead required?
 
Back
Top