Stringer fastening - Pro and Con

DBeaulieu

Patrol Q/B Kit #79
Looks like there are a variety of ways to fasten the kit provided Al stringers to the "U" standoffs and brackets welded to the fuselage.

(1) Cotter pins seem to be a good method - light and relatively easy.
(2) Rivets raise the question in my mind of whether to use a rivet on each side of the "U" and are there short pull rivets that are short enough to fit in the space between the stringer wall space and likely there will be an interference issue with opposing rivets.
(3) Screw and nut would work well but is heavier than a simple cotter pin.

So, I'm leaning toward the cotter pin solution, but would like to hear any other thoughts on the methods or techniques others have used. My single brain "brainstorming" could use some group assist! :rolleyes:
 
Cotter pins are totally adequate. Only force applied is the curvature of the stringers and that is counteracted by the taught fabric tending to push the stringers into the standoffs.
 
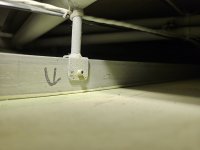
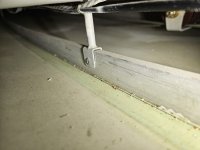
I used pull rivets but did not put one on each side of the "U" just one rivet with the appropriate grip length to accommodate the thickness of the "U" and stringer thickness
 
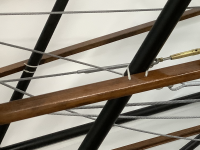
I also used 1/8th in AL pull rivets. They worked great and I don't have to worry about catching a chunk of skin on a cotter pin while reaching under a floorboard. YMMV

20240111_141746.jpg 20240111_141700.jpg
 
I like the Burt Munroe approach with the cotter pins but the rivets look pretty fool proof. I have seen homebuilt biplanes with safety wire holding the stringers in the standoffs. Seemed to work fine.
 
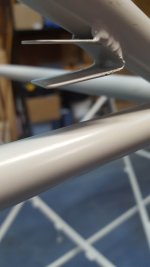
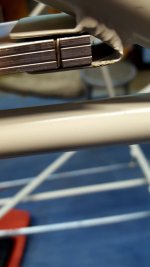
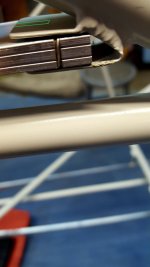
Decided to go with 6-32 stainless machine screws for stringer attachment as this airplane wil eventually be on floats. I do have an issue to resolve with some of the double tabs that the stringers terminate in. In this picture, this is the top stringer on the right side of a Patrol which terminates against the forward baggage door former. I have no idea how to drill in such close quarters. Pancake drill with stubby bit doesn't fit. Could notch the tabs and use safety wire? Open as to how others may have resolved this...appreciate all thoughts!

Dave from Maine

stringer bracket by baggage door.jpg
 
Not sure if it would work, but I have 10 or 12" long #40 drill bit....It will flexes quite a bit. I forgot how forgot how I got that one secured though..

Can you rivet a piece of AL to the inside face of the stinger to hold it on the desired position on that receiver clip?.
 
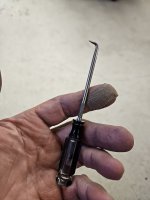
One option would be to use a Dremel engraving bit. It's a bit with a tiny ball on the end and you should be able to make a couple of holes in the tab, top and bottom even at an oblique angle. Once the holes are drilled, mark the location on the stringer with a 90deg scribe, take the stringer out, drill as normal and then put it back in place with a 6-32 screw and nut.

20240117_132511.jpg 20240117_133155.jpg
 
There are a couple on the 4 place like that as well. I used a 12' long drill bit and drilled it at whatever angle i could get. Definitely not straight. I secured the stringer in place somehow, probably tape or zip ties but I can't remember, and drilled through the tabs and the stringer in one go. I used cotter pins which work well because the head isn't much larger than the diameter of the hole so the hole can be close to the edge of the tab and not cause interference with the fabric.
 
To expand on this....a pop rivet can be installed with the tool on an angle by inserting the rivet mandrel into a hole of a small wedge. The rivet tool head contacts the small wedge in place of the top of the rivet. I'd say up to a 30 degree offset works nice. But if the hole on an angle gets drilled, man, safety it in place with some .040 wire.
 
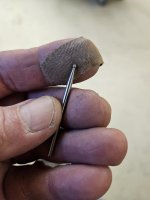
Okay, thanks for all the ideas...this small test piece (see pic) is what I think I may try! Dremel tool to slightly notch sides of the tabs, slight notch on stringer on small facings to "countersink" the safety wire and be done! This particular stringer termination is the only problem child of the bunch. The bottom of the window frame will be riveted into this stringer area and will help secure/stabilize the stringer as well. Does this seem reasonable...any concerns? Feel free to comment please.

Last stringer related question for now... I have the stringers fitted and pilot drilled to #40 along with the tabs. Any reason not to final size drill and fix in place the top and bottom stringers? I can see leaving the side stringers off while working on the floor and other stuff inside the fuselage. Looking for any insight. Thanks so much!!

Click image for larger version  Name:	Stringer safety.jpg Views:	0 Size:	489.1 KB ID:	87809

Dave from Maine :cool:
 
Your solution looks good! The only concern I would have is if the safety wire would be tight enough to keep it from sliding side to side in the bracket. The force applied to the stringer is parallel to the bracket, not at a 90deg. angle or pushing it into the bottom of the U bracket.

As far as stringer final installation goes, I fit everything then would wait until you're ready to put on fabric. It's amazing how small things get in the way sometimes! My .02 cents...
 
Okay, thanks for all the ideas...this small test piece (see pic) is what I think I may try! Dremel tool to slightly notch sides of the tabs, slight notch on stringer on small facings to "countersink" the safety wire and be done! This particular stringer termination is the only problem child of the bunch. The bottom of the window frame will be riveted into this stringer area and will help secure/stabilize the stringer as well. Does this seem reasonable...any concerns? Feel free to comment please.

That looks to me like "Its suppose to be done that way." (aka an industry best practice)

Last stringer related question for now... I have the stringers fitted and pilot drilled to #40 along with the tabs. Any reason not to final size drill and fix in place the top and bottom stringers? I can see leaving the side stringers off while working on the floor and other stuff inside the fuselage. Looking for any insight. Thanks so much!!


I Don't know. My thinking is .... Final size drill them, Fix them in place on the fuselage with Clecos, and build on so they are removable. Then I may prevent a build blunder by (for example) installing something that gets in the way or I can use them to help secure something like an internal antenna. I think I final secured mine with rivets right before covering.
 
Mine were installed pretty early on and was able to work around them. No real issues with that.
 
Okay, I think this is the solution to the "problem" stringer. Plan on notching tab flats (see green lines on pic) the width of a 6-32 machine screw, place stringer in position, scribe for drilling, remove stringer, drill #28 for screw, insert screw loosely, position stringer and clamp with screw and nut. Certainly will prevent lateral movement due to fabric force, and fore/aft movement is fixed via other stringer attach points. Now, back to trying to figure out window frame attachments...:rolleyes:

Stringer safety solution.jpg
 
Very creative solution.

Are you installing the grooved edge of the stringer on the outside? I assumed the smooth side was out. does it matter?
 
Very creative solution.

.........does it matter?

My view is that it does not matter. Those grooves do provide a drilling "Target" when drilling holes to install the rear window frame....you'll easily see if your drill starts to wander off its target. (which may mean your drill point is slighty dull....toss it and get a new one from your inventory).

With that being said, Fabric will taouch the stringers of course. The 90 degree corner of the stringer could rounded with a filed or sanded to make the transition a slight bit easier on the fabric. I did not do that with mine because it was too late when I discovered that technique, and I still wonder if that thinking is a bit anal-retentive. Thats where perfection prevents completion.....as Mark G says. These should be covered with Chafe Tape before covering with fabric.
 
That is a small test piece in the pic. Smooth side is outboard on my stringers (except one) which I did not notice while doing the bending and shaping.
 
Agree, does not matter whether smooth or grooved. Had a buddy AP/IA who has been to the Polyfiber school and specializes in ragwing restoration etc. He said no need to "break" or smooth the edges on the stringers. I'm going to take his word on that and save myself the little bit of effort/trouble.
 
I'm trying to figure out where this situation would occur. I don't ever remember a situation where I couldn't drill the tabs from one side or the other. The stringers all should pass on the outside of the tubing except at the very tail (where they bend inward and become flush with the outside of the tubes). BTW,That tab in the picture looks like it should belong at the tail. The stringers at the baggage area should all blend into the formers at the cargo door, which would put the stringers outside of the tubes, making that tab useless...Just my thoughts. BTW;, I used cotter pins in the tabs, Collin
 
I eased over the corners of my stringers just a bit on mine using a Vixen file. It went pretty quickly, but probably not necessary. My SuperFlite handbook recommends putting anti-chafe tape over sharp edges, metal seams, protruding screws, bolt heads, nails, rivets. I put the tape along the entire length of the stringers...cheap insurance.
 
Yes. I applied the cotton chafe tape the entire length of all stringers. With that being said, this is the internet and proceed with caution. I’ve only covered one aircraft but followed the advice of my Stewart’s system class instructor.
 
Back
Top