Bearhawk Aircraft Bearhawk Tailwheels LLC Eric Newton's Builder Manuals Bearhawk Plans Bearhawk Store

Announcement

Collapse
No announcement yet.

Trim Tab Travel.

Collapse
X
 
  • Filter
  • Time
  • Show
Clear All
new posts

  • #16
    I will have to fix those photos later. P.S. Those fools at Photobucket are deranged, they won't even let me access my own photos now. Their business is surely finished... they just don't know it yet.

    Yes, I mounted the servo and used a pushrod.

    I can't account for other builders. My pushrod travels 1.2 inches, and it connected halfway up the horn - doubling the movement at the tab. If you connect your cables to different places, you can double or half the amount of defection at the tab. It also depends on the position of the elevator, I am talking elevator neutral. This is how I got the required movement from a 1.2 inch servo.

    Note this notional thirty (30) degrees is just a guess.

    The first part of the tab's movement creates the most effect on the controls. I would say the second half of the 30 degrees movement (guesstimated) gives a lot less benefit.

    Comment


    • #17
      Originally posted by Battson View Post
      I will have to fix those photos later. P.S. Those fools at Photobucket are deranged, they won't even let me access my own photos now. Their business is surely finished... they just don't know it yet.
      Yes, those guys are serious nose-pickers.

      I can't account for other builders. My pushrod travels 1.2 inches, and it connected halfway up the horn - doubling the movement at the tab. If you connect your cables to different places, you can double or half the amount of defection at the tab. It also depends on the position of the elevator, I am talking elevator neutral. This is how I got the required movement from a 1.2 inch servo.
      I am planning on having the servo push rod (the heavier duty Bristol SG servo) push the cables directly with a block that works like a yoke. This means the 1.1" of travel is directly applied through the push/pull cable to the horns on the bottom of the trim tab.

      With your setup, you have the pushrod attaching to the trim bellcrank which allows you to add travel with leverage. I want to avoid this bellcrank altogether.

      If you can, this is what would help me the most (instead of digging up pictures)....

      Set your airplane for neutral trim, measure the distance between the trailing edge of the elevator and the trailing edge of the trim tab. Then go full up trim and measure again, then down trim. That will absolutely give me the full range of your trim system accurately and with minimal effort.

      Comment


      • #18
        I'll head over to the hangar in about 20 minutes.

        Ahhh - forgot my battery is out of the plane right now, I can't get the measurement today sorry.

        What I have done instead is uploaded photos showing the full travel of the system to the link posted above. Here it is again https://bearhawkforums.com/forum/bea...im-in-a-qb-kit
        Last edited by Battson; 10-16-2017, 02:53 AM.

        Comment


        • #19
          Back of envelope drawing....
          You do not have permission to view this gallery.
          This gallery has 1 photos.

          Comment


          • #20
            Originally posted by Mark Goldberg View Post
            Just a couple thoughts/comments. Schu - have you flown in a BH with the kind of trim set up you are installing? I am curious. I know you have flown in mine.

            Secondly, runaway electric trim can be very deadly in planes with lots of trim authority like a BH. So I would be sure that you can disable and overcome any electric trim system. I know some builders have used electric trim successfully. But runaway electric trim is something to be very cautious of. Mark
            I haven't flown an airplane with electric trim, but I suspect that having the button right on the stick would make it much easier and safer to trim while in the pattern and slowing down.

            I'll be extra careful to make sure that I don't have runaway trim. I'll probably use some sort of circuit to limit the trim actuation time.

            Comment


            • Mark Goldberg
              Mark Goldberg commented
              Editing a comment
              My comment was two parts. One was about the danger of runaway trim. The other was about the trim system you are going to install with the vernier cables instead of the stock as designed trim system. I was curious if you had flown a plane set up like that. MG

          • #21
            Originally posted by Battson View Post
            I'll head over to the hangar in about 20 minutes.

            Ahhh - forgot my battery is out of the plane right now, I can't get the measurement today sorry.

            What I have done instead is uploaded photos showing the full travel of the system to the link posted above. Here it is again https://bearhawkforums.com/forum/bea...im-in-a-qb-kit
            Thank you!

            Let me know when you have the battery mounted again and can get measurements.

            For now.... do you use all of your trim travel? Your other thread mentioned you moving the push rods to the holes closest to the elevator, so either you didn't have enough total trim, or you wanted it to move faster, I'm not sure which.

            Looking at your pictures, 1.1" of total pushrod movement under the elevator seems like enough, but I'm not going to order anything until you have a chance to confirm.

            Thanks,
            schu

            Comment


            • #22
              Originally posted by schu View Post

              Thank you!

              Let me know when you have the battery mounted again and can get measurements.

              For now.... do you use all of your trim travel? Your other thread mentioned you moving the push rods to the holes closest to the elevator, so either you didn't have enough total trim, or you wanted it to move faster, I'm not sure which.

              Looking at your pictures, 1.1" of total pushrod movement under the elevator seems like enough, but I'm not going to order anything until you have a chance to confirm.

              Thanks,
              schu
              I use all the nose-up trim (tab down) range for landing any time the plane is loaded light.

              Comment


              • #23
                Okay, I'll need to build a bellcrank then.... where is my autocad at?

                Comment


                • #24
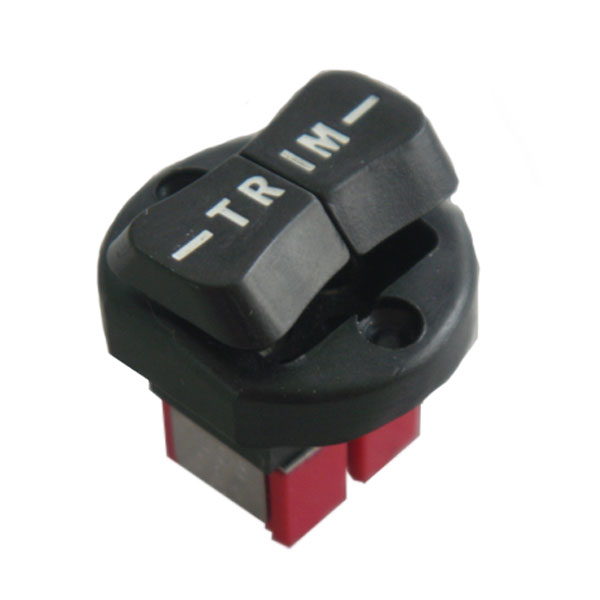
                  As far as I know, every aircraft with electric elevator trim I have ever flown is actually a dual switch to prevent what Mark says....run-a-way trim. I recall the preflight test of the electric trim on one aircraft I flew in the last century was to activate one half of the trim switch and check for movement, then the other half, then both halves together.
                  Here is a switch from Aircraft Spruce that may help visualize a rule trim switch.
                  Trim Switch CA3112-G Replace your old S-Tec trim switch with Cygnet's new direct replacement switch.
                  Brooks Cone
                  Southeast Michigan
                  Patrol #303, Kit build

                  Comment


                  • #25
                    There are lots and lots of planes with electric trim using just a single relay with a single push-button. Every one with electric trim which I've flown has been that way

                    Comment

                    Working...
                    X