2 Unrelated Questions

pnh2atl

Well-known member
1. I’m just about ready to start covering my BH5. I have the horizontal stab set to -2 degrees. Do I need to set all the flying wires and strut prior to removing the tail feathers to cover?

2. Has anyone installed the Ray Allen (T3) servo and maintained the manual trim? I’d like to have both but if I’m forced to pick I’ll pick the electric trim.

Thanks,
 
1. I’m just about ready to start covering my BH5. I have the horizontal stab set to -2 degrees. Do I need to set all the flying wires and strut prior to removing the tail feathers to cover?

2. Has anyone installed the Ray Allen (T3) servo and maintained the manual trim? I’d like to have both but if I’m forced to pick I’ll pick the electric trim.

Thanks,
1. No. I covered before I even had my flying wires. I did dry fit the tail feathers and struts though to make sure everything fit well. Make sure when you're covering your elevators that you don't tighten the fabric too much. There's enough flex in the elevator that you can end up with trim tab fit issues if you shrink too aggressively.
2. Not sure. I haven't flown a 5 yet but I wouldn't want an electric trim on my 4. The trim is so sensitive that a slight movement is all thats needed to make big pitch changes. I've had a runaway trim a couple times, both with Ray Allen servos. It would be scary in the 4 place to have the trim runaway in almost any phase of flight and unmanegable in some phases close to the ground. Maybe the 5 is different. I like how sensitive the manual system is now that I'm used to it.
 
We put Ray Allen trim servos in each elevator and eliminated the servo tab action. To minimize possible runaway trim issues we used the 0.7" throw servo. This limits the amount of throw available to just what is needed. Both the VPX-Pro and Garmin trim modules have runaway trim prevention in the form of preventing a button failure from running the trim electrically. You can cover before setting the rigging, but just make sure as said above to check the trim tabs for clearance. Some covering/paint methods can reduce the gap dramatically.
 
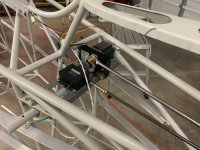
At Airventure, the BH5 on display had electric trim that the factory did. I talked with Virgil and Peter (who did it) and they'll be offering it as kit in the future. It was the Ray Allen servo on an aluminum plate on the tail that directly attached to the trim horn and was controlled by the Garmin GSA 28 pitch servo and an electric trim switch on the yoke. Virgil said it was great never having to adjust manual trim when the autopilot is active.

I also have been exploring just using another Garmin servo as a trim controller but with the existing manual trim still in place by attaching it to the trim cables in the back, like most trim servos in certified planes, i.e. C182 and C206's. This would operate similar to the yaw damper that attaches to the rudder cables.
 
To convert to Electric Pitch Trim in a Bearhawk, you really must disable/remove the manual trim.

To explain this in more detail, aircraft with both manual and electric trim use trim cables connected to a rotary jackscrew to move a trim pushrod, or bellcrank that is connected to the control surface. The trim servo's in this arrangement are a servo with a multi-glooved pulley allowing for endless motion of a bridle cable, or the primary trim cable. (The cable will have 1.5-2 wraps around the pulley and then continue on)
This setup allows for trim cable movement from either the servo or the cockpit trim wheel, which would be another rotary pulley. The combination of these wrapped pulleys (one on servo and one on trim wheel) provides a completely closed loop cable.

And importantly, trim servo's do not have a brake on them holding a cable in position. It relies completely on the jackscrew to hold position and load from the flight control surface.

The manual Bearhawk trim, using a gear/chain at the trim wheel, is a dual cable, one connecting to the top of the bellcrank and terminating at the chain for the trim wheel, and the second connecting to the bottom of the chain and terminating at a turnbuckle, which attaches to the bellcrank.

If you were to attempt to add a servo to this system, you would need to retain the "friction lock" of the manual system to hold the control surface in place. In doing so, it becomes a fight between enough friction to hold the surface from moving, and especially fluttering, and keeping it loose enough for the servo to move it precisely from point to point. The trim wheel "load" in a Cessna is 90% cable tension and pulley condition, and 10% actual load placed on the jackscrew. The "load" on a Bearhawk manual trim is a combination of cable tension, friction in the drag in the steel torque tubes, and bolt tightness to keep it all from moving. While there could be cases of a system working, I do not feel it would be reliable enough without adjustment.
The second part of this is a GSA28 servo used for pitch trim would be far too fast in movement when actuated. It would need to be geared down with a secondary pulley arrangement a'la many Piper Trim systems, (which also still go to a jackscrew actuator) and we are not in the business of developing an entire autopilot trim system.

To actuate a direct-connection control surface for trim, the Ray Allen Trim servo provides the answer, via an electrically driven jackscrew. It just doesn't have a cable attachment. :)

pb
 
Regarding runaway trim, the servo runs slow to allow for precise adjustment. But, would be hard pressed to get it to run away. Even so, we put timers on our trim output to only allow X seconds of movement without reactivating the switch (power output).

I believe Garmin has a default of 5 seconds, which seems like a lot but it moves so slow that longer might be a better timeframe.
 
FWIW, this is how I set up my pitch servo and trim servo for the Dynon system. I have a VPX and the Dynon AP controller for runaway trim protection, plus I have a switch that allows me to select which trim controller is in command. I did have an instance with the Dynon unit in my RV-8 which put me in an uncommanded descent. Flip the switch and control stick buttons are switched to the VPX for control

IMG_1258.JPG
 
To convert to Electric Pitch Trim in a Bearhawk, you really must disable/remove the manual trim.

To explain this in more detail, aircraft with both manual and electric trim use trim cables connected to a rotary jackscrew to move a trim pushrod, or bellcrank that is connected to the control surface. The trim servo's in this arrangement are a servo with a multi-glooved pulley allowing for endless motion of a bridle cable, or the primary trim cable. (The cable will have 1.5-2 wraps around the pulley and then continue on)
This setup allows for trim cable movement from either the servo or the cockpit trim wheel, which would be another rotary pulley. The combination of these wrapped pulleys (one on servo and one on trim wheel) provides a completely closed loop cable.

And importantly, trim servo's do not have a brake on them holding a cable in position. It relies completely on the jackscrew to hold position and load from the flight control surface.

The manual Bearhawk trim, using a gear/chain at the trim wheel, is a dual cable, one connecting to the top of the bellcrank and terminating at the chain for the trim wheel, and the second connecting to the bottom of the chain and terminating at a turnbuckle, which attaches to the bellcrank.

If you were to attempt to add a servo to this system, you would need to retain the "friction lock" of the manual system to hold the control surface in place. In doing so, it becomes a fight between enough friction to hold the surface from moving, and especially fluttering, and keeping it loose enough for the servo to move it precisely from point to point. The trim wheel "load" in a Cessna is 90% cable tension and pulley condition, and 10% actual load placed on the jackscrew. The "load" on a Bearhawk manual trim is a combination of cable tension, friction in the drag in the steel torque tubes, and bolt tightness to keep it all from moving. While there could be cases of a system working, I do not feel it would be reliable enough without adjustment.
The second part of this is a GSA28 servo used for pitch trim would be far too fast in movement when actuated. It would need to be geared down with a secondary pulley arrangement a'la many Piper Trim systems, (which also still go to a jackscrew actuator) and we are not in the business of developing an entire autopilot trim system.

To actuate a direct-connection control surface for trim, the Ray Allen Trim servo provides the answer, via an electrically driven jackscrew. It just doesn't have a cable attachment. :)

pb

Peter: "ah, Grasshopper John, you have much to learn still."
John: "Master Peter, why is it I can't see what you see?"
Peter (aka Master Po): "Patience, young Grasshopper"

Thanks, Peter, for the in-depth explanation and why my dual idea is dumb. I will pursue the electric trim directly. Any thoughts on when the electric trim kit would be available from the factory?
 
FWIW, this is how I set up my pitch servo and trim servo for the Dynon system. I have a VPX and the Dynon AP controller for runaway trim protection, plus I have a switch that allows me to select which trim controller is in command. I did have an instance with the Dynon unit in my RV-8 which put me in an uncommanded descent. Flip the switch and control stick buttons are switched to the VPX for control

View attachment 102200
I’ve been hemming and hawing about where to mount them. I think I just fingered it out. Thanks.
 
I want you guys to build exactly how you want to build. Dont think I am trying to influence with what I am about to say.

A deHailland Dash 8-100 (37 passenger seats) has manual trim. The Fairchild Metroliner (19 passenger seats) has electric trim. It beeps when its activated. You'll get used to what ever you have. I think often back to the Dash 8. It was a joy to fly and trim up. Often all it took to get it trimmed up was moving the trim wheel an inch. I like the manual trim in the Patrol.

I put a transparent ruler on my window screen with index numbers about every inch. It is oriented vertically on the centerline of the windshield. The index numbers allows me to see what pitch is actually doing in relation to the horizon. This lets me fine tune pitch. I've flown 12 minutes without touching the stick. My rule is altitdee must stay in 100'. I use just rudder pedals. I can influence pitch if I lean my body.
 
Back
Top