Floating nutplates

DBeaulieu

Patrol Q/B Kit #79
Having spent a good part of yesterday drilling for nutplates around the fuel bay, I began wondering if it would be okay use floating nutplates versus standard to help with aligning all those screws that are going in on the cover panel. I think that typically you don't use floating in structural application, and the cover panel is such. Any thoughts? Also, did I mention there are a lot of nutplates...starting to love (not) nutplates :rolleyes: more nutplates.jpg
 
The first step in being different to solve a problem is making sure there is a problem. Are your holes not lining up? If they aren't, we might want to talk about why not.
 
Look at it from a positive stsndpoint, after you finish you will be a competent nutplate installer and could train others in the skill. You tube is calling.
 
I think the floating ones are more trouble than they are worth. Sometimes a temporary screw to hold everything in place helps a lot. That doesn't really work with the floating version.
 
Thread drift here and not answering your specific question - sorry. It took me a while to get mine aligning well, but the following points helped to get the alignment very good.

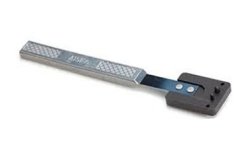
I found that the nut plate tool helped alot with aligning the rivet holes while drilling them. Before squeezing the rivets, I put a screw temporarily in each nut plate to ensure alignment while setting the rivets. A lot of work for sure. If you enjoy this, then you're gonna love removing your tank covers for each 50 hour check. More fun than you can poke a stick at :rolleyes:

This is the business :

F0F15460-260B-484A-AC85-B0270B43EF88.jpg
 
Our plane has number 6 miniature nutplates (MK1000-06). There are so many of them that the weight difference probably does add up. Generally, here is the sequence I use:

Drill the primary screw hole to match the pilot on the nutplate jig - this could be a 6 or not, depending on which jig you buy.
Use the jig to drill one leg side to a #40 hole. In a pinch, a nutplate can serve as a jig, but it means having to start a screw in the nutplate. Also, if I use a nutplate as the jig, I only use it once, then install it. If you keep using the same nutplate over and over again, it will get a little wallowed out.
Flip the jig and drill the other side - if you are using a nutplate as the jig, stick a cleco in that first hole.
Drill the center hole to final size - if it is a #6 jig and a #6 screw, I usually upsize the aluminum hole to a #8. Otherwise, the aluminum gets in the way.
Debur all three holes
Create the countersink or dimple as applicable
Cleco one side of the nutplate
Rivet the other, then remove the cleco and rivet the final hole.

Naturally I'd batch these tasks and not do them in order for each nutplate, but rather do a whole panel's worth of each step.
 
  • Like
Reactions: Nev
After I had Jared's sequence down pat and it was going well, I'd put a pod cast, or U2 music through my shop Blue Tooth speaker and ingulf myself in the spiritual elements of Bono's Music. If I start feeling overwhelmed like I will never finish this task, I time myself to see how long it takes me to do a step five times. I then use that information to predict what time I will finish this task that seems like it will never end. My data on my progress is then used to help me to convince my self that I will really not be doing this task for the next three years. I'll see the light at the end of the tunnel sooner based on the clock. Fuel Tank nuplates were like that.
 
Any thoughts? Also, did I mention there are a lot of nutplates...starting to love (not) nutplates :rolleyes:

Ahh I remember that. Something like 92 nut plates from memory.

Mine all lined up perfectly, apart from the corner one which goes through like 6 sheets of aluminium... May not be an issue?

If you are having trouble lining them up, there are tricks you can use. No need for jigs or fancy tools. :cool:
 
Okay, thanks for the replies to all who chimed in! On one wing I have completed drillng all the fuel tank cover nutplates (except the 4 corners) and used a jig to do so. Everything was previously piloted (Q/B wing) from AviPro, so I'm assuming screw holes will all line up and "play nice" - won't really know until riveting things up.
 
I hate to bring up an old post, but it's relevant to my question. Any recommendations where to buy the #6 or #8 drill bits for installing nut plates?

Aircraft Spruce and ATS don't seem to carry them. There are a couple on Amazon.
 
I love the drill bits from yardstore.com
They make drilling enjoyable!

Also, I'm sure you know this but you don't want to order #6 and #8 drill bits. The screw size and drill size are different. If this isn't something you already know I'm happy to elaborate.
 
A 6-32 machine screw has a diameter of 0.138" A common 9/64" drill is 0.1406" so I used it to drill all those screw holes. The nut plate jig was a bit tight but I made it work. The numbered drill for it was so close to 9/64 that I got by just fine. I only have 1 nutplate jig. For the #8 machine screws I use the #6 jig to drill the nutplat rivet holes then before I rivet the nutplates in place I drill out the holes to fit the 8-32 screw.
 
I already know that a #6 drill bit is not the same as the hole needed for these nut plates supplied with the kit (Kit #49 BH5), I've been using a #27 for the screw hole and #40 for the legs. What is the "right" drill bit size to use for the screw hole?
 
Ok, thanks for the replies. I had just assumed the numbers match the the drill but size. That will save me a couple of $$
 
I don't know what a right size is, but personally I enlarge the screw hole up a size as a final step before riveting the nutplate. I had too many frustrating instances where the nutplate moved half a thousandth while setting the rivets and then the aluminum blocked the passage of the screw.
 
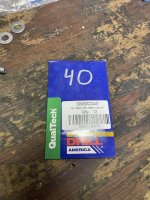
For drilling aluminum I use low cost cobalt bits from Amazon, and treat them as consumable. I’ve been happy with this brand. IMG_0207.jpg
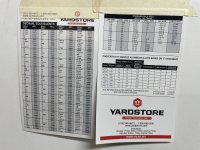
Yardstore has a great reference table for bit sizes, which I refer to daily. IMG_0208.jpg
I’ve used a #27 bit as a clearance hole for a #6 screw when installing nut plates. It’s a good match for the center peg of my nut plate jig, and resulting hole doesn’t seem to interfere with screw installation. I use the jig whenever I can, and resort to using a nut plate as a jig when there’s not enough room.
 
The cobalt Drill America stuff on Amazon works fine and encourages sharp bits, plus you'll have them overnight on most sizes. Pan American has really nice bits as well as makes the Nova line of palm drills (what the Sioux line of palm drills used to be) with and without a keyless chuck (order Nova palm drill direct...the one time when the manufacturer is the least expensive source). I like the keyless chuck version, but keep a keyed chuck version set up for the primary and use the keyless for the musical bits stuff.
 
Ok, I've found in my limited experience that the #27 is a bit too small so like you I size up a bit so I don't have that frustration!
 
Back
Top