
You are using an out of date browser. It may not display this or other websites correctly.
You should upgrade or use an alternative browser.
You should upgrade or use an alternative browser.
Patrol Wing Main Spar Assy Spar Cap Strip Locations
- Thread starter Arrow01
- Start date


SpruceForest
Scratch-Built Patrol SP
Sections A, B, and C are correct. if you are having trouble reading the drawing correctly, I suggest making up a scale model at 1/10 or 1/5 scale (I was feeling particularly ornery that day, so did it in 1/6 scale). Laying out the locations for flap and aileron drives, all of the doublers and mounts, the lightening holes, and spar splice details allows you to get an idea where everything goes and avoids those calls to Bob to get an idea of the fix to be made after you cut a 7" lightening hole just inboard of the splice.
I did not really understand the cap stack until I did the work to lay it out in Fusion, which naturally led to having a physical model for quick reference during the spar build-up.. The scale model lacks the upper and lower flanges, which would just get in the way of viewing the aft spar caps, and has the fore-and-aft scale (e.g., thickness of web, caps, doublers, and mounts multiplied by a scaling factor of 6 to more readily see the various stacks. I would suggest using contrasting colors on the inner and outer caps (mine were all mahogany... could have made the outers maple).
All main spar caps are 1/8" x 1" 2024 T3/T4
Let's talk about the front/forward spar caps on the left main wing spar.
- The inner (fitted to spar web) upper and lower caps start at the root and are 131-3/8" in length.
- The outer (fitted to the inner cap) upper cap starts at the root and is 102" in length.
- The outer lower cap strip starts about 34" from the root and is 71-1/2" in length.
Now for the back/aft spar caps on the left main wing spar.
- The inner (fitted to spar web) upper and lower caps start at the root and are 143-5/8" in length.
- The outer upper and lower caps start about 47-1/2" from the root and are 71-1/2" in length.
See my next post for what this means in terms of BOM and cutting list.
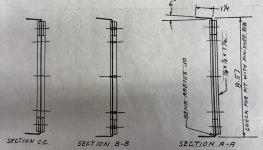
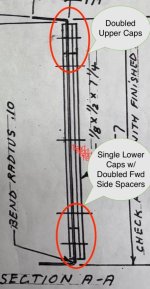
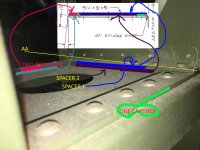
Section A-A (through the second nose rib location) is correct because it shows inner and outer caps on the upper front side of the spar at A-A, inner only lower cap (with the overlapping 1/8" spacers), and inner caps ONLY on the rear side of the spar at that wing station.
Section B-B (through the fifth nose rib location) is correct because it shows inner and outer caps on the front side of the spar at B-B (the inner and outer lower caps start just inboard of B-B) and inner caps ONLY on the rear side of the spar at that wing station as with A-A.
Section C-C (through the seventh nose rib location) is correct in showing both inner and outer caps top and bottom at that wing station.
I did not really understand the cap stack until I did the work to lay it out in Fusion, which naturally led to having a physical model for quick reference during the spar build-up.. The scale model lacks the upper and lower flanges, which would just get in the way of viewing the aft spar caps, and has the fore-and-aft scale (e.g., thickness of web, caps, doublers, and mounts multiplied by a scaling factor of 6 to more readily see the various stacks. I would suggest using contrasting colors on the inner and outer caps (mine were all mahogany... could have made the outers maple).
All main spar caps are 1/8" x 1" 2024 T3/T4
Let's talk about the front/forward spar caps on the left main wing spar.
- The inner (fitted to spar web) upper and lower caps start at the root and are 131-3/8" in length.
- The outer (fitted to the inner cap) upper cap starts at the root and is 102" in length.
- The outer lower cap strip starts about 34" from the root and is 71-1/2" in length.
Now for the back/aft spar caps on the left main wing spar.
- The inner (fitted to spar web) upper and lower caps start at the root and are 143-5/8" in length.
- The outer upper and lower caps start about 47-1/2" from the root and are 71-1/2" in length.
See my next post for what this means in terms of BOM and cutting list.
Section A-A (through the second nose rib location) is correct because it shows inner and outer caps on the upper front side of the spar at A-A, inner only lower cap (with the overlapping 1/8" spacers), and inner caps ONLY on the rear side of the spar at that wing station.
Section B-B (through the fifth nose rib location) is correct because it shows inner and outer caps on the front side of the spar at B-B (the inner and outer lower caps start just inboard of B-B) and inner caps ONLY on the rear side of the spar at that wing station as with A-A.
Section C-C (through the seventh nose rib location) is correct in showing both inner and outer caps top and bottom at that wing station.
Last edited:
SpruceForest
Scratch-Built Patrol SP
In terms of bill of materials, you'll need 4 x 143-5/8", 4 x 131-3/8", 6 x 71-1/2", and 2 x 102". This can be gotten out of 13 pieces of 144" (12') 1/8" x 1" cap material.
Here's the model sitting on a quick sketch I did. Do not use my sketch to build from - use it to better understand your drawings and build as Bob designed it.
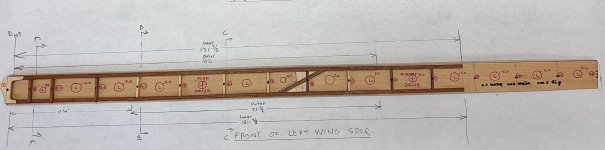
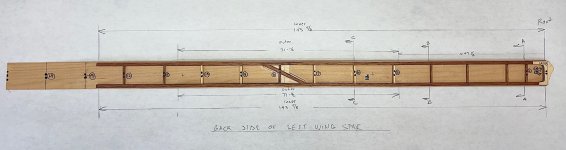
Here's the pull of the sections A-A, B-B, and C-C:
Annotated Sec A-A highlighting the cap and spacer stack:
Hope this helps.
Here's the model sitting on a quick sketch I did. Do not use my sketch to build from - use it to better understand your drawings and build as Bob designed it.
Here's the pull of the sections A-A, B-B, and C-C:
Annotated Sec A-A highlighting the cap and spacer stack:
Hope this helps.
Last edited:
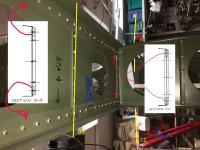
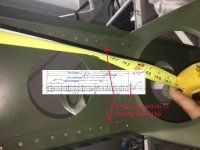
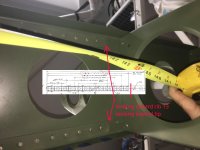
The patrol main spar has a spice in the middle. To avoid problems there is one rivet that is your reference location.
This is really an issue with how to slide c web around relative to capstrip.
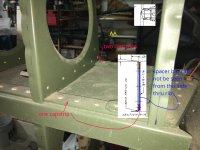
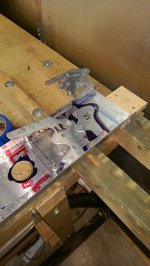 This picture shows that the capstip locations are not plotted from the beginning of the C web. I will route this off when everything is riveted.
At the beginning of the process I have a capstrip with the rib rivet locations carefully plotted and pre driilled. I also have drilled the capstip locations -- between those rib rivet locations (WITH A FEW EXCEPTIONS).
Make sure both of your splices have the same length or that you are using the correct C web.
Opposite of what you might think of doing, place the capstrip offset (1 9/16) from the END of the C web. This will guarantee the splice is in the correct location and you will avoid the problem of having a rivet to close the the end of the C web and violating the rivet to edge distance.
If you follow this procedure you will have the beginning of the C web (at the root) end at an arbitrary location. You will have to route the C web root end to match the capstrip and attach fittings.
[
WITH A FEW EXCEPTIONS
https://bearhawkforums.com/forum/bearhawk-4-place-plans-build/93651-main-spar-no-drill-locations
]
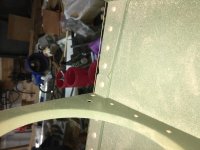
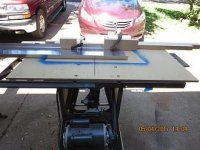 this picture shows trimming the web at the wing tip side.
I recommend starting capstrip placement from this one rivet location. Imagine having a capstrip longer then needed. You would then place the rivet (1 9/16 ) from web splice.
Then go back and modify the beginning of the capstrip to be whatever is required.
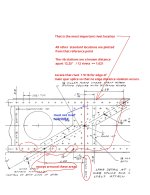
This is really an issue with how to slide c web around relative to capstrip.
This picture shows that the capstip locations are not plotted from the beginning of the C web. I will route this off when everything is riveted.At the beginning of the process I have a capstrip with the rib rivet locations carefully plotted and pre driilled. I also have drilled the capstip locations -- between those rib rivet locations (WITH A FEW EXCEPTIONS).
Make sure both of your splices have the same length or that you are using the correct C web.
Opposite of what you might think of doing, place the capstrip offset (1 9/16) from the END of the C web. This will guarantee the splice is in the correct location and you will avoid the problem of having a rivet to close the the end of the C web and violating the rivet to edge distance.
If you follow this procedure you will have the beginning of the C web (at the root) end at an arbitrary location. You will have to route the C web root end to match the capstrip and attach fittings.
[
WITH A FEW EXCEPTIONS
https://bearhawkforums.com/forum/bearhawk-4-place-plans-build/93651-main-spar-no-drill-locations
]
this picture shows trimming the web at the wing tip side.I recommend starting capstrip placement from this one rivet location. Imagine having a capstrip longer then needed. You would then place the rivet (1 9/16 ) from web splice.
Then go back and modify the beginning of the capstrip to be whatever is required.
Attachments
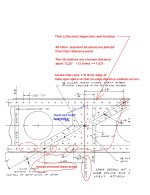
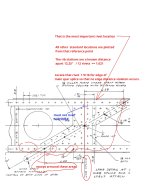
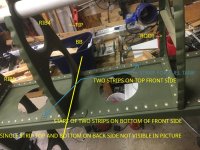
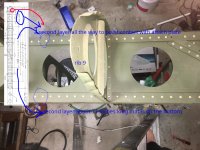
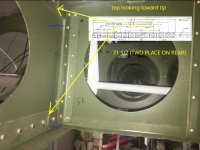
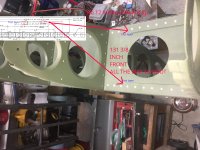
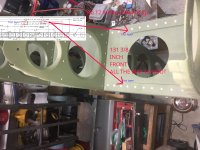
This is the most confusing capstrip direction. There are two (first layer) strips on the front side that run the length of 131 inches .
Note on drawing is about the second layer.
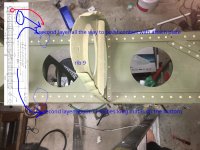
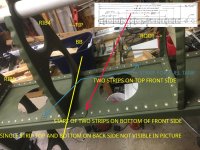
The last line in the call out wants a second layer 71 inch capstrip on the bottom of the front side.
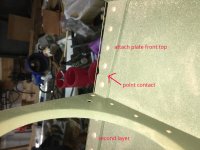
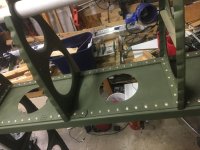
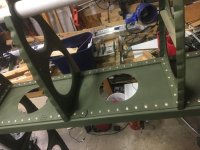
There is also a second layer capstrip on the top of the front side that is 71 inches plus whatever it takes to point contact the front attach plate:
Main spar front side top. Top layer capstrip impinges on front attach angle (POINT CONTACT)
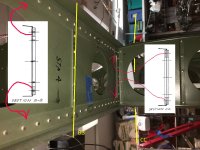
Section bb
Note on drawing is about the second layer.
The last line in the call out wants a second layer 71 inch capstrip on the bottom of the front side.
There is also a second layer capstrip on the top of the front side that is 71 inches plus whatever it takes to point contact the front attach plate:
Main spar front side top. Top layer capstrip impinges on front attach angle (POINT CONTACT)
Section bb
Attachments
Last edited:
SpruceForest
Scratch-Built Patrol SP
My recommendation is to do full-sized layout prior to committing to cutting metal. Once those inner and outer 8' spar webs are bent, a handy 16' x 2' surface that can be painted with cheap white ceiling paint, marked up for the gross stuff, and the various spar bits and pieces dry-fitted, marked, etc. Other than the inner caps and the lower outer caps on the front of the main spar, there's a half inch or less to play with on cap strips... a mistake in layout or cutting means you'll need to burn that spare you squirreled away or come up with another $600 to buy an additional cap strip and have it shipped... ouch. As Stan mentioned, we did all layout from the splice location, to include the rivet locations to debug any spacing issues, then rough trim to 1/16" on the inner web. Once the rib locations are laid out, everything else (caps, lightening holes, doublers, spacers) goes on with fine sharpie. Following dry fit-up, everything gets surface treated and primed, then earlier layout repeated as necessary, drilled, etc.
FWIW, I built my 2' wide spar bench in three segments... 2 x 5'-3" and one 5'-6". The first two sections live in the basement shop and serve as an assembly table. Right now, the third section is supporting the Bambu printer and the laser cutter/engraver in the garage. The 10-1/2' bench is large enough to build up the flaps and ailerons as well, and adding the third section gets you the length needed for spares. We did a similar 3' wide, lower 24" high table with 2 x 8' sections and a 2' add-on for the fuse welding. Modular tables make life easier - they break down into reusable components (we run everything through jointer and thickness sand to standard dimension) and sheet stock. We laid out on bare ply because it was pretty clean, but paint is easier on aging eyes.
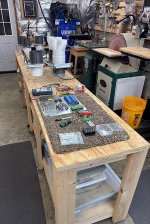
Shot shows the core table without the third section. All that stuff sitting on the bench: electro-pneumatic blast gates, main main device board (power supplies, relay board, bus bars, and the Arduino Mega R3 controller)... system has manual and auto capability so I can shut down dust collection when working ferrous metals, etc. Control panel on enclosure to left of the compressor controls DC and each gate when in manual or sets auto function where load sensors trigger DC and gate config. You don't realize the hours spent playing with blast gates until you work in a shop that has enough suck to allow everything to stay open or auto-sets.
Time spent on accurate layout, jigs, and fixtures def reduces headspace-and-timing errors!
FWIW, I built my 2' wide spar bench in three segments... 2 x 5'-3" and one 5'-6". The first two sections live in the basement shop and serve as an assembly table. Right now, the third section is supporting the Bambu printer and the laser cutter/engraver in the garage. The 10-1/2' bench is large enough to build up the flaps and ailerons as well, and adding the third section gets you the length needed for spares. We did a similar 3' wide, lower 24" high table with 2 x 8' sections and a 2' add-on for the fuse welding. Modular tables make life easier - they break down into reusable components (we run everything through jointer and thickness sand to standard dimension) and sheet stock. We laid out on bare ply because it was pretty clean, but paint is easier on aging eyes.
Shot shows the core table without the third section. All that stuff sitting on the bench: electro-pneumatic blast gates, main main device board (power supplies, relay board, bus bars, and the Arduino Mega R3 controller)... system has manual and auto capability so I can shut down dust collection when working ferrous metals, etc. Control panel on enclosure to left of the compressor controls DC and each gate when in manual or sets auto function where load sensors trigger DC and gate config. You don't realize the hours spent playing with blast gates until you work in a shop that has enough suck to allow everything to stay open or auto-sets.
Time spent on accurate layout, jigs, and fixtures def reduces headspace-and-timing errors!
Last edited:
fairchild1934
Well-known member
if there is ANYWHERE on this airplane that could benefit (IMHO) from having a cad type exploded view that could be rotated on the computer screen--- its the spar assy. There is just a LOT of parts crammed into a very small space. Hard to see all of it by just using the plans.
if there is ANYWHERE on this airplane that could benefit (IMHO) from having a cad type exploded view that could be rotated on the computer screen--- its the spar assy. There is just a LOT of parts crammed into a very small space. Hard to see all of it by just using the plans.
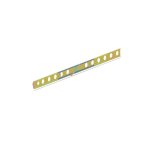
Building the B model but I had to model it out to get it all straight in my brain! Just got the spar webs bent so it's relatively fresh in my mind! It is possible to host Fusion models via the cloud and link to them here in the forums. Just not sure about the legality. It's just a viewer function...no design capabilities exist as far as I know. I'm sure this question has been asked. Maybe someone can chime in!
Justin
Attachments
Last edited:
BillSchmanski
Member
Nice model.In terms of bill of materials, you'll need 4 x 143-5/8", 4 x 131-3/8", 6 x 71-1/2", and 2 x 102". This can be gotten out of 13 pieces of 144" (12') 1/8" x 1" cap material.
Here's the model sitting on a quick sketch I did. Do not use my sketch to build from - use it to better understand your drawings and build as Bob designed it.
View attachment 99842
View attachment 99843
Here's the pull of the sections A-A, B-B, and C-C:
View attachment 99844
Annotated Sec A-A highlighting the cap and spacer stack:
View attachment 99845
Hope this helps.
geraldmorrissey
Well-known member
I just sat down and studied the print. I started by visualizing the longest capstrip, then the 2 long uppers and 2 long lowers. Break it out into individual detail parts and add them to the assembly. It's rather overwhelming trying to visualize the assembly straight away. Make notes and sketches help. If you scratch build a set of spars, your drawing will be worn out and you will know everything about those assemblies.