Rudder trim tab

chickenhawk47

New member
Has anyone installed a rudder trim tab? As I accelerate above 100 mph, my 4 place drifts to the right about 1 degree per second. Very annoying! I want to design a proper trim tab and properly install it. I haven't found any past posts about it.
 
Last edited:
I don't plan on a tab, but I do plan on a rudder trim similar to that used in the Archer and Cutlass I've flown, which is essentially a spring tension adjustment on the rudder pedals to keep the nose pointed and the ball centered.
 
For starters:

What Mark and Budd said. Here's what I did, which needed to be done before fabric.

http://www.mykitlog.com/users/displ...nc&project=191&category=1913&log=19766&row=14

The trim's effect is airspeed dependent, also. The faster you go, the more left rudder, the slower, the more right. I set my trim to about 120 KIAS, which is about 55% power, kind of the average speed I cruise at.

Kelley Babin has installed a rudder trim in his, which as I recall is this one, or one somewhat similar:

http://www.stevesaircraft.com/ruddertrimstc.php

Ron QB64.


My plane needed a touch of right rudder at cruise so I took a 3/8" dowel about 5" long, cut in half lengthwise, and painted it the same color as the rudder. I taped it to the left side of the rudder at the trailing edge with a strip of 3M clear packing tape. Not noticable and works great. It usually doesn't take much.

Regards,

Ted

Another solution to rudder trim is to install a heavy or shorter spring on the rudder pedal as needed.

Eric Newton

Hi Paul

I put three 6-32 nut plates on a .032 tab welded to the perimeter tube and rib.
Once adjusted for hands off flight in cruise, I have never adjusted since.
Also put a trim tab on each aileron , mounted to the underside and attached to the trailing edge with 6-32 nut plates, between the two control hinge ribs.
Same thing once adjusted,( one slightly up and one slightly more down) I have never adjusted since.
All trim tabs are 2024 x .032
It was worth it !

Gavin
 
I'm adding an Aerotrim servo to my rudder. The tab will be built just like the elevator trim tabs... Adding rudder trim for the following reasons.
1. I'm installing a 300 hp engine.... Cessna 185's with virtually the same engine has an adjustable rudder trim.
2. Fly lean of peak at 55%.... On wheels...need less trim if operating at continuous maximum rated power.
3. On floats at gross may need to run 285 hp continuous...
4. Then there is everything in between...would like to trim for all occasions.
5. Maule M4-7 has an adjustable rudder trim.
6.... It's always windy

On a side note...I've ordered the B model elevator and horizontal stabilizer from Mark G... Will install Pat Fagans version of elevator trim...Will not be using the flat ones I've built...my hinges aren't quite right...
Still waiting on the second set of Dakota Cub spars for my Pacer...the first set disappeared somewhere between Dakota Cubs shop and Anchorage..

The Pacer waiting in her wings. She sits unloved on the new concrete floor in the Hanger.

Mark M.


Sent from my iPad using Tapatalk
 
Last edited:
I would probly install Steve's Aircraft PA20 rudder trim system if I wanted rudder trim. Mark Moyle I know you installed it on your Pacer; why not use it on the BH?

RT1.jpg


ruddertrimcad.gif
 
Last edited:
I would probly install Steve's Aircraft PA20 rudder trim system if I wanted rudder trim. Mark Moyle I know you installed it on your Pacer; why not use it on the BH?

RT1.jpg


ruddertrimcad.gif

I've installed a Cessna parking brake where the Steve's Aircraft rudder trim would be located. The other issue is where my rudder cables are located...they run down the middle of the aircraft under the floor.
86e296843005c21297ca2755dec11be3.jpg
7756f8ab49e92f61b2b19ea19a1616e8.jpg
85b610c94df8168cb836f067d8c5821f.jpg
7ff7b9f750fdf155f5d75e81f1fbca94.jpg


Sent from my iPad using Tapatalk
 
I've been thinking, could something like a Ray Allen trim servo be used to adjust spring tension on one side?
 
I bet you could..... Look at Steve's rudder trim drawing. Using two sheaves assemblies to clear the firewall tubing...the top two sheaves.....Put the top two sheaves where the bottom two are....rotate them 90 degrees. Mount the servo low on the firewall between the sheaves using a bellcrank to increase the Ray Allen servo travel and a spring on each rudder cable.


Sent from my iPad using Tapatalk
 
Last edited:
Ray Allen now makes a mini servo that's only 3/4" thick. A guy who has yet to cover could fit one inside his rudder to drive a small rudder trim tab.

Similar to this: http://www.n127tl.com/?p=422
 
Last edited:
I had never thought of the very simple solution of putting a stronger spring on one of the rudder pedals to even things out in cruise. I think I really like that idea. I had considered adding a fixed/bendable trim tab but when I mentioned it to an IA friend, he was concerned about changing the aerodynamics from what has been proven and opening up the risk of flutter. Probably not much risk of that, especially if some have already done it, but I really like the idea of something even simpler that is inside instead of on a control surface. Seems to me it will be very easy to experiment with a few different springs on the pedals, of course this only compares to the fixed trim tab, it won't be inflight adjustable like some of the complex systems being discussed. Although its been awhile since I've flown a plane with rudder trim, from what I remember of my Aztec, I'm pretty sure once I had it set for my normal cruise setting I rarely touched it again. It was handy for reducing the workload during single engine training, and I think that's the only time we ever used it.
 
Ray Allen now makes a mini servo that's only 3/4" thick. A guy who has yet to cover could fit one inside his rudder to drive a small rudder trim tab.

Similar to this: http://www.n127tl.com/?p=422
A small electric servo is an elegant solution - probably the best solution in my opinion. It might need to live inside the vertical stabiliser unless you want a small blister in the fabric, that rudder is pretty darn skinny. The fabric would beat against the hard parts inside and soon wear a hole.

I think it would be worth having electric rudder trim, but it's never going to mean you can take your feet off the pedals completely (unless your in perfectly clear air, or if your return springs are very strong).

I simply retrofitted a trim tab after test flying. We just screwed in straight onto the 4130N tube at the aft side of the rudder. By injecting a small amount of linseed oil into the tube, you can prevent / slow corrosion while still drilling directly into the tube.
 
Last edited:
A small electric servo is an elegant solution - probably the best solution in my opinion. It might need to live inside the vertical stabiliser unless you want a small blister in the fabric, that rudder is pretty darn skinny. The fabric would beat against the hard parts inside and soon wear a hole.

I think it would be worth having electric rudder trim, but it's never going to mean you can take your feet off the pedals completely (unless your in perfectly clear air, or if your return springs are very strong).

I simply retrofitted a trim tab after test flying. We just screwed in straight onto the 4130N tube at the aft side of the rudder. By injecting a small amount of linseed oil into the tube, you can prevent / slow corrosion while still drilling directly into the tube.

It's a tough call. A fixed tab that's optimized for cruise flight is dead simple and won't malfunction. Really the only time having to hold sustained rudder input is annoying is during straightline cruise when you'd kinda like to relax and think about fuel and clouds, so while the servo idea might be neat, I think a fixed tab is the way to go. Or a short return spring.
 
....once I had it set for my normal cruise setting I rarely touched it again. It was handy for reducing the workload during single engine training, and I think that's the only time we ever used it.

I have experienced what Rollie said. Once rudder trim is set, its never used it again. Rather, proper application of the rudder consistent with the phase of flight is all that most of us do. In cruise, I want the ball centered with my feet off the rudders. This "Set it once, and forget it." practice would call for one adjustable rudder cable, or an adjustable spring mechanism.

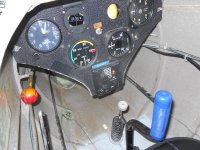
Something like this elevator trim design used on a Schliecher K-6 glider.


+1 486705DSCN0102.JPG
 

Attachments

  • 486705DSCN0102.JPG
    486705DSCN0102.JPG
    323.8 KB · Views: 0
No Title

Here is a rough idea I've been thinking about. Depicted is the left side rudder pedal arm. Tighten the wing nut for left rudder, loosen for right rudder. Right side arm has typical rudder spring.
 

Attachments

  • photo3028.jpg
    photo3028.jpg
    2.6 MB · Views: 0
I've never intended to install a rudder trim because I to figured I could just set it, using the return springs and cables to adjust it, and forget it. As I've thought about it I'm thinking rudder trim might be nice if it could be don't simply at little weight/complexity cost.
 
I just wanted to say that there are some really cool ideas here and this is exactly why I moved over to the experimental world. The guys who want the fully adjustable rudder trim and are willing to design and install it should do it and those who want something simpler should do that. I love having the freedom to modify my plane to exactly what I think I want without needing to see if someone already did it, got an STC approved and is available for me to purchase it from, only to find out that that is only the beginning of the paperwork. Next is getting someone with the proper certificate to inspect your work (if they will let you do it yourself) and make a writeup in your logbook and send in a 337 and whatever else might be required. I'm sure I have done a few mods that most people would look at and think "why?" but really I am having such a blast just putting this thing together exactly how I want it that sometimes I might add things just because I wasn't allowed to on my last couple planes.
 
No Title

I used the Ray Allen trim in my elevators one in each elevator for redundancy and no mech linkage, welded a a bracket into the elevator at the front torgue tube, mounted with 440 screws and used a piece of 5/16 2024 alum rod threaded internally at each end for 10-32 threaded rod to attach to the servo clevis and trim tab. It will be removable and sticks into the wind about 1/8 inch, mounted from the bottom. The rudder is the same thickness tube and would mount similar. I plan to taper the edges with Pro seal.
 

Attachments

  • photo3030.jpg
    photo3030.jpg
    189.6 KB · Views: 0
  • photo3031.jpg
    photo3031.jpg
    191.1 KB · Views: 0
  • photo3032.jpg
    photo3032.jpg
    202.6 KB · Views: 0
  • photo3033.jpg
    photo3033.jpg
    191 KB · Views: 0
  • photo3034.jpg
    photo3034.jpg
    208.6 KB · Views: 0
Last edited:
I used the Ray Allen trim in my elevators one in each elevator for redundancy and no mech linkage, welded a a bracket into the elevator at the front torgue tube, mounted with 440 screws and used a piece of 5/16 2024 alum rod threaded internally at each end for 10-32 threaded rod to attach to the servo clevis and trim tab. It will be removable and sticks into the wind about 1/8 inch, mounted from the bottom. The rudder is the same thickness tube and would mount similar. I plan to taper the edges with Pro seal.

That is just about exactly what I've been contemplating as a retrofit to mine. Mine has the older larger trim tabs, so I'm only using one tab and would need only one servo. I was envisioning a fiberglass blister to cover the extra thickness. Eliminates the "servo action" of the stock trim. Eliminates a lot of linkages. Eliminates the flex in the link to the tab.
 
Yes it cleans up the elevators and trim linkages, the servo only protrudes about 1/8 in and when you seal the edges it would be weathertite without a blister covering. This would not be the servo tab. You could install one in each elevator and use one as a standby In case of failure.
 
Last edited:
I used the Ray Allen trim in my elevators one in each elevator for redundancy and no mech linkage, welded a a bracket into the elevator at the front torgue tube, mounted with 440 screws and used a piece of 5/16 2024 alum rod threaded internally at each end for 10-32 threaded rod to attach to the servo clevis and trim tab. It will be removable and sticks into the wind about 1/8 inch, mounted from the bottom. The rudder is the same thickness tube and would mount similar. I plan to taper the edges with Pro seal.

Are you able to sync them? If they're run independently with no frequently calibration won't they get out of sync possibly causing a differential trim situation?

I've considered this same method as I think it totally cleans up the tail, but have been hesitant for the reason I mentioned.
 
If you run them to the end and the return them to neutral they should be in sync for a while if powered together. I might use one side only as main trim and the second side for standby trim, not sure yet. I was also thinking of using 2 switches ganged together with separate power sources with 2 trim indicators then you can sync them anytime in flight or on the ground.
 
Last edited:
With the smaller trim tabs on most Bearhawks, you probably want to use both tabs or make a single large tab. I am running a single large tab (old style) with the 2nd tab disconnected and secured. I have seen no problems with "differential trim". Many aircraft use a single tab, including RV's and C-172's. Huntaero's suggestion of a pair of switches and a pair of position sensors should be fine.
 
I've been thinking I might try an electric elevator trim too, and have thought about using just one tab. Even with the smaller tabs, I suspect there would still be plenty of effectiveness, but that hunch is not based on science. If I were to redo the covering on the horizontal stabs I could also add wooden strips to go to the profile shape, and in that case there would be plenty of room for mounting the servo directly to the pushrod. I'd immobilize the tab on the other side. It's easy to see how these little projects creep into bigger ones. Somehow I'm still waist-deep in a Skyview upgrade that has also become an autopilot and heated pitot installation, and maybe the addition of a flap position sensor.
 
I've been thinking I might try an electric elevator trim too, and have thought about using just one tab. Even with the smaller tabs, I suspect there would still be plenty of effectiveness, but that hunch is not based on science. If I were to redo the covering on the horizontal stabs I could also add wooden strips to go to the profile shape, and in that case there would be plenty of room for mounting the servo directly to the pushrod. I'd immobilize the tab on the other side. It's easy to see how these little projects creep into bigger ones. Somehow I'm still waist-deep in a Skyview upgrade that has also become an autopilot and heated pitot installation, and maybe the addition of a flap position sensor.

I have the opposite hunch. In my short 30hrs in a BH I can think of two different flight were I nearly ran out of forward trim; that plane had the large tabs with one disabled. If you mount the servo in the H-stab then you still have the servo action but maybe that doesn't matter to you.

Do you have a hard time figuring out what position your flaps are in ;)

I know we are getting off track here but if I could go back to before I ordered my empannage I'd make my own elevators. I build them with one large tab and mount a servo inside the elevator. I suspect that installing a servo in each elevator to drive each small tab and powering them from one switch would result in a slightly out of sink but completely functional trim system.
 
Yes, we totally off track! Who is supposed to be moderating this place anyway? I'm in the "pro-servo" camp so that's not a concern for me. If a single small tab is not adequate, I like the idea of a fuselage-mounted single servo to control both tabs through the torque tubes. Do you know what kind of deflection your tab had when it wasn't quite enough? This would be a useful datapoint. As for the flap position, the setup is very small and light, and it would allow the electronics to provide an aural alert of a flap overspeed. Perhaps with future software enhancements it might also allow for Vfe indications conditional to flap settings. I'm also interested in seeing how much the flap deflection changes with airspeed. I can see in gopro videos that it is pretty significant, but getting the flap position into the EMS will allow tracking in the recorded data.
 
All this discussion about the elevator trim strikes me as kind of funny, though I'm building a Patrol, and not the 4-place. But one of the things I remember about the Patrol demo flight I took at OSH with Wayne Massey was that he basically adjusted the trim once - to compensate for my weight in the back seat - and then never touched it again. The airplane was incredibly stable at speeds ranging from 140+ mph all the way down to stall speed, with no significantly noticeable or objectionable stick force. Maybe that's a result of the inherent "servo-action" of the stock trim system?

All I know is I'm planning to build mine with the dirt-simple, ultra-lightweight Bob Barrows trim lever. After flying with a similar overhead trim lever in the Champion 7ECA, it's super-easy to tweak the trim, and you quickly learn the set it for takeoff / cruise / landing by "feel." I must admit that I am considering the addition of a wood "kitchen drawer" pull knob to the end of the lever to act as the "handle." I know - those ounces add up! LOL
 
Do you know what kind of deflection your tab had when it wasn't quite enough? This would be a useful datapoint. As for the flap position, the setup is very small and light, and it would allow the electronics to provide an aural alert of a flap overspeed. Perhaps with future software enhancements it might also allow for Vfe indications conditional to flap settings. I'm also interested in seeing how much the flap deflection changes with airspeed. I can see in gopro videos that it is pretty significant, but getting the flap position into the EMS will allow tracking in the recorded data.

I wish I knew what the measured tab deflection was because you are right, that would be a very useful datapoint but I don't.

I was just razzing you about the flap position indicator.
 
I search the site trying to find pictures of the patrol elevator trim mechanisms, no luck. What is different from the four place?
 
All this discussion about the elevator trim strikes me as kind of funny, though I'm building a Patrol, and not the 4-place. But one of the things I remember about the Patrol demo flight I took at OSH with Wayne Massey was that he basically adjusted the trim once - to compensate for my weight in the back seat - and then never touched it again. The airplane was incredibly stable at speeds ranging from 140+ mph all the way down to stall speed, with no significantly noticeable or objectionable stick force. Maybe that's a result of the inherent "servo-action" of the stock trim system?

All I know is I'm planning to build mine with the dirt-simple, ultra-lightweight Bob Barrows trim lever. After flying with a similar overhead trim lever in the Champion 7ECA, it's super-easy to tweak the trim, and you quickly learn the set it for takeoff / cruise / landing by "feel." I must admit that I am considering the addition of a wood "kitchen drawer" pull knob to the end of the lever to act as the "handle." I know - those ounces add up! LOL

If you are at aft CG - the Bearhawk is the same - you only set it once. At forward CG, you are adjusting it all the time.

I've had the pleasure of flying both electric trim and manual trim in a Bearhawk, for several hours including some short and difficult landings in each... Personally, I remain in favor of servo-driven electric trim. Each system has pros and cons, and each person their own preferences.
 
Marcus, the 4 place is bigger and heavier. A 4 place flown solo and light on fuel will have a lot more trim change with power or speed changes than a Patrol with someone in the back seat to move the CG back.
 
Back
Top