Windshield to upper channel

TLyon

Well-known member
I'd also love some photos of the top of your windscreens. It's pretty obvious that the top of the windshield needs to get trimmed down as the channel might take 1" of windshield and the distance from the offset to the edge is about 1-1/2". Is there a best practice for how much needs to fit in the channel? I'm finding that I need to open it up with a hand seamer to even get 3/4" in, is that to be expected?

I want to get it test fit close enough to drill that top channel to the fuselage, but don't want to mess up a windshield forcing it in when it's so tight.
 
Hey Tom,
Depending on how the windshield came out of the mold, a small amount of sanding on the top windshield flange will help with the fitment a bit. I would not recommend trimming your top flange, typically the flange line on the windshield will be out of Chanel by about a 1/4- 1/2in.
 
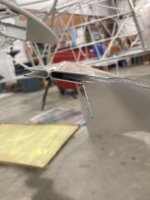
Here’s where I got to at the end of yesterday. The welds burned through a bit and warped these channels. I don’t think there’s much to be done on the aluminum at this point. If this is a workable alloy then I might be able to press something in there to straighten out the warped sections? I can work the windshield, but it will need more than light sanding.
 

Attachments

  • IMG_7543.jpeg
    IMG_7543.jpeg
    492.4 KB · Views: 18
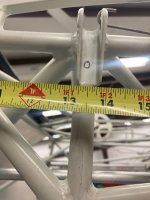
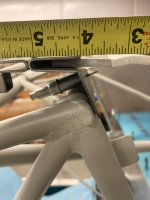
Tom, just for a sanity check also measure the wing leading edge to a reference point, like the spar attachment. On the BH5 mine was exactly 13". Then I compared that number to where the windshield is sitting in the channel. Like Virgil said, there is going to be a gap in the flange. It does not butt all the way into the channel.
 
Thanks guys. My windshield is still sitting forward by 1/4-3/8” by both measures. My leading edge to front of spar is just shy of 13”.
After sleeping on it, I’m going to try to get that channel cleaned out with a burr bit on a dremel. Then I’ll think about trimming the windshield if that doesn’t get me there.
 

Attachments

  • IMG_7547.jpeg
    IMG_7547.jpeg
    637 KB · Views: 4
  • IMG_7545.jpeg
    IMG_7545.jpeg
    590.7 KB · Views: 4
I agree with Virgil, no need to get that "step" in the windshield to align with the channel.

I had to open up the channel a little bit to let the windshield go all the way to the back of the channel slot. It was only tight in a couple of places. I think I may have done some work to round off the sharp edges of the windscreen too, as they are crack initiation sites.
I think you want it near the back. You don't want it moving over years, as it chafes itself down against the metal over thousands of hours of vibration. You could also get a strip of door stopping foam from a hardware store, and push that in for a better seal / cushion.

I would be hesitant about removing much paint, it's good paint. You will get moisture in there, so you don't want corrosion starting. Easy with the dremmel unless you want to repaint. Better to narrow down the windshield.
 
The channel is unpainted aluminum (maybe used to be steel in older kits?) and the issue is that the welds warped it and burned through in a few spots. At this point it’s the weld boogers that need to come out.
 
How are the vertical sections aligning along the posts where the windshield transitions to the upper side windows? Those might give you a data point about channel depth since channel depth impacts alignment there. Also, if you lay a straight edge along your wing leading edge, how is that transition looking? This area usually gets a flat fairing, so if the transition isn't good, that will be hard to make nice. It's also another data point to compare where your windshield is vs where it was intended to be.
 
The channel is unpainted aluminum (maybe used to be steel in older kits?) and the issue is that the welds warped it and burned through in a few spots. At this point it’s the weld boogers that need to come out.
Yes, it was steel in older kits.

Unless it's a 50-series marine grade aluminium, I would still expect to see corrosion if unpainted.
 
Back
Top