Bearhawk Aircraft Bearhawk Tailwheels LLC Eric Newton's Builder Manuals Bearhawk Plans Bearhawk Store

Announcement

Collapse
No announcement yet.

Prop governor hookup.

Collapse
X
 
  • Filter
  • Time
  • Show
Clear All
new posts

  • Prop governor hookup.

    Guys,

    I am working on the baffling. I am at the point that I need to locate the hole in the left air ramp for the cable penetration. I don't know what the cable end looks like as it attaches to the governor. Does anybody have a link or a pic?

    Thanks,

    Wes
    You do not have permission to view this gallery.
    This gallery has 2 photos.

  • #2
    I think I now understand now. There will be a rod end bearing on the end of the cable. So, offset the hole slightly to compensate for the width of the bearing. If I'm wrong, somebody stop me.

    Wes

    Comment


    • #3
      Well, that would depend on how you do it. If you use a cable, with a threaded end, you would likely use a rod end bearing, attached to the bellcrank. Or, you could use a cable, with a solid rod end, with a 'bug-nut' at the bellcrank. Or, a drilled shank bolt, extending out from the bellcrank, where the cable end goes through the hole and is captured by a nut.
      Do you have the control cable that you're going to use? That's where I'd start, cause that'll determine how the cable attaches to the governor bellcrank arm. FWIW, I'm going to use control cables with 10-32 threaded ends, onto which I'll attach rod end bearings, that will bolt to the bellcranks. I'll fabricate all the cable attach points, before fitting baffles. No magical reason there, just to be sure of all the paths, before cutting holes. I'm getting close, but not quite there yet.

      Bill

      Comment


      • #4
        I have the PCU5000X Governor (which is great!) - but the hook-up principles are the same with both.

        My baffle plate had an access cover to attach the mounting bracket to, and to drill the hole in, which complicated things a little.

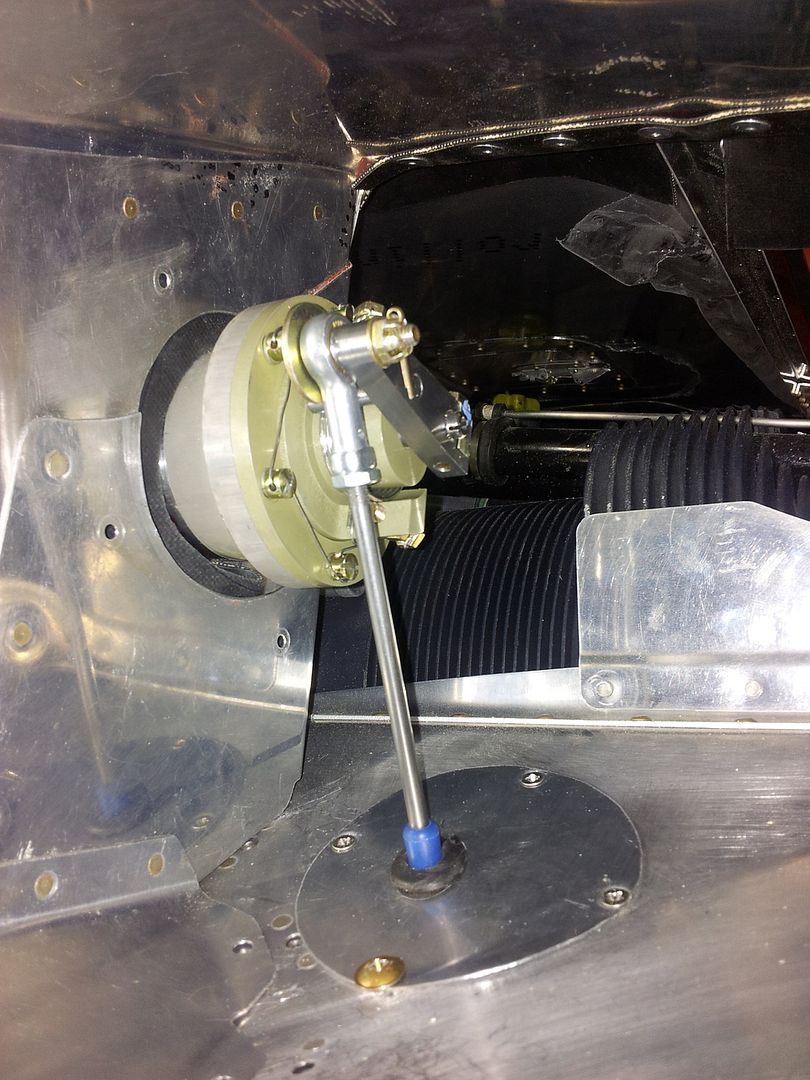
        This is how I connected my governor. Note that as the control arm swings through its range of motion, the pushrod has to move with it. So you need a slotted hole to avoid putting unnecessary stress on the pushrod at mid-range RPM settings:

        P.S. Ignore the baffling, it's only mocked up so everything is in the wrong place...


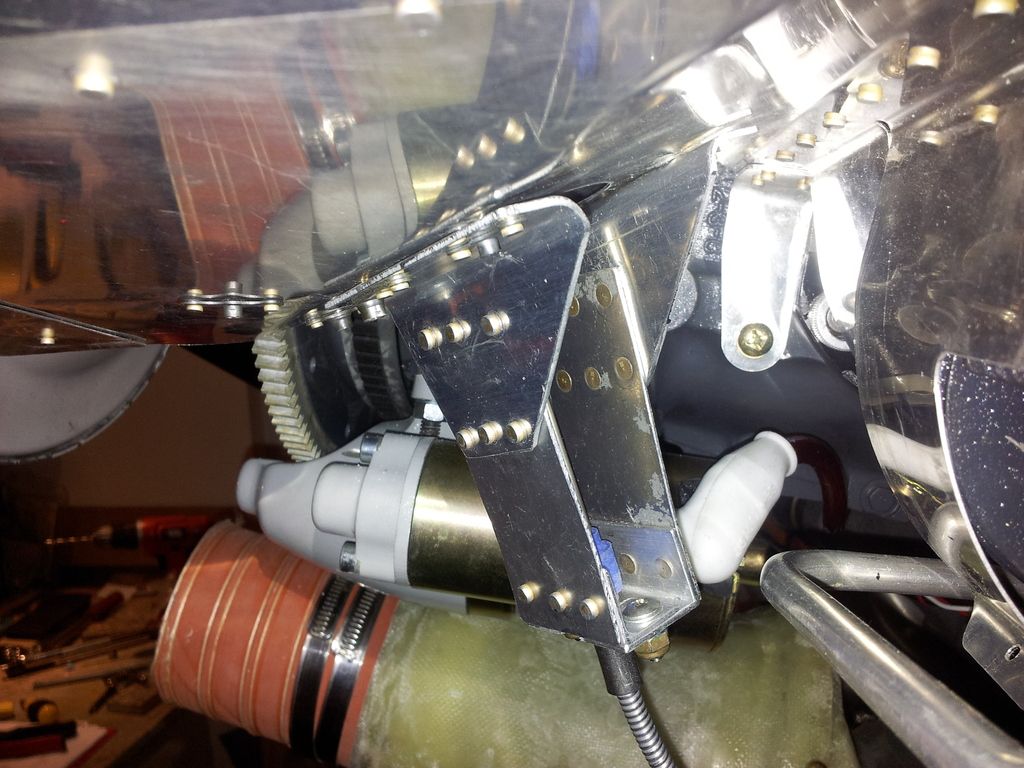
        This is the pushrod attach bracket I made, pictured halfway through fabrication for a test fit - still had a few rough edges as pictured...
        Last edited by Battson; 03-09-2016, 04:48 PM.

        Comment


        • #5
          Thanks Guys! I think I got it. I'll adjust the bellcrank for even fore/aft movement of the cable end as the governor moves stop to stop. Van's supplied a bracket for the cable end. It's not as beefy as Jonathan's, and not as far from the governor so might stress the cable more. I'll give it a try. If I have issues I'll drill it off and try again.

          My main problem was that I visualized the rod end incorrectly. I now understand that there is nothing to rub. The only thing that will "rub" as the governor is adjusted is the rod end bearing in the socket.

          Thanks Again,

          Wes

          Comment


          • #6
            I used pretty much the same type of 10-32 rod end, but at first I had failed to put a regular washer between the rod end and the governor arm. This caused the prop control to bind at some points in the travel when the wider threaded part of the bearing rubbed against the governor arm. This was something we caught in the final inspections before the first flight.

            Comment


            • #7
              Well,

              The prop gov that Bob supplied is larger in diameter than others I have seen. And, the lever arm of the bellcrank is longer. I pulled out an old mixture control cable to measure the side to side "give" at the end of the cable and it is only about 1/2" each way with the knob all the way in, and obviously less than that as you pull it. I don't see any way to make the geometry work using the supplied bracket and a standard cable.

              So Jonathan, is that why your bracket is as long as it is? Did you extend it to reduce the side to side angle as the governor was adjusted? Custom cable?

              I think I'm going to have to get someone smarter than I am to look at this.

              Wes


              Comment


              • #8
                Hey Wes,

                I just used the control cable from Spruce. The stroke is fairly long, closer to 5" than 4" at a complete guess. So the extended arm is probably about 10" long at least, probably closer to 12 inches. All that length allows for a lot of travel. The head has a swivel fitting which allows it to swivel in all directions, but only through a small angle. The swivel point is hidden under the blue rubber boot you can only just see in the second picture (not the blue dust cover in the first picture). Using that hardwear I didn't have a problem, but the arm on the PCU5000X is not extraordinarily long.

                Alternatively, you could always use the closer attachment hole on your governor, the one which is a smaller radius from the point the level arm rotates about. That would result in less travel in the cable, to get the governor from stop to stop.
                Last edited by Battson; 03-10-2016, 02:00 PM.

                Comment


                • #9
                  Hi Jonathan,

                  Yea, I was looking at the inside hole. I'm probably just over reacting. I'll scratch my head a little more. Worst case I will have to get creative with the bracket.

                  Thanks for all the input guys.

                  Wes

                  Comment


                  • #10
                    OK,

                    Not so bad. Just had to modify the supplied bracket and move it as far forward as possible. Like I said, I just over reacted. The hole in the ramp will be enlarged for the appropriate grommet and it should work just fine.

                    Wes

                    You do not have permission to view this gallery.
                    This gallery has 3 photos.

                    Comment


                    • #11
                      Slightly off thread subject. But related.

                      I am fabbing the intake ramps to the cowl, and doing it similar to Battson/Nev but I don't think that really matters. I have a IO-540 and PCU5000x governor. How do you remove the front left baffle/ramp? Make the hole big enough to simply pull the whole thing over the governor? Make an extra screw in section of sheet metal to cover the gap after reinstallation?

                      I am hoping not to make it 3 times to get it right.

                      Comment


                      • svyolo
                        svyolo commented
                        Editing a comment
                        The right side is no problem. Left side is harder but I think I got it. I like the idea of what you guys did. I ended up using the stock part, trimmed, as intended and that forms half a clamshell around the governor. Another larger piece is part of the one piece air intake duct, and screws to the Vans part with nutplates and forms the other side of the clamshell. Between your videos and some of Jonathons pics I think I got it. Thanks to both for taking the time. I will post some pics of how I did it if it works.

                      • Battson
                        Battson commented
                        Editing a comment
                        I made the hole large enough to remove the baffle with the governor in place, with a baffle seal to ensure a tight seal. The baffle seal is held on with a screw plate, so it can be removed first - before removing the baffling.

                      • svyolo
                        svyolo commented
                        Editing a comment
                        The left side seems difficult to remove because of the lower baffle/drain tubes. I am almost done with it and will post a few pics when I am done. The original vans rear part is stock with an upper extension. Removeable alone. Last part to assemble and it covers 180 degrees of the governor. The rest of the left baffle is one piece, and covers the other 180 degrees of the governor, with nutplates connecting the two pieces. Not done yet, I hope it works. Pics if it does. Silence if is all scrap.
                    Working...
                    X