Flap cables rubbing

TrueAirSpeed

Junior Member
I'm about to attach the flap cables on my four place quick build and have come across a "head scratcher." With the cables connected to the flap lever and ran rearwards they rub where the rear spar attaches to the fuselage. Especially on the right side when it goes through the external fairlead. Am I missing something here?
 
I ran into the same head scratcher. I just hung my wings for the first time and drilled them. The left side seems to be okay, but as you mentioned, the right side has the cable contacting the rear spar attach points in the flaps down position. I positioned the torque tube arm in and out to provide the best clearance in the gap, then I was planning to use a slightly bigger pulley to provide the proper clearance.

I'm very interested to hear what others have to say though.
 
Sometimes using the bigger cable shackle helps. I have also used two strips of .062 steel to connect the cable to the flap torque tube arm. Both those tricks have helped on occasion. Mark
 
I used these fork ends to get the flap arm as close as possible to the root fitting for minimum deflection in the pulley groove. Had the cables made up at Spruce. It also allows more clearance against the arm in the retracted position.
 

Attachments

  • photo3920.jpg
    photo3920.jpg
    2.7 KB · Views: 0
Not sure. Look it up on Spruces website. SA362. The inside distance is much longer than a shackle and is quite slender compared to the shackle/thimble combination.
 
I ran into the same head scratcher. I just hung my wings for the first time and drilled them. The left side seems to be okay, but as you mentioned, the right side has the cable contacting the rear spar attach points in the flaps down position. I positioned the torque tube arm in and out to provide the best clearance in the gap, then I was planning to use a slightly bigger pulley to provide the proper clearance.

I'm very interested to hear what others have to say though.

I had this same scenario. I got the inboard / outboard alignment as central as possible, but the flaps travel a long way.

I found the reality is the flaps never go down far enough in flight to make contact with the spar attach point. The contact isn't a big deal if there's no strain on the cables. I just put some tape into that area to buffer it. After a lot of flying, it hasn't left a mark.
 
I had this same scenario. I got the inboard / outboard alignment as central as possible, but the flaps travel a long way.

I found the reality is the flaps never go down far enough in flight to make contact with the spar attach point. The contact isn't a big deal if there's no strain on the cables. I just put some tape into that area to buffer it. After a lot of flying, it hasn't left a mark.

Ah, that's very good to hear. Thanks Battson!
 
I've run into a slight different issue with my left flap cable. Where it crosses over from tube from the outside fair lead to the inside fair lead it is rubbing on the top of the tube. Wondering if anyone has encountered this and if so what you might have done to resolve it. Thanks.
 
Thank you, Chris. That's pretty much what I came up with. I can't really modify anything. It's the geometry of the pulley in relation to the tube. The rub is very slight but still has to be addressed. I don't really have the option of using an Adel clamp on the tube (no good place to affix it). I have some very tough nylon tubing with an I.D. to accommodate the cable. The O.D. is sized so it fits snugly through the fair leads. I will make it long enough to extend enough past the front and rear fair leads to secure it in place with either a very small clamp or a couple wraps of safety wire.
 
I just spent way more time installing and adjusting aileron and flap cables than I thought I would. I decided to hang the wings one more time before I closed them, and wanted to make sure the linkages were "plug and play" when I hang the wings for the last time. Fuel line connections also.

Having the flaps and ailerons not installed (flaps especially), and the fuselage not covered made this a lot easier. Specifically, if the wing roots were covered with fabric, it would be more difficult to accurately measure distances when adjusting the flap linkages. Adjusting the left and right flap cables individually, also affect the opposite one. I now have the two sides moving the exact same amount, retracted and extended. The only thing left to adjust, is the flap pushrod.

Ailerons same thing. The linkage needs to be adjusted so that both sides operate the same. I clamped the aileron bell cranks in the square position, and made up the cables. Unclamp them, and tension the cables. Make sure both bell cranks are square at the same cable position. And make sure the cables aren't rubbing on the ribs (I had a couple that did).

I think if you did all this adjusting off of aileron and flap movement, you would be introducing another variable. You might adjust the aileron (or flap) pushrod to correct a mechanism misalignment. The mechanism needs to be adjusted first.

So far I am very glad I did this before the fuselage is covered. Hopefully I won't be unhappy I did it this way later. :<)
 
Good work svyolo. Getting the flap and aileron rigging correct can be a trial of patience. It’s easy to get it “good enough” but that last little bit is tough. And we still won’t know if we got it right till the plane actually flies. Oh the joy of building😁
 
One of the gotchas that might be easy to miss, is the 0 degree flap setting, the pushrod needs to be resting (pulled actually) up against the pad on the tubing. If it isn't, or one side isn't, you can adjust the flap pushrod to zero, but in flight, with air loads, it might go farther up, past zero. Result - heavy wing.

I didn't realize how much force the flap springs would impart to the mechanism. You cannot properly adjust the cables without all 4 springs attached - not 1 or 2, but all of them. Which makes adjusting them (and making them) much harder. There is a lot of torsional flex in the torque tube. I ended up pulling the cable off of the pulleys, and sometimes removing a pulley, rather than remove the springs to adjust something.

The springs are also a bit hard to install and remove. I used pieces of 100# fishing line to pull the spring aft onto the arm, pulling the line straight back through the hole in the aft spar.

I will try tonight to come up with the actual procedure used to do all of this.
 
Last edited:
Help me understand the difficulty with the flap adjustment. I might be wrong, but you may be over thinking it. From what I am thinking....

1) In the Flaps UP position, the springs force the flap pushrod against the rubber bumper. So, No adjustment is needed. The flap cables might even be a bit slack when the flap lever is in the UP position. I don't see a need for any adjustment.

2) When I pull the flap lever with a small mis-adjustment in the lengths of the cable that attach each flap to the Flap Junction Plate, no big deal. The Flaps are connected to each other via the tri-angle shaped plate. So the load on each flap will be equalized by the plate shifting slightly one to equalize the tension in the two cables and thus equalizing the flap travel. Plans call for a turn buckle on each of those cables. I adjust the turnbuckles so the junction plate remains centered.

One adjustment you might want to look at is how far the flaps travel down when the handle is in the FULL down position. If it travels past the point where Bob designed it to be, it may cause a load in the structure above the design considerations. I set my flap cable tension so distance between the rear spar and the inboard flap lever in the fully deployed position meets what is called out for in the plans.
 
Last edited:
During the adjustment, I could get one side down on the stop, and the other one looked like it was down, but wasn't. I could only tell by looking through the hole in the rear spar. The side that wasn't "up" all the way still had spring tension, which was carried all the way through the system. Both sides, from the view from the access cover, looked up. Both sides had identical cable tension.

If you adjusted both flap pushrods so that they were zero at this point, it would look correct on the ground. But in the air, only one side would be "against the stop". The other could move up past zero a little bit with air loads. Top side of the wing is low pressure. It might get sucked up a degree or two, against cable tension, which is light at this point.

Right now, with flaps at full, I have about 38 lbs of cable tension on the upper cables. With the flaps retracted, it is about 17 and both pushrods are up against the stops.

But at one point, I had the same tension readings, with one pushrod on the stops, one about a 1/4" off of it, and the springs on that side were keeping about the same tension on the whole system. I assumed both were on the stops, but one side was not.

BTW I am not using tension readings for anything other than information. I just wanted to see how much it was.
 
During the adjustment, I could get one side down on the stop, and the other one looked like it was down, but wasn't. I could only tell by looking through the hole in the rear spar. The side that wasn't "up" all the way still had spring tension, which was carried all the way through the system. Both sides, from the view from the access cover, looked up. Both sides had identical cable tension.

If you adjusted both flap pushrods so that they were zero at this point, it would look correct on the ground. But in the air, only one side would be "against the stop". The other could move up past zero a little bit with air loads. Top side of the wing is low pressure. It might get sucked up a degree or two, against cable tension, which is light at this point.

Right now, with flaps at full, I have about 38 lbs of cable tension on the upper cables. With the flaps retracted, it is about 17 and both pushrods are up against the stops.

But at one point, I had the same tension readings, with one pushrod on the stops, one about a 1/4" off of it, and the springs on that side were keeping about the same tension on the whole system. I assumed both were on the stops, but one side was not.

BTW I am not using tension readings for anything other than information. I just wanted to see how much it was.

What would happen if the cable tension was zero when the Flap Handle stowed while the flaps are removed from the wing? Both flaps pushrods will rest on the rubber bumper. Now install the flaps, and adjust the rod end bearing so the flap positions are equal.

In flight, the cable tension and the flap position is self adjusting. (via the flap cable junction tri-angle) The the tri-angle move towards the higher loaded flap and releases some of its load.

Issue #2. When I installed the flap cable system on the Patrol, I had to release all cable tension when the flaps were UP to prevent the Flap Handle from moving the inboard flap arm beyond a point that would result in 40 degrees. The distance between the Inboard Flap Arm cable attach hole and the rear spar should meet the plans when the Flap Handle is fully deployed. Because of my experience, I wonder if your flap handle is pulling the flaps too far down with a flaps up 17 pound cable preload.

My procedural recommendation to set the flap cable tension is to
1) Remove the flaps from the wing.
2) Loosen cable tension via the turnbuckles so that slack exists and so the Flap Pushrods rest against their rubber bumpers.
3) Pull the Flap Handle to Full Flaps.
4) Adjust each turnbuckle so the Inboard Flap Lever position meets what is called for in the plans. (as Indicated on the Patrol Plans below with red arrows.)

Mission complete. No cable tension meter required.


Screen Shot 2019-04-17 at 8.20.11 PM.png
 
That is exactly what I did initially, but then I went back and verified if the pushrods were resting firmly on the bumper. At first they appeared to be, but looking closer, and measuring the distance from the spar to the pivot bolt, one was off the bumper slightly. I could not see it from below, only from the hole in the rear spar from behind the wing.

A very minor error in the length of the cable at Flaps 40 is a very small angular error. As the flaps retract, the angle of the cable gets much more acute, and that same amount of linear error becomes a much larger angular error.

I got better results by using the resting position on the bumper as the "index" for adjusting the cables. I wanted a little tension on it while I was adjusting to make sure all the slack was taken up in the pulleys, which are small in diameter.

Then pull on full flaps and make sure they are the same.

Anyway that worked for me.
 
Hey folks I need some help please. I am clearly missing something, and probably something obvious, but I am very much missing it. When the flap lever is in the forward/down position (flaps up) the flap cable coming from the flap lever going aft, immediately contacts the gear strut attach point. Then proceeds back a few inches to contact the bolt in the elevator bellcrank (maybe because it is displaced by the strut attach pt.)
A couple of notes:
1) the rigging is not complete - wings are not even out of the crates yet. But I don’t see how it would change this since the cables will only be under more tension in the same pulleys etc.
2) my kit’s flap lever is constructed slightly different than Bob’s drawings. It’s hard to explain but it places the attach point about 1/8” closer to centerline than it would otherwise. I put more details in the pictures below to explain. This may be normal in the kits but it may not be?
 

Attachments

  • photo6839.jpg
    photo6839.jpg
    1.9 MB · Views: 0
  • photo6840.jpg
    photo6840.jpg
    1.9 MB · Views: 0
  • photo6841.jpg
    photo6841.jpg
    1.7 MB · Views: 0
  • photo6842.jpg
    photo6842.jpg
    1.5 MB · Views: 0
  • photo6843.jpg
    photo6843.jpg
    2 MB · Views: 0
I wanted to update on my use of the swaged ball/fork ends l initially installed three years ago and mentioned on this thread. I thought this would be a better rig than a shackle and thimble. I was very wrong.
I recently assembled the plane at a local airport preparing for its final inspection. I was surprised to find the cable assembly was too stiff and the ball didn’t pivot at all in the fork. The cable was being forced hard against the pulley at full flap. Today I replaced both cables with a shackles and thimbles. The shackle should allow the thimble pivot enough to better align the cable with the pulley.
After tensioning the cables, the assembly was much better and was quite pleased with the results. I wanted to mention this because there were some interest from others. The ball end and fork didn’t work for me.
By using a shackle, I was able to just clear the rear spar attach fitting. I had to flatten the press ridges on the nico sleeve, it was that close.
 
AKKen07 how did you end up resolving your interference? I have the same issue. My flap cable rubs against the lower elevator bellcrank bolt when flaps are fully retracted.
 
I’m afraid it’s still a work in progress. Put that task off until later. Soon, hopefully.
 
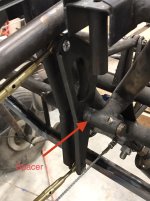
Click image for larger version  Name:	007DD11C-ADF9-490C-8215-9E180714CB18.jpg Views:	3 Size:	606.9 KB ID:	76750 I solved my flap cable / elevator bellcrank interference. I found that my bellcrank was actually off center a small amount towards the passenger side, aggravating the interference. I removed about 3/16 of an inch from the pilot side of the bellcrank pivot tube and cut a spacer to fill in the gap on the passenger side. This moved the bellcrank back to center, or a little closer to the pilots side of center and left a small gap between it and the flap cable.

Edit: I noticed this thread was in the quickbuild section, I should note that my project is a scratch built.
 
Last edited:
Back
Top