
You are using an out of date browser. It may not display this or other websites correctly.
You should upgrade or use an alternative browser.
You should upgrade or use an alternative browser.
Tell us what you did today on your Bearhawk Project
- Thread starter Bcone1381
- Start date


nborer
Well-known member
Looking through my builder's log, 13 months from my first airworthy rib (a flap rib). I have about 160 hours in my log, but that includes building templates (which I started about 18 months ago), making ribs that ended up as scrap metal, making more templates, and re-making templates (I made 3x different templates for flanging the lightening holes on my ailerons before getting one I liked). COVID-19 has definitely accelerated my build... I'm not traveling for work every other week and we're not traveling to see family much at this time. It's been a long time since I've had this many travel-free weekends in a row...
I've spent far more time staring at the plans with a beverage in my hands, searching these forums or other guidebooks for answers, and maybe making airplane noises once or twice. But I don't think I can log those hours.
I've spent far more time staring at the plans with a beverage in my hands, searching these forums or other guidebooks for answers, and maybe making airplane noises once or twice. But I don't think I can log those hours.

Aero_tango
Flying since Oct. 2018...
I just saw your update Mark. Great progress...I love the green engine color, awesome. I’ll stop by your place soon to see how things goes, and I’ll bring my mask  . Mike.
. Mike.
rv8bldr
4A Scratch Builder
Sounds good, Mike. I've had an Auto-gyro and a 65hp Champ (with two people in it !!) stop in lately so you will be in good company.
You were right: that RV-6 chin scoop is a LOT OF WORK to get fitted, but I think it looks great and is worth it. I had to hack a bunch more off of it after the above photos were taken once I fully fabricated the filter air box (rather then holding it together with clecoes and hockey tape). It changed the air box intake position enough I needed to raise the chin scoop inlet 3/4".
You were right: that RV-6 chin scoop is a LOT OF WORK to get fitted, but I think it looks great and is worth it. I had to hack a bunch more off of it after the above photos were taken once I fully fabricated the filter air box (rather then holding it together with clecoes and hockey tape). It changed the air box intake position enough I needed to raise the chin scoop inlet 3/4".


Russellmn
rock star
Finished my build table. 3 9.5" I-joists 18' long, bunch of 2x10s joining them, and random 2x4s for legs. I added T-nuts and 3/8" bolts to the bottom of the legs so I can level the table easily. 5/8" AC plywood on top topped with two coats of paint to make markings easier to read.
Now I can start prepping my ribs for the aileron build...

Now I can start prepping my ribs for the aileron build...

Bearhawk535
Junior Member
I pushed my project out of the hangar just to take a look at it in the light and compare to the previous photos to reflect on progress. Have tack welded one boarding step made out of a salvaged strut from a Maule ground loop. I have all the control cables built and fitted. I have the stringers all fitted as well. A handful of tabs and brackets to add and then I can get the steel primed.
Attachments


Chewie
Well-known member
The flap and aileron structures are finished. I have hundreds of photos documenting these builds if anyone would like to see a particular detail in the process.

Later, while storing everything in the hangar, I looked at the flaps on the 140 and couldn't resist. I can't help but think of Mick Dundee saying "that's not a flap... that's a flap!"

Later, while storing everything in the hangar, I looked at the flaps on the 140 and couldn't resist. I can't help but think of Mick Dundee saying "that's not a flap... that's a flap!"
Russellmn
rock star
Between yesterday and today I got the aileron rib locations marked out on the spars as well as the locations for the hinges and hinge bolt holes. Tomorrow I need to make a couple tools to finish out the ribs I got from Mark G (small amount of fluting and a little additional bending to make the flanges 90*, etc...) and I'll get a start on prepping them for the next step. I also made my first YouTubes video, hopefully I'll keep that updated weekly (or close to weekly) as the build progresses.
https://www.youtube.com/watch?v=6XE5fkGR0jA&t=4s
https://www.youtube.com/watch?v=6XE5fkGR0jA&t=4s

btdobie
Member
Bearhawk building officially started today with the master form block. I also got a work table built this weekend. My excitement is at a 10 right now because I've been wanting to get started on this for years and everything has finally fallen into place. Form block still needs some hand sanding to remove the last 1/32 of material and achieve a totally smooth edge. Once I get the form blocks done I'm going to send some to my Dad's house (Flap and Aileron ribs/pockets?) to divide and conquer.


jim.mclaughlin924
Well-known member
Moved to airport for final assembly. 

robcaldwell
Model B Quick Build Kit
Moving Day!

Gerhard Rieger
Well-known member
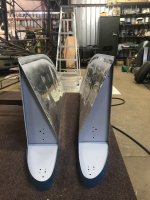
Its was and still is a slowly progressing job, but the Aluminum parts are all riveted together and next up will be the leading edges with a lens fitted that will cover the landing light and strobe/nav lights. Presently they weigh 8lbs each. And are 22 inches wide.
Attachments

Last edited:

Sir Newton
Well-known member
RFQ's for 2024 material requirements for my Model B wings for my BH5 scratch build.
Nathan
Nathan
Last edited:


Sir Newton
Well-known member
Those tips are a work of art!
btdobie
Member
Just received my first order of Al from Spruce. Should by my estimate be just enough to get the ribs done if I don't make any mistakes. So not quite enough to get the ribs done  , but enough to keep me busy for a while. Unfortunately, actual airplane progress has been put on hold this week possibly into next due to home repairs that need to get done. I'm excited to start working on actual airplane parts though when I get going again since all I've made so far is tools and cutting templates for ribs.
, but enough to keep me busy for a while. Unfortunately, actual airplane progress has been put on hold this week possibly into next due to home repairs that need to get done. I'm excited to start working on actual airplane parts though when I get going again since all I've made so far is tools and cutting templates for ribs.
Sir Newton
Well-known member
Well I am rolling right along, 10 hrs of print review, accepted a quote from a material supplier, wing material delivery Oct10. Started making rib templates, Moved fab tables & equipment down to my hangar. Picked up a few new toys. KC-1620CML along with some other King equipment. Loven Life !
Attachments


Pbruce
Member, Patrol QB
Is that machine a KC-1620CML? What purposes will it serve for your Bearhawk build? Just curious; I’m building a QB Patrol kit and the experience is obviously much different than scratch, since so much is done for you that you often don’t consider the steps which were undertaken by others to get to that point.
Sir Newton
Well-known member
Yes it is, Time saver! For instance 4130n material stock required to complete the project is reduced. Nothing worse then fabrication being held up because of a engineering requirement of difficult to procure material sizing. Now I can just build whatever parts/tools I need. eg, tube notcher an exhaustive list would be long.
Last edited:
Chewie
Well-known member
I took a break from the wings and created a copy of a Tail Dragger Dragger. I'm calling it the Drag Queen. Still want to paint it but it actually works! 10" harbor freight air filled tires roll over the hangar tracks nicely.
Attachments


spinningwrench
Patrol


I decided I wanted a lockable baggage compartment and also to eliminate any openings to the outside for wind and elements. I installed this nice cam over mechanism which pulls the door firmly closed.
Last edited:

James
4-Place Model A
Today I spent an hour here on the forums, clicking on random threads, and trying to match people's real names with their forum user names.
I've got a paper list written out now, so from now on I should be able to address you all properly!
Thanks again everyone for all the help you send my way, and happy building
James
I've got a paper list written out now, so from now on I should be able to address you all properly!
Thanks again everyone for all the help you send my way, and happy building
James


JimParker256
Bearhawk Enthusiast
ELT panel? Circuit breakers / fuses? I like the simplicity.
spinningwrench
Patrol


I welded up a simple shock strut simulator. This uses a simple hardware store turnbuckle to simulate the landing gear at both minimum and maximum deflection without having to load the aircraft down with weights. Using paper templates I was able to then accurately locate the required shock strut openings in the lower boot cowl.

Nev
Quick-build 4-place B #25
Jim You’re right, I will likely need an ELT panel and it’ll go above the right side air vent. Circuit breakers will be electronic via the Dynon ACM module mounted behind the panel.
James it’ll be for cowl flaps, unless I think I can simplify further by eliminating them. Not shown above but there will also be a park brake and heater knobs above the engine controls. At the advice of Dynon I’m probably about to eliminate the QNH/ALT/HDG selector panel as well. I figure I need two switches for fuel boost pump, and landing lights.
James it’ll be for cowl flaps, unless I think I can simplify further by eliminating them. Not shown above but there will also be a park brake and heater knobs above the engine controls. At the advice of Dynon I’m probably about to eliminate the QNH/ALT/HDG selector panel as well. I figure I need two switches for fuel boost pump, and landing lights.
spinningwrench
Patrol
NEV not sure what you are referring to. The adjustable rod you are seeing temporarily replaces the shock strut.
spinningwrench
Patrol
 Moved my Quickbuild wings from deep storage to the active hangar. I think this is an accurate description of wing walking.
Nev
Quick-build 4-place B #25
Started back on the doors. Changed the window lines and added a small “bubble†curve to give some rigidity to the acrylic, give a little more room and increase visibility. The lower part will be skinned in aluminium.
I plan to begin installing the latches tomorrow.


I plan to begin installing the latches tomorrow.
Last edited:

Gary Wallace
Well-known member
Its not what i did today, but what i am going to do tomorrow is what im excited about! Officially starting to cover my airplane! Starting with the ailerons and flaps...expect ready for paint in the spring!

svyolo
Junior Member
Nev;
How/where did you fasten the sheet metal below the door frames. The kit piece wraps around the lower longeron to the kit bottom aluminum piece but I extended the sides the same as you. I am going to weld on 3 or 4 tabs per side to fasten the aft half of that sheet metal. I haven't decided whether to wrap it around the tube, or put the tabs on top of the lower longerons and terminate it without the wrap.
How/where did you fasten the sheet metal below the door frames. The kit piece wraps around the lower longeron to the kit bottom aluminum piece but I extended the sides the same as you. I am going to weld on 3 or 4 tabs per side to fasten the aft half of that sheet metal. I haven't decided whether to wrap it around the tube, or put the tabs on top of the lower longerons and terminate it without the wrap.
robcaldwell
Model B Quick Build Kit
Fabric covering and painting are my 2 favorite building tasks. Be sure you have installed the hinge brackets and test fitted the ailerons and flaps before covering them.

Westward_Flyer
Well-known member
Really looking forward to more info on this, I'm planning on adding a slight bubble too in order to go with a lighter weight (thickness) acrylic and to combat drumming.
Gary Wallace
Well-known member
Thanks Rob . Above tasks have been completed and fits are great!


Chewie
Well-known member
So I'm told. https://youtu.be/B7jkXoGxM_U
Nev
Quick-build 4-place B #25
More door progress. Left door mostly finished now. I’ll add a gas strut to the back frame, and possibly a grab handle to help close from the inside.
It has given a noticeable increase in “shoulder-width†space, around 2-3 inches, which carries forward to the knee area too. Probably no additional space at eye level though with the way I think the acrylic will lay.


It has given a noticeable increase in “shoulder-width†space, around 2-3 inches, which carries forward to the knee area too. Probably no additional space at eye level though with the way I think the acrylic will lay.
Attachments


Last edited:
Nev
Quick-build 4-place B #25
svyolo - apologies, I just saw your comment above now.
I’m adding adel clamps to the lower longerons, with tinnermans on them and will use sheet metal screws to attach the aluminium lower skin to the tinnermans through the belly fabric. I plan to use a soldering iron to melt holes through the fabric with a dollar patch in these areas. The tinnermans will have a small dab of adhesive (sikaflex or similar) to keep them attached when the screw is not in place. So the adel clamps and tinnermans will sit inside the fabric, with the aluminum skin on the outside. If you weld tabs on, I’d consider welding them on the underside and wrapping the skin around with a small over-lap. Just my 2c, I think it’d give good results.
I’m pleased with the lower skins running back to the rear door pillar, partly for the way they look and the additional protection, but largely because of the way the fabric can now terminate inside the rear door pillar, with the aluminium skin overlapping it. Everything goes together very neatly, whereas before I couldn’t find a logical way to terminate the fabric under the door.
I’m adding adel clamps to the lower longerons, with tinnermans on them and will use sheet metal screws to attach the aluminium lower skin to the tinnermans through the belly fabric. I plan to use a soldering iron to melt holes through the fabric with a dollar patch in these areas. The tinnermans will have a small dab of adhesive (sikaflex or similar) to keep them attached when the screw is not in place. So the adel clamps and tinnermans will sit inside the fabric, with the aluminum skin on the outside. If you weld tabs on, I’d consider welding them on the underside and wrapping the skin around with a small over-lap. Just my 2c, I think it’d give good results.
I’m pleased with the lower skins running back to the rear door pillar, partly for the way they look and the additional protection, but largely because of the way the fabric can now terminate inside the rear door pillar, with the aluminium skin overlapping it. Everything goes together very neatly, whereas before I couldn’t find a logical way to terminate the fabric under the door.
Last edited:

Sir Newton
Well-known member
I completed a list of the rivets required for my scratch build BK5 wings. It is more work then I thought it would be. Placed the order with a supplier along with 750 differing Clecos required to hold it all together. Now I am designing a jig to build the wings main & rear spars on. Fairly simple stuff but it is keeping me entertained during CV-19 days.
Last edited:
svyolo
Junior Member
yeah I wanted to wrap it around to stiffen the edge so the airstream didn't grab it. I am not sure about using adel clamps under the fabric as they might chafe the fabric pretty quickly. Maybe some adel clamps holding a piece of angle and have the fabric ride over that before it wraps around the lower longeron?

Bcone1381
Finished Patrol
My windows are fabricated except for paint and final assembly. I thought some might like to see some detail of the interface between the former, the rear window frame, Acrylic, and window overlap.
The third photo shows the trim that holds the rear window in place. It has a joggle to accommodate the 1/4" from window overlap. The fourth photo lines on the former show where the rear window glass, the front window overlap, and the space for the joggle would be. The last photo....if I did it again, I would extend the top window frame forward anbohter 1/2 inch. I Cut the darn thing twice but it was still too short!!!


The third photo shows the trim that holds the rear window in place. It has a joggle to accommodate the 1/4" from window overlap. The fourth photo lines on the former show where the rear window glass, the front window overlap, and the space for the joggle would be. The last photo....if I did it again, I would extend the top window frame forward anbohter 1/2 inch. I Cut the darn thing twice but it was still too short!!!
Nev
Quick-build 4-place B #25
Today I worked on the skylight frame. I’m planning a single large skylight, so starting with the new 4-place Bravo factory frame, I’ve modified it by moving the two center top retainers to the outside edges where I’ll rivet them to the formers once the acrylic is in place. It’ll be captured around all outside edges, and bonded to the two center longitudinal frames.

Gary Wallace
Well-known member
16 days and everything covered in fabric! Now polybrush and the chore of stitching and finishing tapes
Last edited:


gary heuser
Member
I looked at youre post , and workwd on a sand blst and paint booth
rv8bldr
4A Scratch Builder
For those of you scratch building, I cobbled together a handy little jig for tack welding the 4,000,006 tabs on the fuselage.
I use two pieces of scrap .032 aluminum. I cut a hole in one of them, then riveted the two pieces together offset by the thickness of the steel tabs I am putting on (.040). I then used a hot glue gun to stick two rare earth magnets to the angle that will sit on the fuselage tube. A magnet was then glued underneath where the tab to be welded is positioned. I then just put the jig on the tube where I want the tab, tack weld the tab, take the jig off, and finish weld it. It works upside down, right side up, sideways, etc.
Now, given that the magnets are held on with hot glue, this probably wouldn't last long if you are using oxy, but if you are using TIG, it works a treat.


I use two pieces of scrap .032 aluminum. I cut a hole in one of them, then riveted the two pieces together offset by the thickness of the steel tabs I am putting on (.040). I then used a hot glue gun to stick two rare earth magnets to the angle that will sit on the fuselage tube. A magnet was then glued underneath where the tab to be welded is positioned. I then just put the jig on the tube where I want the tab, tack weld the tab, take the jig off, and finish weld it. It works upside down, right side up, sideways, etc.
Now, given that the magnets are held on with hot glue, this probably wouldn't last long if you are using oxy, but if you are using TIG, it works a treat.

I found this product on amazon
https://www.amazon.com/gp/product/B08MWYXLWG/ref=ppx_yo_dt_b_asin_image_o03_s00?ie=UTF8&psc=1
Attachments

Gerhard Rieger
Well-known member
Sand blasted my airframe using used B60 blasting sand, it gives a softer blast for a real satin finish. Painted with a coat of edge primer with a anti rust and then the hardener based undercoat.
Attachments


Gerhard Rieger
Well-known member
For sure, it cost an arm and a leg to send it away for blasting, Its done, next up is top coat
Gary Wallace
Well-known member
Whew!!! Big accomplishment. Ive been extremely busy..solo. 7 weeks ago i started covering. Poly Fiber processs. Just finished last tape and all ironing and inspection rings..squares. i am officially ready to start spraying poly brush etc. Have to rig up garage for the next process. I feel like i accomplished a lot...till i think of the next steps. Poly brush, spray, and paint.....i need a week or two to lose my buzz from the chemicals so i can think straight.
Last edited:
Gary Wallace
Well-known member
Ill be using the garage im thinking. Cover the floor , remove everything. Cover windows with clear plastic. Exhaust fan out window..makeup air from house walk up door from basement. Gonna be a real sh@# show. Want to utilize as much space as possible.

TimTall
Well-known member
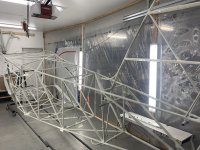
Today I started painting! Feels like a big step to finally get started on the stuff that people will actual see. The $400 spray booth is working well so far...
Attachments



Nev
Quick-build 4-place B #25
Today I spray painted my doors. My front doors were a modification and as expected, took quite some time. But I thoroughly enjoyed fabricating them and the creative side of the project was a welcome diversion too. They’re not finished yet, I still need to do a top coat on the inside of the cargo doors, and then I’ll line the front doors with Kydex. I’m also planning to mold some fiberglass retainer frames to hold the acrylic panes in place. I’m very happy with results so far.

Last edited:
Nev
Quick-build 4-place B #25
Very nice! I'm trying to determine if I can still raise the door sill and go with seaplane doors, without redoing a lot of fabric.
It wasn’t particularly difficult to fabricate an aluminium panel underneath the door that extended its full length, and then terminate the fabric at the rear structure.
This shows pictures of how I did it.
JimParker256
Bearhawk Enthusiast
Those look really nice, Nev!
Nev
Quick-build 4-place B #25
Thanks for the link! Is that wood that you added above the original door sill?
Yes - I got the idea from Rob Caldwell. 2†thick Cedar to raise the door sill, which enables the original aluminum sill to be screwed to it.

RatherBFlying
Well-known member
Working on wing attach fittings

AKKen07
Well-known member
Finally hit a sort of milestone. Both wings are riveted shut with fuel systems etc installed and I am setting them aside to do the handful of projects on the fuselage that I want done before covering! I will be ordering my Stewart Systems stuff pretty soon methinks! Oddly enough one of the projects that I need to do is modify the pilots seat to give me more headroom! I sat in the fuse with the tail propped up level and found I had only 1/4" between my head and the crossbar above, which won't do...
Gerhard Rieger
Well-known member
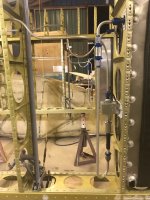
Installed the fuel tanks and the fuel lines from Aux tanks to mains. I understand that the Facet pumps do have a non return inside, but, when I blew on mine a little air still seeped through. Because of that I opted to keep to my plan to install a proper oneway valve. I also added the recommended fuel filter from aircraft spruce.
Attachments
-
 055647DA-6B39-41D0-87B9-B255AA6A01E4.jpeg130.2 KB · Views: 0
 -
 5B61CF86-BD78-49AA-95E1-FFEF7EEE4D94.jpeg652.5 KB · Views: 0
 -
 5479C1D8-5725-47A9-B0EF-B8F90E86A4B5.jpeg714.6 KB · Views: 0
 -
 168CEFD6-34BA-4DC9-815B-5842BF9C0549.jpeg1.5 MB · Views: 0
 -
 5526F4E7-8D7B-45A6-B780-59D749E6AF78.jpeg1.5 MB · Views: 0


Nev
Quick-build 4-place B #25
Is the side panel Kydex?
Yes it’s Kydex. I’m learning to heat form it. Seems to be pretty magical stuff so far. Fairly light-weight too.