
You are using an out of date browser. It may not display this or other websites correctly.
You should upgrade or use an alternative browser.
You should upgrade or use an alternative browser.
Tell us what you did today on your Bearhawk Project
- Thread starter Bcone1381
- Start date

Nev
Quick-build 4-place B #25
What thickness of Kydex are you using and any advice on using it?
I’m using .028†thickness for the cockpit panels and it seems easily sufficient. Putting bends in it naturally stiffens it. Kydex can be cut with scissor or shears, drilled, sanded, and a Dremel works well too. It has good qualities for fire/smoke and is used in commercial aircraft cabins. I’m currently doing some test pieces for PVC adhesive.
The main issue is if you get too much heat on it, it will turn shiny and ripple. This is avoided by shielding what you don’t want to heat. I’ve made a mould to mould the interior door panel. My first attempt gave quite good results, but rippled in one area. I’ve now made up the wing root panels as well.


spinningwrench
Patrol


Finally finished installing and securing the last of my fuselage fuel lines with 5000 tubing. I welded these small zip lock tabs on the fuselage which makes for a very clean and super secure installation without using an Adel clamp.
Last edited:
Nev
Quick-build 4-place B #25
What are you using to mount the panels?
The lower forward panels have lips that fold under the floor panels and are captured securely. The upper lips fold under the door sill aluminium cover and are captured there. The very front panels under the instrument console have their lower edge captured by the floor panels, and the top edge curves around the steel tubing and locks in place.
I’m still working out how to align the forward door edging, sikaflex might need to feature here.
The wing root panel lower edges roll nicely around the tubing and “clip†into place. Although they sit there nicely I think the fuel sight gauge mounts will lock it all together.
The upper rear panel that sits under the skylight will be retained by Velcro. I contemplated screws, but the panel is so light and “superficial†that I think Velcro will be perfect.

JimParker256
Bearhawk Enthusiast
Wow! That looks really nice.
Mark Goldberg
Bearhawk Aircraft
Nev - your Kydex panels look really good. I wish one of you guys out there would make a little side business of making up these Kydex panels and offering them to builders. For all the different models. I am willing to assist. It has been something that seems really a nice looking alternative to interior fabric. And light weight. Mark

robcaldwell
Model B Quick Build Kit
Interesting... I Just ordered a sample sheet of Kydex from Amazon. Looking forward to seeing this material in person.
spinningwrench
Patrol
Its a great material and very flameproof. Aluminum is .098 lbs/in3 and Kydex is .052lbs/in3 or half the weight. It heat/vacuum forms very well. That said I just finished all my interior panels in .020" aluminum as I wanted the ease of removal vs fabric. I considered Kydex a bit too late.
Nev
Quick-build 4-place B #25
I think Kydex will take the knocks well, it’s flexible but doesn’t dent easily. The heat forming has a learning curve, but not difficult. I’ve been working on the interior door panels which need a formed bulge and several 90 degree corners, so this is proving challenging. I’ve got one almost spot on, but then over heated it. Yesterday I tried heating a small sheet in the oven (while the wife was out) and this was quite successful - I draped it over a wooden mould and pressed it into place. It also glues well with a primer and PVC adhesive. Once I’ve finished everything I’ll post some pics and a short video.

TimTall
Well-known member
Passed what feels like a major milestone today. The Dynon system, including the radio, intercom, and transponder are all up and running. The rest of the wiring harness with switches, breakers, and fuse panels is done aft of the firewall. Everything checks out on the bench. I was actually pretty surprised that the radio works as well as it does from inside the garage. I was easily talking to planes in the circuit at the airport 4 miles away and that's with the antenna mounted to the work bench with a 6" piece of scrap for a ground plane.
The wiring felt like a daunting task going into it. I've wired houses but I'd never done any 12v more complicated than a small utility trailer. The Aeroelectric Connection is a life saver!
I considered paying for a pre-made panel but, having done it now, I'm very glad I didn't. I have a far better understanding of how wiring in general works and know my system inside out.
The panel in the photo is just a mock up. Next step is figuring out how to finish the panel and labelling. Anodizing with laser etched letters? Anyone done that?
The wiring felt like a daunting task going into it. I've wired houses but I'd never done any 12v more complicated than a small utility trailer. The Aeroelectric Connection is a life saver!
I considered paying for a pre-made panel but, having done it now, I'm very glad I didn't. I have a far better understanding of how wiring in general works and know my system inside out.
The panel in the photo is just a mock up. Next step is figuring out how to finish the panel and labelling. Anodizing with laser etched letters? Anyone done that?
Attachments


spinningwrench
Patrol
Be careful using your radio as a transmitter with an insufficient ground plane. Your SWR could really be out of wack without enough ground plane and damage to your transmitter is possible. I would recommend you get a friend who is a ham and borrow their SWR meter.
geraldmorrissey
Well-known member
Set 50 rivets on my Patrol rear spars. No cuts, all within spec.
Gerry
Patrol #30
Gerry
Patrol #30

AKKen07
Well-known member
I went ahead and modified my seat for more headroom. The major downside that I accepted is that I will no longer be able to adjust my seat for anybody else (without the use of cushions). I literally maximized the airframe's useable space - at least vertically. Though I am just over 6' 3" I have "short" legs for my height and a long torso. Something I learned from this experiment is that there are three things to keep in mind for seat placement. Leg room, headroom, and reach to the panel. The fore and aft position of the seat was the biggest factor for legroom with a slight headroom change, but the seat angle had the largest effect on headroom and reach to the panel. The largest obstacle to placing the seat wherever I wanted was that big crossbar that passes left-right under the front of the seat pan. In the end I made the 1/4" of room between the crossbar and my head into 1/4"+ between the crossbar and a helmet! I am very pleased. A few flight hours will be required before I can really judge the results of course. The mod kept the use of the stock seatback. I should have an eye-line just under the top of the window. The pic with me in it shows the tiny gap before the mod. Here the stock seat with a pretty taught "Herculon" pan was all the way back and down and I have a 1.5" pad. If I decide down the road that a little more room is required it will be easy to swap out the aluminum pan for fabric with a bit of a dip and perhaps reduce my pad 1/2". I also found a touch up paint that matches my powder coating nearly perfectly. It's not going to win awards for beauty but I am happy with my results:
Attachments


Nev
Quick-build 4-place B #25
I made a firewall mock-up, cut from my wooden “poor mans rotisserie†stand.
I’m using a Vans IO540 FWF kit, which I can’t recommend enough. The instructions and drawings are exceptional and with the kit containing every part large and small that you could possibly need, it makes the FWF quite a fun project for someone like myself with no prior experience. It also includes all the engine controls and connectors, alternator, oil cooler, and baffles etc. Top and slightly to starboard of the center engine mount bolt is the Vans pressure transducer mounting block.
It appears that there are adequate clearances between parts at this point, but I don’t know how the exhaust will affect yet. The Emags can be rotated to any position which gives plenty of flexibility. I plan to put the remote oil filter above the oil cooler, plumbed in series.
If you see any issues or improvements to be made please let me know.

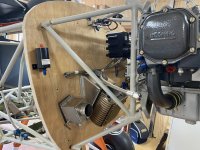

I’m using a Vans IO540 FWF kit, which I can’t recommend enough. The instructions and drawings are exceptional and with the kit containing every part large and small that you could possibly need, it makes the FWF quite a fun project for someone like myself with no prior experience. It also includes all the engine controls and connectors, alternator, oil cooler, and baffles etc. Top and slightly to starboard of the center engine mount bolt is the Vans pressure transducer mounting block.
It appears that there are adequate clearances between parts at this point, but I don’t know how the exhaust will affect yet. The Emags can be rotated to any position which gives plenty of flexibility. I plan to put the remote oil filter above the oil cooler, plumbed in series.
If you see any issues or improvements to be made please let me know.
spinningwrench
Patrol
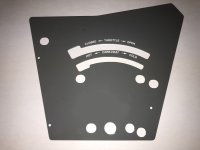
Taking care of interior details. Cover plate for Patrol throttle machined, painted and lettered.
spinningwrench
Patrol
Ordered engine today, cough. All engine shops are pretty busy. Had strange response from Superior who indicated they don't make money selling assembled engines so would not even quote.

RatherBFlying
Well-known member
Where did you end up ordering your engine from?
spinningwrench
Patrol
I ended up ordering a Lycoming Thunderbolt as they were able to do a bunch of configuration changes I wanted.

Bcone1381
Finished Patrol
The article below might indicate what is behind Superiors strange response.
https://www.aopa.org/news-and-media...ssembly-ad?utm_source=ebrief&utm_medium=email
https://www.aopa.org/news-and-media...ssembly-ad?utm_source=ebrief&utm_medium=email
spinningwrench
Patrol
Brooks that is strange as Superior continues to pursue the engine parts business, possibly they are not supplying cranks at this time. I know Bob likes their cylinders. The interaction and responsive with the Thunderbolt sales guys and willingness to test and supply the engine with E-Mags was an important factory.


Airplane3472
Member
Where are you buying your Kydex material? Amazon and some other suppliers I googled only had small sheets or were offering sheets much thicker than the .028 you are using. Thanks for the info!
Nev
Quick-build 4-place B #25
Where are you buying your Kydex material?
I got mine from Interstate Plastics.
Consider asking them to ship it rolled, otherwise they will freight it on a pallet. (Ask me how I know that
 )


spinningwrench
Patrol
Closing in on finishing the interior. Baggage compartment logo went on today.


spinningwrench
Patrol
Closing in on final panel design


Gerhard Rieger
Well-known member
You are progressing well. Looking great
Gerhard Rieger
Well-known member
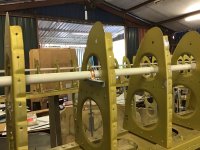
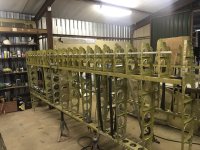
Hi to you all, i made and installed 8 fittings per wing for the tube to house the wiring of the nav lights, aux pumps, and fuel gauges. Also cleaned the wings by washing them before I start to close them up.
Attachments
-
 6CD2BF5A-19F7-483F-BA5F-2DC538859C2A.jpeg615.8 KB · Views: 0
-
 49336A46-2774-4554-B295-C4971A4F4D3B.jpeg465.3 KB · Views: 0
-
 FF1BD0C1-D565-4258-B0A9-0B48B6775F69.jpeg485.7 KB · Views: 0
-
 993D82D9-5237-4E50-BA59-8D335575AD7C.jpeg665.3 KB · Views: 0
-
 11EE086D-A6B7-457E-8C37-DD07CD7940FE.jpeg725.2 KB · Views: 0
Gerhard Rieger
Well-known member


Gerhard Rieger
Well-known member
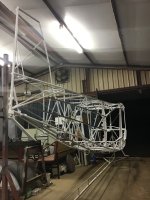
My fuselage, gear legs and engin mount are painted, being at it for almost eleven years now, all is done and ready for assembly, other than firewall forward,
my wings are ready for riveting. All is happening so much faster now. I always wondered what it must feel like building a quick build kit, now I know. Its so much fun putting it all together now. May you all have a great time building.
my wings are ready for riveting. All is happening so much faster now. I always wondered what it must feel like building a quick build kit, now I know. Its so much fun putting it all together now. May you all have a great time building.
Attachments
-
 11EAE7AC-4976-49E8-BCB6-8967DEB06926.jpeg1.3 MB · Views: 0
-
 FD0D1B0D-031E-4790-A0D3-CAA04C3808B8.jpeg1.3 MB · Views: 0
-
 84C6E4B5-9D21-4130-883B-358984539DB5.jpeg1.3 MB · Views: 0
-
 806B7EE2-916A-414C-96CE-366F6AB86AFF.jpeg1.4 MB · Views: 0
-
 5BBEB3BF-731C-4470-871C-08901A90F2F0.jpeg1.4 MB · Views: 0
-
 747796F1-A7A4-4D06-BA54-BCB25C857742.jpeg1.5 MB · Views: 0
-
 295D85F2-9671-41B2-926C-7707470BBEF6.jpeg1.4 MB · Views: 0
-
 photo8830.jpg623.9 KB · Views: 0
-
 photo8831.jpg779.5 KB · Views: 0
spinningwrench
Patrol
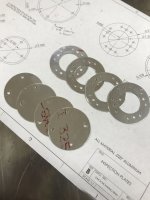 Its inspection ring fabrication day, talk about repetitious!! I make them in a variety of diameters with holes for nut plates. Covers will be slightly dished.
Last edited:

rodsmith
Well-known member
My fuselage, gear legs and engin mount are painted, being at it for almost eleven years now, all is done and ready for assembly, other than firewall forward,
my wings are ready for riveting. All is happening so much faster now. I always wondered what it must feel like building a quick build kit, now I know. Its so much fun putting it all together now. May you all have a great time building.
Everything looks great. I noticed you are using the original configuration for the fabric on the gear leg which is fine for 8.50x6 tires or maybe even 26" but could interfere with larger tires. There is a July 2009 engineering notice that shows an alternate configuration for the lower part of the gear leg stream lining.
spinningwrench
Patrol
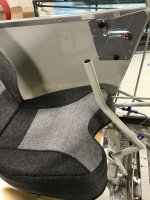
Seats are done for my Patrol. This was a big detour as I wanted a really comfortable pilot seat. I made a molded carbon fiber shell for the pilot seat which is sculpted along the back and the bottom. I also added some nice leg extensions for comfort as I am a tall guy. I redesigned the pilot seat frame so it is now hinged for really good access for the rear seat passenger. Oregon Aero did the upholstery. It is really comfortable and I'm ready for those long trips to Idaho.


Nev
Quick-build 4-place B #25
geraldmorrissey
Well-known member
Setting rivets on my second rear spar. Talk about major visual progress. After years of fabricating detail parts, I have to say assembly is way more satisfying. Second spar will take about half the time of the first.
Gerry
Patrol #30
Gerry
Patrol #30
Last edited:
Gerhard Rieger
Well-known member
Hi Rod, thank you, it’s my first build and I try my very best to get it all right, scratch building is very satisfying to say the least, but also stressful at times. I saw that engineering notice,thanks. Take a look at the part where the axle should be, my axles are different and I made it to use the bolt on axles like a Cessna, that moves the rim or wheel/ brake away some and will allow me to even put 31’s on. The main reason for this it that I can shim the axle to get it to run straight instead of the heat/ bent until it’s straight method. That process put a lot of stress on a very vulnerable component and extreme heating and reheating have a negative lasting effect on the integrity of the metal. Thanks again for the heads up.
Last edited:
Gerhard Rieger
Well-known member
I am feeling the same way, well said. Its so great to get to just put everything together now, and the progress is amazing. Maybe still on long finals but approaching the end and getting that last 90% done. Enjoy!
Gerhard Rieger
Well-known member
Here is some foto’s of my gear legs with the Matco Bolt-on axles. 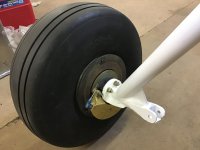

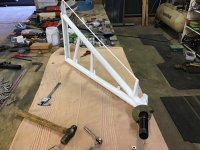
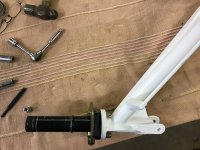
Last edited:
rodsmith
Well-known member


 Finally laminated my Hoerner wing tips. Used 4 layers of 9 oz fiberglass cloth. They extend from the end of the wing 15" and weight 7 pounds. I spent a lot of time filling and sanding the forms and I am very happy how they turned out. Should need minimal work to prepare for paint. Expensive in time spent but very glad I went this route.

N3UW
Patrol Scratch Builder
I really like that tilt forward seat option. Do you have a latch or do you just use butt weight and seat belts to keep it 8n place. It also looks like you have the seaplane door option but have setup throttle and mixture for the rear seat on the side wall. Can you talk a little about what you did? Did you post about this earlier. I am also building a Patrol and just order the fuselage from Mark with the seaplane door options and had been thinking about how I would do the throttle.
rodsmith
Well-known member
Nice! Will you be making any more to sell?
No, you would need to make external molds with a split line to produce more than 1 copy. I believe Carbon Concepts is making them for the B model. These are for the original wing. They released nicely but due to the shape I had to destroy the forms to get them out.


Gerhard Rieger
Well-known member
I upgraded my flap ring, 304 Stainless steel. 
Gerhard Rieger
Well-known member

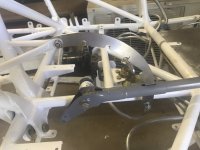


geraldmorrissey
Well-known member
Just curious, why not cover the body, then build the horizontal stabs so that ths root ribs butt against the body. Then you don't need a root fairing.
Gerry
Patrol #30
Gerry
Patrol #30
Bcone1381
Finished Patrol
I fabricated a shroud fro my Throttle Quadrants and installed the headset jacks under the shroud. I try to keep all items I can off the instrument panel and moving these to the side at shoulder level opens up and simplifies the instrument panel. It also keeps cords from hanging down from overhead. I used Phenolic sheet 1/8 inch thick to attach the jacks to the bottom (brown in color) Phenolic is non conductive which will improve long term serviceability I think. Boeing installs them this way.


Gerhard Rieger
Well-known member

 I installed the two static port holding plates, will likely route the plumbing up and over the top to the instrument panel. Up to stop water from entering the system.
Gerhard Rieger
Well-known member
Working with fibreglass is not my strong point, but I am making up the wingtip leading edge, the landing light will be housed in there. 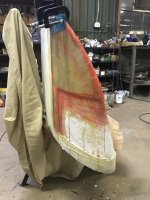

Chris Werner
Active member
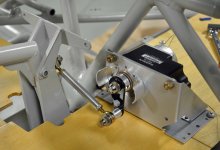
Drilled holes to mount control stick assembly to fuselage.

svyolo
Junior Member
Wiring hell for a week and a half, and I did the basic avionics harnesses 2 years ago. Trying to get everything to talk to each other, and the wire lengths correct. I wish I could recommend paying Dynon or Garmin to build it all for you, but making that all work with your custom layout may not work out.
I am really very experienced at 12v stuff, but this is the first time I designed and built an entire 12v system for a moving object. It is more work than I thought. But with EFI, if mine isn't spot on, I will spend to much time as a glider. When it is done I am sure I will be happy with what I did, but a carb and two magnetos is resonating in my mind. LOL.
I am really very experienced at 12v stuff, but this is the first time I designed and built an entire 12v system for a moving object. It is more work than I thought. But with EFI, if mine isn't spot on, I will spend to much time as a glider. When it is done I am sure I will be happy with what I did, but a carb and two magnetos is resonating in my mind. LOL.
Gerhard Rieger
Well-known member
No, I made a foam leading edge and are adding fibreglass over it, going to be a lot of sanding, I am making it thicker and will sand it back to flow perfectly with the aluminum.
Nev
Quick-build 4-place B #25
Today is dopamine release day......I powered up my avionics for the first time !
I can’t take any credit for the wiring, I simply used the Advanced Flight Systems off the shelf wiring looms which I can highly recommend, they really are “plug and playâ€. I installed the avionics wiring yesterday and added the network cables this morning.
I’ve also added a very light weight carpet that I found in the local rubber suppliers.
I’m currently making some mounts for the headset sockets in the wing root panels.


I can’t take any credit for the wiring, I simply used the Advanced Flight Systems off the shelf wiring looms which I can highly recommend, they really are “plug and playâ€. I installed the avionics wiring yesterday and added the network cables this morning.
I’ve also added a very light weight carpet that I found in the local rubber suppliers.
I’m currently making some mounts for the headset sockets in the wing root panels.
Last edited:

Gerhard Rieger
Well-known member
Great progress, looking good
Gerhard Rieger
Well-known member
Every moment counts, stay excited, I am still excited to receive a parcel with aircraft parts in after 10 years

dutchmaster36
New member
My Patrol kit arrives in June and I’ve been ordering parts (mains, brakes, tailwheel on shelf). With Mark’s help I ordered the Wick’s hardware kit. The hardware arrived a week or so ago and I’ve been organizing and sorting. I had a brief career at Home Depot and lean toward pegboard displays. My wife thinks I’m OCD. Good luck with your build.
Attachments

robcaldwell
Model B Quick Build Kit
My Patrol kit arrives in June and I’ve been ordering parts (mains, brakes, tailwheel on shelf). With Mark’s help I ordered the Wick’s hardware kit. The hardware arrived a week or so ago and I’ve been organizing and sorting. I had a brief career at Home Depot and lean toward pegboard displays. My wife thinks I’m OCD. Good luck with your build.
A well organized shop and work area will serve you well and save tons of time! I've tried to be as organized as I possibly can, but my biggest problem continues to be where did I leave the tool that was just in my hand 30 seconds ago!
Mark Goldberg
Bearhawk Aircraft
I seem at times to spend more time looking for tools than actually working on the project. Not a productive practice. Mark
AKKen07
Well-known member
I third that. I often wish I took the time to make a rolling stand that I could drag around easily to drop tools on. I even drew up plans for one then just forgot about it as life happened. I would have a top surface about the size of a large grypmat and some open containers hanging off the sides for clecos...
JimParker256
Bearhawk Enthusiast
I bought a stainless steel rolling "kitchen cart" from somewhere (IKEA, maybe?). It has one drawer and a couple of shelves in addition to the top. I attached a thick plywood layer on top to protect it if/when I used it to drill something. It's really nice to be able to grab the tools you expect to use, and roll them around with you. Shelves are nice to hold small parts (or other tools) you'll be using.
spinningwrench
Patrol


Gerhard Rieger
Well-known member
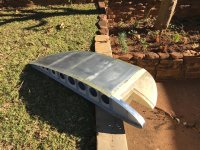
Wingtip leading edge progress, getting there slowly. 



Nev
Quick-build 4-place B #25
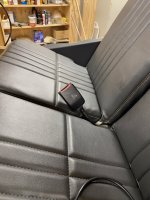
I mounted the seatbelts to try them out in the front right seat, and rear right seat. The front one has the tongue from a lap only belt fitted. This has made it able to be easily adjusted when un-fastened.
When it’s fastened it locks the lap part in position to keep a person firmly in their seats during turbulence.
We removed the ball bearing, so it should only lock under acceleration, but I won’t be able to test that part out until inflight.
Currently it gives very good access to the flap handle and fuel selector.

When it’s fastened it locks the lap part in position to keep a person firmly in their seats during turbulence.
We removed the ball bearing, so it should only lock under acceleration, but I won’t be able to test that part out until inflight.
Currently it gives very good access to the flap handle and fuel selector.
Gerhard Rieger
Well-known member
Looking great Nev, I also plan to use auto seatbelts. Where is the ball bearing you took out?
Nev
Quick-build 4-place B #25
Looking great Nev, I also plan to use auto seatbelts. Where is the ball bearing you took out?
It’s inside the inertial reel, but easy to access. Actually the guy that sells the seat belts is coming over to see my plane, so I’ll see if I can get a pic of how to do the ball bearing, You need to remove it because otherwise it will lock the belt on most angles other than level, and also when it gets moved.
The really good thing so far is that the lap belt locks when you plug it in - unlike a car belt. And when you unplug it, it’s fully adjustable.
It’s inside the inertial reel, but easy to access. Actually the guy that sells the seat belts is coming over to see my plane, so I’ll see if I can get a pic of how to do the ball bearing, You need to remove it because otherwise it will lock the belt on most angles other than level, and also when it gets moved.
The really good thing so far is that the lap belt locks when you plug it in - unlike a car belt. And when you unplug it, it’s fully adjustable.
the old car belts ( without shoulder restraints ) did that and I remember a few late 70s cars that had static lap belt ( but adjustable length ) and inertia reel shoulder restraints.. people hated them! but for an aircraft that is an ideal setup. why .. or how, did you decide to choose the shoulder ( 3 point ) over the 4 point ( centered vs lateral inertia reel ) style restraint Nev?