March 2019 Elevator Trim Cable Tension

jaredyates

4-Place Kit Builder
Staff member
March 2019 Elevator Trim Cable Tension

ENGINEERING CHANGE NOTICE: Design change that requires immediate attention to affected serial numbers. This NOTICE contains the technical information to correct the unsafe condition.
Applies to all three types, Bearhawk 4-Place, Bearhawk Patrol, and Bearhawk LSA.

Check the tension in the 1/16 cable used for the trim system. Cable tension should be approximately 60 pounds. If too loose the airplane will be unstable in pitch trim.
 
I spoke with Bob on the phone about this today, and he provided some clarity. If the tension is too light, the trim tab will be able to move uncommanded in flight. This can create adverse handling characteristics with regard to the servo action of the tab. The minimum tension specification is intended to create sufficient friction to keep the trim wheel fixed in position when a change is not commanded by the pilot.
 
I have a lot of "wobble" in the trim tab because of the fit of the parts in the tail, specifically the trim pushrods where they meet the trim horns in the horizontal stabilisers.
At the tab trailing edge, they can wobble about 3/16" at most.
I have not yet experienced any negative consequences from this situation. That said, I can't physically do high speed dives with the dragwheels (bushwheels) attached.
 
The bolt that attaches the trim pushrod to the little tab( coming out the bottom of the hor stab) has to be pretty tight but not so tight that it does not allow movement. If it is too loose, then the vibration starts to wear the hole. I had this happen and fixed the hole. After I learned the bolt needed to be tighter I have had better luck. Mark
 
Responding to Marks comment......
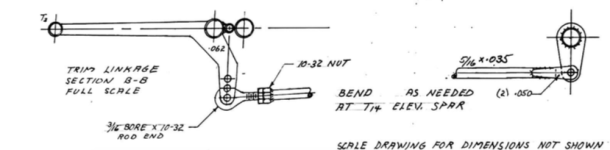
Below is a screen shot of the Patrol Trim linkage. I think my Patrol Kit came with a 10-32 threaded end on each end of the trim tab push rod. So, I think my assembly has a Rod End Bearing on each and and allows me to fully tighten the nut at the tab under the H-Stab. Does that sound right?

Second, it would seem to me that any uncommanded movement of the elevator trim tab would be indicated (seen?) by the movement of the trim wheel/lever. So, Can I test the system for proper function be moving the elevator to full travel limits, and watching the trim lever/wheel for any movement? Maybe this could be included when doing the pre-takeoff Control Check by keeping an eye on the trim handle for movement....but I agree its not a substitute for setting the trim cable tension IAW the engineering notice.

Third, is there a way to measuring cable tension without a $200 to $800 tool?


Screen Shot 2019-04-01 at 10.43.50 AM.png
 

Attachments

  • Screen Shot 2019-04-01 at 10.43.50 AM.png
    Screen Shot 2019-04-01 at 10.43.50 AM.png
    81.9 KB · Views: 0
You are welcome to borrow my tensionometer sometime. It's nothing special and isn't calibrated, but I suppose we could send it off and make it so.
 
If you have a rod end bearing at each end - you can tighten down the bolt/nut well and not worry. It is the forked end (as called out on the plans) that can vibrate and enlarge the hole. Mark
 
I recall Bob outlining a method to measure tension without the expensive tool. I think it was in a beartracks, I'll post it here if I find it.
 
Bob does not own a tensionometer. He calibrates his feel by hanging weights from a piece of cable. That and from having built a dozen airplanes over the last 50 years or so. Personally, I'm not there yet, so I'll stick to the measuring device!
 
The bolt that attaches the trim pushrod to the little tab( coming out the bottom of the hor stab) has to be pretty tight but not so tight that it does not allow movement. If it is too loose, then the vibration starts to wear the hole. I had this happen and fixed the hole. After I learned the bolt needed to be tighter I have had better luck. Mark

How did you fix the hole, Mark?
 
My friend put some weld bead in the hole where it was elongated. Then re drilled. With fabric on the hor stab. Has to be done carefully and using the proper techniques needed to protect the fabric. Mark
 
I think a friction lock would be in addition to tightening the cable. It seems to me that if you apply a friction lock without tightening the cable, you would have a locked wheel with a continued wobbly trim tab.
 
Just wondering if everyone has installed the bronze flat washers on the trim wheel install as shown on dwg. 22. On my trim wheel with the washers and the tightened AN4 bolt/castellated nut combined with the cable tension there seems to be more than enough resistance to keep the trim tab as set.

Dave Plans 865 QB 77 Awaiting final inspection..
 
I did, but I couldn’t find a reduced OD bronze washer so I ordered 100 standard ones from McMaster. The standard OD interfered with the trim wheel chain. Not having a lathe I chucked a couple up in my drill press and had at them with a file... I wouldn’t recommend that. I did manage to get two usable ones out of it fortunately. They serve as a self lubricating wear surface, I don’t think running without them is recommended.
 
I have read in the "Bearhawk Assistance Manual (Revised edition 18 October 2007) on page 16 that "Early kits relied on twisting the cables upon each other or a separate tension block to supply friction to the cable." I have an early kit (048) and I notice the elevator trim cables are "twisted." Does this follow what I am reading in the assistance manual or should I be concerned?

Terry
 
Hi Guys,

Just wondering about the bit where it says to feed the elevator trim cable through the end of the trim wheel chain - the photo in the beartracks seems to show thimbles at the forward ends of these trim cables, but I've found that the -3 thimbles are too fat to go through the chain.

Also, do people put the turnbuckles up near the wheel, or back at the trim horn?

Thanks,

James
 
I put my turnbuckles just aft of the rear bulkhead. Also got my cables back from being tested under load last week and the engineer recommended that I put small split pins through the end links on the chain to carry the load. I’ve done as he suggested. To clarify, I didn’t use thimbles, just the bare wire.
 
I could not find a a thimble thin enough to go through the #25 chain, so I made my connection using bare wire. I did not install a turnbuckle in the trim system as I tightened the wire to 60lbs before crimping.
 
I think the cable will stretch over time and the tension will relax. I think there needs to be some adjustment. You can also apply tension by pulling one wires to the side with a small pulley
 
Thanks for the info guys - I'll go with the thimble option Mark.
Given that it's essentially one loop of cable anchored at the rear ends, how come you can't get away with using just one turnbuckle?
The wheel position isn't indexed in use (although I see a couple of guys put a paint mark or something on the chain for TO trim position).

Svyolo - do you think I'll need more take-up than a single turnbuckle can provide as the cable tension slackens over time?

Nev - where did you get the figures for the cable proof loading? Has Bob stated it somewhere, or is it written in AC 43 or something?
I'm sure I've pressed all my cables correctly, but it'd be nice to know that they won't fail.

Ok, thanks again guys for all the help,

James
 
Theres a go no go gauge for nicopress. You need to have it and check them all. Most of the cables should they fail will be catastrophic.
I have one turnbuckle on the trim cable. If I run out of adjustment with that I'll replace the cable.
 
Thanks ZK - yep I have the approved nicopress tool and use the go-no go gauge. It sounds like Nev's been hooking them up to the back of the tractor and doing a proof load on them as well. Did you do that for your cables?

Thanks for confirming a single turnbuckle can work - I'll give that a go. Did you pre-tension your cable before swaging it?

James
 
I can't really see how you need to proof load them? They shouldn't be even remotely approaching their breaking point on the airplane. Follow 43.13. Use aircraft grade wire of the appropriate thickness and strands. It all comes pre-stretched.
I ran all the wire really long, then when it came time to terminate at the turnbuckle, set it so I could get like 1 thread in with my hands holding it there, marked that, cut, swaged and then you can get appropriate tension with the turnbuckle, but make sure you have enough threads engaged when you're done also.
 
Yep ZK - that's how I would do it as well. The tensionmeter will tell me I'm in the zone, and there should be min 3 threads engagement, I'd assume, but I'll try to get my hands on a copy of AC43.

James
 
I have a reasonable amount of experience with cable and fittings from the sailing world. Nico-press are not that desirable, but they are more than good enough for our application. Wire nuts are the worst, and used commonly in some fields. Cables used for structural applications are much different than airplane use. 1/8" cable tensioned to 30 lbs? Talk about overkill. The only reason to use 1/8" cable is friction and wear. Our control application doesn't even come close to any limit for the cable. It is just not a factor, or worth worrying about. Our controls use 1/8" cable for wear and tear.

Friction and wear are something to worry about.

A go/no go gauge is more than adequate to judge the quality of an 1/8" nico press in an airplane control system. The cable is good for, off the top of my head, 1800 lbs. Over time, corrosion at the nico press is an issue, but the cables will probably be worn by then.

Swaged terminals are far better. Good to the strength of the cable, at a minimum. They are overkill for our requirements. ACS charges I think 6 bucks a swage. I ended up with mostly swaged ends because they made larger adjustment easier, lighter, and a little cheaper than turnbuckles. I used nico press and a thimble in a few places where the fitting was making a 3D actuation. The thimble and nico press made a great universal joint. Aileron connection to the stick and flap actuator at the wing root come to mind.

I did not use swaged terminals because they were superior for our application. Nico press is more than good enough.

Do make good cable fittings and use a go/no go gauge. But getting into the nitty gritty is really way out there for 30 lbs of tension. I doubt the max load on any cable is more than 100-200 lbs. Wear and tear is the risk, not failure due to excess load. I paid extra for "pre-stretched" cable from ACS. I didn't do it because I was worried about stretch. That was all they had in stock, and I had already waited over a month for the cheaper stuff.
 
Thanks for the insight on cable tension Svyolo, I'm not really familiar with the swages, and all my turnbuckles and thimbles are already in the kit, so I'll stick with them.

But maybe on my next plane! :-)

James
 
I had to replace the nicopressed cables on the flap arm at the wing root with swaged cables from spruce so the nicopress didn't rub on the rear spar. It has it's uses.
Another place, and while I don't think many people if anyone chooses this route, would be the flying wires on the tail could be tensioned cable instead of the streamlined or round stainless material. You wouldn't want a nicropress out in the wind and elements. Either way cables are a lot more drag, but they're wildly cheaper.
 
I was going to do the same, I bought them and started making the cables. I have nothing against nico press, and the price is right, and I had already bought them. But then I started using the turnbuckles. I couldn't believe how little adjustment they have, although that does make them lighter. I read a comment that Bob doesn't use turnbuckles, and did a little ACS searching on their website.

MS21259's are swaged, threaded studs. They come in R and L hand threads, and they have a hole for a safety wire. I have 1 turnbuckle on the trim, and one on the elevator. The other cables have 1 MS21259 on one end with a threaded fork that gives just under an inch of adjustment.

I didn't do it, but I think a slick way to rig the aileron cable in the cockpit would be have 1 R hand and 1 L hand stud join in the overheard with a turnbuckle. Very clean and easy to adjust aileron cable tension.

Unfortunately I also bought a whole set of turnbuckles.
 
Right, sounds interesting - I'm a long way from ACS (and a 4 month turn-around on orders) - it looks like you need a pretty expensive (and hard to find?) tool AT520DC, plus the right dies to swage these terminals yourself. I might have to stick with the nicopress.

When I hung my wings off and drilled the flap arms, I was lucky - the cables just clear the rear spar plate. But I'll put some teflon chafe tape there just in case the cable slaps when I release the flaps.

I was thinking about putting a turnbuckle on the aileron cable at the location you describe, that would make it easier to remove each wing without feeding the cable right through the runs. But then I wondered whether it was worth doing this.

Maybe ZK when it's time do replace the flight control cables, and I've learnt what works and what doesn't, I might grab one of these swaged cables. On the other hand, I'd be interested in learning more about their use for the flying wires - did you record the cable measurements you used?

Ok, that's enough from me on the forum - it's time to plan a solo nav flight to Canberra and back this afternoon. My instructor keeps pressuring me to finally finish getting my pilot's licence, but building is more rewarding, and it gets in the way of the flying :-)

James
 
I did not use cables for the flying wires, I used round stainless because there's a guy up here that can make them and turnaround time was a couple days rather than the 6 months brunton's wants. I think for you there's a guy in NZ that can do streamlined or round.

I do have a turnbuckle in the middle of the fuselage for the aileron cable. Highly recommend that.

I put teflon tape as well on the spar, but it wasn't an issue except at full flap extension, then it rubbed.
 
Thanks, as always ZK - priceless information from a guy who's been there, and done what I'm trying to do.
You can't beat the wisdom on offer on this forum.

Survived the nav to Canberra, so back to building tomorrow :-)

James
 
Back
Top