

 Tweet
Tweet
Finally I have a system rigged up to produce rib flanges.
The two form blocks (which are copies of the working template) were run through the router using a flush cutting bit, an angled fence, and and inclined table. This resulted in a 10 degree bevel, one for “left†flanges and one for “right†flanges.
Using a 1/16 radius roundover bit in a small trim router, went around the working edges of the form blocks, even though the LSA book specifies 1/32.
Studied and thought a bit, then marked rivet locations. Then indicated the flute locations, which are slight grooves and serve as initial guides.
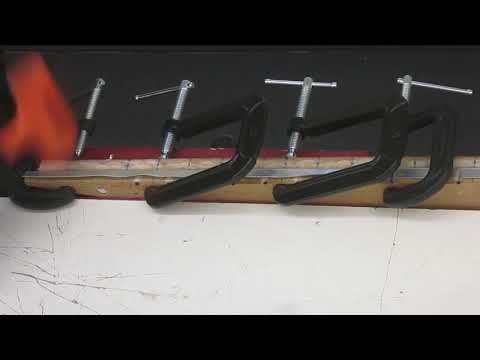
Gave the working edges and surfaces a couple of coats of a wood hardener. Hopefully this will help the form blocks and backup block hold up to the abuse.
Made a practice set up (form block and backup block) which replicates the tightest curve on the nose rib and worked on bending technique.
Making homemade fluting pliers was more a rite of passage than anything else. They are so-so, and I see how I could do better a second time. But it’s pretty hard on the drill press. Fluting pliers I bought from Airports Inc. work much better.
B-Spot on youtube inspired me to make a table mounted fluting vise along with the Vans-style rib straightener. The fluting vise gives a nice moderate 3/16 flute. And the Vans rib straightener really works, though I may need to refine the angle. It also serves as a flute reducer.
The only difficult areas are at the first three or four flutes over the front of the nose rib. These seem to require a bit of the store-bought fluting pliers to get a little deeper. And smooth-jawed pliers to go in and fine tune the flange. The trailing edge of the back rib is too tight for the rib straightener but it’s workable with the pliers.
So that’s the plan going forward: bend the flange over in the form block and start the flutes using a 3/16 rod and hammer. I can do a nose rib and center rib at the same time. The back rib is done separately. The pieces come out of the jig with close to a 90 degree flange. The flange is refined with the fluting vise, rib straightener and pliers.
The goal is to create rib flanges where the inter-flute surfaces match the line of the airfoil, as opposed to bowed surfaces between the flutes. Maximize contact between the flange and the skin, and not rely on the skin and rivets to pull the flange into shape.
We’ll see how it goes!
The two form blocks (which are copies of the working template) were run through the router using a flush cutting bit, an angled fence, and and inclined table. This resulted in a 10 degree bevel, one for “left†flanges and one for “right†flanges.
Using a 1/16 radius roundover bit in a small trim router, went around the working edges of the form blocks, even though the LSA book specifies 1/32.
Studied and thought a bit, then marked rivet locations. Then indicated the flute locations, which are slight grooves and serve as initial guides.
Gave the working edges and surfaces a couple of coats of a wood hardener. Hopefully this will help the form blocks and backup block hold up to the abuse.
Made a practice set up (form block and backup block) which replicates the tightest curve on the nose rib and worked on bending technique.
Making homemade fluting pliers was more a rite of passage than anything else. They are so-so, and I see how I could do better a second time. But it’s pretty hard on the drill press. Fluting pliers I bought from Airports Inc. work much better.
B-Spot on youtube inspired me to make a table mounted fluting vise along with the Vans-style rib straightener. The fluting vise gives a nice moderate 3/16 flute. And the Vans rib straightener really works, though I may need to refine the angle. It also serves as a flute reducer.
The only difficult areas are at the first three or four flutes over the front of the nose rib. These seem to require a bit of the store-bought fluting pliers to get a little deeper. And smooth-jawed pliers to go in and fine tune the flange. The trailing edge of the back rib is too tight for the rib straightener but it’s workable with the pliers.
So that’s the plan going forward: bend the flange over in the form block and start the flutes using a 3/16 rod and hammer. I can do a nose rib and center rib at the same time. The back rib is done separately. The pieces come out of the jig with close to a 90 degree flange. The flange is refined with the fluting vise, rib straightener and pliers.
The goal is to create rib flanges where the inter-flute surfaces match the line of the airfoil, as opposed to bowed surfaces between the flutes. Maximize contact between the flange and the skin, and not rely on the skin and rivets to pull the flange into shape.
We’ll see how it goes!


Comment