Bearhawk Aircraft Bearhawk Tailwheels LLC Eric Newton's Builder Manuals Bearhawk Plans Bearhawk Store

Announcement

Collapse
No announcement yet.

Avionics and Electrical Systems, Placement/Location

Collapse
X
 
  • Filter
  • Time
  • Show
Clear All
new posts

  • Avionics and Electrical Systems, Placement/Location

    I have spent the last couple of weeks (or was is months) finding a definitive answer on wiring up the airplane. I just wanted to place a "simple" Steinair order. Turns out everything depends on everything. The kind of wire and length you need depends on where you place the component. Where to place the component depends on the type and brand of the component. The type of component depends on the kind of mission you are building for. Do I ever want to fly to Greenland?

    Long story short I finally have come to a layout I am fairly happy with. I am posting it here with the intention to help future builders shortcut their journey. But I am also looking for feedback so I can further refine it. Please let me know if you see something that could be done better or should be changed.


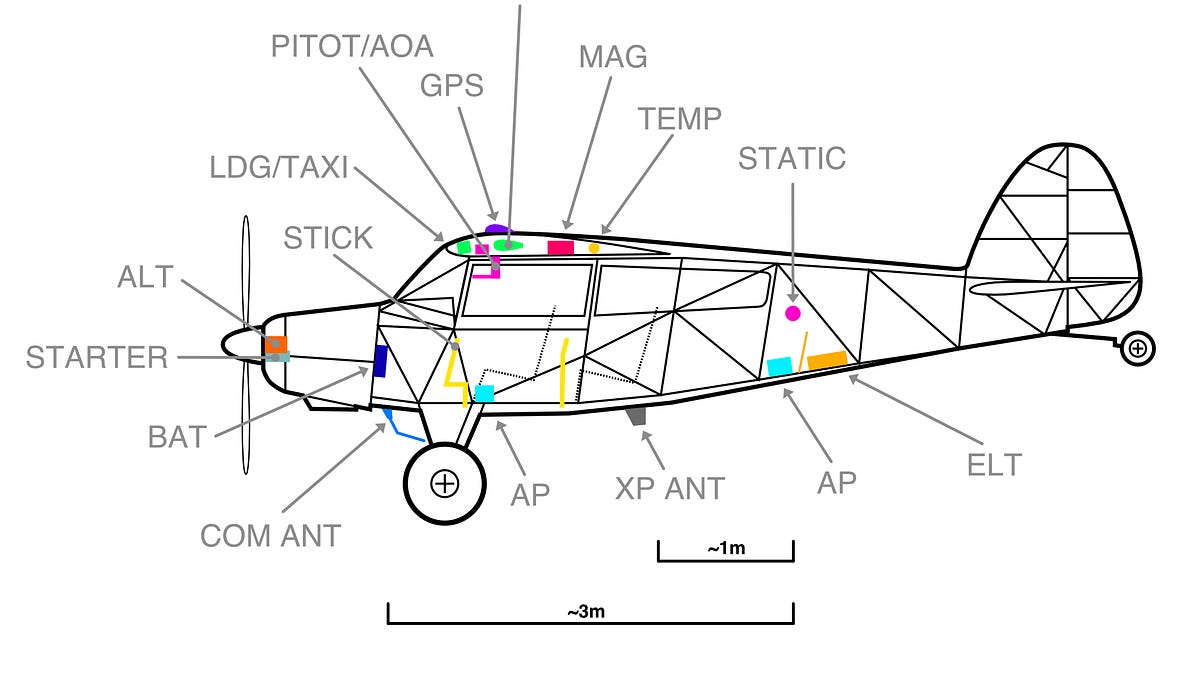
    bearhawk_avionicselectrical_side.png

    bearhawk_avionicselectrical_top.png

    Avionics Components
    • PFD - Garmin G5
    • MFD/PFD2/EIS - Garmin GSU 460
    • Sensor LRU - Garmin GSU 25C
    • Magnetometer - Garmin GMU 11
    • Temp Sensor - Garmin GTP 59
    • Pitot/AoA - Garmin GAP 26 (heated, regulated)
    • Engine LRU - Garmin GEA 25
    • VHF Com - Trig TY-91
    • VHF Antenna - Rami AV-17
    • Transponder/ADS-B/LPV - Garmin GNX 375
    • Transponder/ADS-B Antenna - Rami AV-74
    • GPS Antenna: Garmin GA 35
    • ELT - ACK-04
    • Autopilot Servo - Garmin GSA 28
    • Static Port - ACS 10-00250
    Electrical Components
    • Battery - EarthX ETX-900
    • Alternator - B & C L-40
    • Starter (with YO-360-A1A) - SKyTec XLT
    • NAV/ACL Lights - Whelen Blaze
    • Taxi/Landing Lights - Baja S1 flush
    • Stick - Tosten CS-4
    Last edited by noema; 06-24-2022, 03:57 PM.
    Bearhawk "XHawk" Patrol, O-360, Trailblazer 80", tubeless 26" Goodyears, Stewart Systems. See XHawk Build Log.

  • #2
    All the others seem to have easy access, but do you have an access panel for the ELT and rear AP? In my current airplane, accessing the ELT was a major PITA... During my last annual, I moved it (and re-wired it) for easier access. Not sure how anyone "legally" fulfilled the Instructions for Continued Airworthiness with the old placement...
    Jim Parker
    Farmersville, TX (NE of Dallas)
    RANS S-6ES (E-LSA) with Rotax 912ULS (100 HP)

    Comment


    • #3
      Thanks Jim for the feedback.

      I think I found a pretty good solution for accessing the ELT and AP servo. In my cargo bulkhead I will be installing an access panel at the lower right corner. This makes it possible to get to the ELT/AP from outside the airplane through the cargo door. Best of all it also allows me to extend my feet into the rear fuselage if I ever wanted to sleep in the airplane. The cargo bulkhead is also removable but may take 5min instead of 1min to remove.

      cargo_bh.jpg
      cargo_bh_b.jpg
      Bearhawk "XHawk" Patrol, O-360, Trailblazer 80", tubeless 26" Goodyears, Stewart Systems. See XHawk Build Log.

      Comment


      • #4
        Are you using the expensive Garmiin CAN24 wire? They used to recommend 22ga 2 conductor shielded for the canbus. I would recommend going with 22 ga unless you are using there "now" recommended wire which looks pretty robust. The instructor in the avionics installation class I took said 24 ga wire was fine behind the panel, but recommended 22 ga minimum for the airframe. I love your drawings, your layout looks good. What program did you use for the drawings?

        Comment


        • noema
          noema commented
          Editing a comment
          I am using the Garmin recommended CANBUS wire and not taking any chances here. If it fails a lot of devices go offline. Some devices have RS232 fallbacks and I will hook those up as well. One thing I was considering was placing the GSU 25 air/adhrs box close to the pitot and temp sensor. I decided against it because it makes the canbus unnecessarily long.

          I am using Affinity Designer for most of my drawings. It's a better, cheaper Illustrator. Good if you don't need CAD and like freeform drawing.

      • #5
        Nice planning diagram. The 6AWG wire for the 40amp alternator is larger than required so you could save a little weight by stepping down to 8AWG. Nothing wrong with the 6AWG though other than weight and it's stiffer. On the starter, many people get good results using 4AWG. Your distance to the battery is not long, and it's an EarthX, so I don't see any factors that would push you to 2AWG unless that Sky-Tec start just draws a huge amount of current compared to other starters. Again, no downside to stepping up to the 2AWG other than weight and wire stiffness. Since you are mounting the EarthX inside the cabin, you might consider the ETX900-VNT which has provisions for it to be vented overboard and is designed for in-cabin installations.

        Comment


        • rodsmith
          rodsmith commented
          Editing a comment
          For the 2 or 4AWG wire, welding cable is perfectly acceptable, cheaper and very flexible.

        • noema
          noema commented
          Editing a comment
          This is good to know, thanks. The VNT version seems like a good choice (at 0.2 lbs heavier). After watching some videos of LiFePO4 batteries being mishandled I understand why the venting is advisable. Even if the thermal run-away is fairly controlled with this chemistry they produce a lot of smoke.

      • #6

        Here is my verbose Blog entry with updated pictures:
        System overview of avionics sensor, actuators and electrical wiring.


        I decided I don't need a navigator and prefer analog standby alt/asi instead of a G5. Most of the device placement is still the same.

        In terms of wiring I have found a few handy multi-conductor wires. For example Steinair sells a 2C+4C for wiring up a Garmin GMU 11 magnetometer.

        I have also decided to Terminate the CAN bus differently.
        Bearhawk "XHawk" Patrol, O-360, Trailblazer 80", tubeless 26" Goodyears, Stewart Systems. See XHawk Build Log.

        Comment


        • Nev
          Nev commented
          Editing a comment
          Really like your Blog !

      • #7
        This is quite similar to how I laid out my Patrol. I seem to recall Garmin requiring a slightly bigger gage of wire for the heated probe but I will double check when back in the hangar.

        Comment

        Working...
        X