Bearhawk Aircraft Bearhawk Tailwheels LLC Eric Newton's Builder Manuals Bearhawk Plans Bearhawk Store

Announcement

Collapse
No announcement yet.

Work smarter not harder…with your drills

Collapse
X
 
  • Filter
  • Time
  • Show
Clear All
new posts

  • Work smarter not harder…with your drills

    Not sure if anyone has posted this before, I couldn’t find it so I thought I’d share…I have zero background in building aircraft and am about 6 months into my build on a 4 place model B. I’ve all but built my own hangar and have learned more than I thought was possible along the way, most of that is thanks to you guys and (and gals) the posts made here. I don’t post often but I read and subscribe to just about everything. I am a woodworker by heart, carpenter/framer by family request, and fixer of whatever’s (most things) broke when mom calls. Nevertheless, I’m a tool freak. The phrase “the right tool for the job” was engrained in me, admittedly and absolutely costly, mostly by myself when I got old enough to make money and afford my own tools.

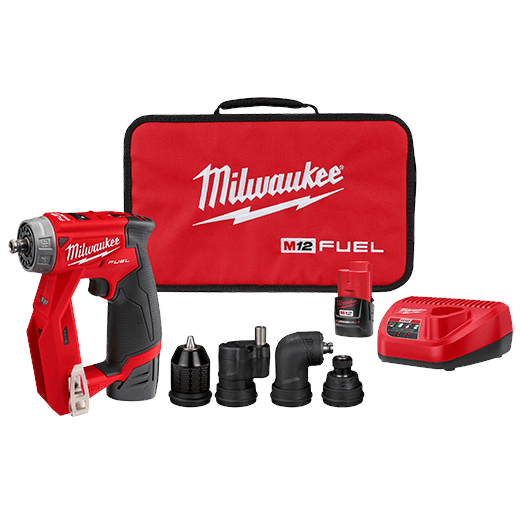
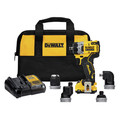
    one of the tools I had on my mind for a while but just didn’t have the need for, until I started building the BH, was the dewalt (Bosch is the OG but Milwaukee makes one as well) 5 in 1 drill driver. Link below. This is the coolest, most versatile little drill ive ever used. I’m only about 60% done with the left wing and this thing has already paid for itself. The ability to fit in tight spaces is unparalleled to anything I’ve used before.

    I also read (I believe in Eric newtons manuals) that it is preferred to use a drill press anytime possible for drilling any hole. While that is ideal and would absolutely produce the cleanest holes, I don’t find it to be practical as many times the hole that needs drilled is not in a “removable” part. I still use a drill press whenever possible but if I’m banging out a bunch of nut plates (fuel tank bay cover for example ) or drilling out any home made parts I use a handheld pneumatic drill. Super gluing bubble levels, I found cheap 10 packs on amazon, to the back and top of my drill really helps keep the bit centered as you drill. Center the bubble(s) before you engage the drill, if you use a pneumatic it gets slightly off when you engage the trigger, then start drilling. If I’m drilling thicker than .040 I stop intermittently to make sure my bubble level still checks out then go again. This has helped me a lot, especially with nut plates when using a nut plate jig, I found a slightly angled hole on one leg really makes it a bear to get the center pin and leg pin of the jig into the holes when drilling the second leg.


    You do not have permission to view this gallery.
    This gallery has 5 photos.

  • #2
    Forgot to mention in the post but the dyna swivel connections I bought from grainger really make working with pneumatic tools much easier,the swivel connection keeps your air line from getting in any type of bind. They’re expensive but totally worth it in my opinion

    Comment


    • #3
      Great post...that stubby DeWalt and the short Milwaukee version are handy and avoids the 'Air Hose Fandango' when it's just a few holes. Good luck on the rest of your build!

      On the swivel connectors, have these on most of my air tools, and need to be on all of them! Amazon has the composite version (94300; lighter, but over-tightening or drops onto concrete are a bad idea ) and the all-metal type (95460) you pictured... $17 and $24.04 respectively. Search gets a bit wonky on the site, so here are the links:

      The aluminum version:

      https://www.amazon.com/Dynabrade-95460-Original-Dynaswivel-Connector/dp/B000XRTZJ2/ref=sr_1_88?crid=1KUEQYMNANIXE&keywords=dynabrade+ dynaswivel+94300&qid=1653561168&sprefix=dynabrade+ %2Caps%2C91&sr=8-88

      The composite version:

      https://www.amazon.com/Dynabrade-Products-DYB94300-Dynaswivel-360-Degree/dp/B00065TPKK/ref=pd_bxgy_img_sccl_1/146-6285793-4964549?pd_rd_w=cpOZm&pf_rd_p=6b3eefea-7b16-43e9-bc45-2e332cbf99da&pf_rd_r=P8Z8A06CW50EADKYX94M&pd_rd_r= d371a556-deb5-40b5-92e7-846a2ffb1b67&pd_rd_wg=d9akg&pd_rd_i=B00065TPKK&psc =1

      The Chinese version from Harbor Freight is not horrible, and at $5 per is very affordable, but the Dynabrade version is made in Taiwan, so gets my money.
      Last edited by SpruceForest; 05-26-2022, 07:34 AM.

      Comment


      • #4
        Nice, I never found anything like that when I was building. I ended up buying (and sometimes even using) a pneumatic drill because it was the shortest drill I could find. I really didn't like the noise that went with it so I only ever used it on the holes that I couldn't get to any other way.
        Rollie VanDorn
        Findlay, OH
        Patrol Quick Build

        Comment


        • #5
          I found this Bosch drill to work best for me. Compact, brushless and powerful. Gets in tight spaces.

          Rob Caldwell
          Lake Norman Airpark (14A), North Carolina
          EAA Chapter 309
          Model B Quick Build Kit Serial # 11B-24B / 25B
          YouTube Channel: http://bearhawklife.video
          1st Flight May 18, 2021

          Comment


          • Bcone1381
            Bcone1381 commented
            Editing a comment
            Rob, I think you did a video on that drill, so I bought one. I seldom get my air drill out any more. Small and compact.

            This is the first time I've seen a drill with attachments. Bosch's product is called The Bosch Chameleon. I use a 90 degree drill attachment that uses 1/4 inch threaded drill bits for real high places. Those angle attachments are pricey.

        • #6

          So far I was able to reach any hole with (1) short and 12" drill bits (2) compact battery-powered drill (3) battery powered angle drill and (4) an air drill with a small chuck. I am not sure I could have done some tasked with only three out of the four.
          Bearhawk "XHawk" Patrol, O-360, Trailblazer 80", tubeless 26" Goodyears, Stewart Systems. See XHawk Build Log.

          Comment


          • #7
            We used a 12v DeWalt drill for the majority of the holes and an 18V for some. Dremel has a right angle drill attachment and could drill in awkward places with the smaller battery powered Dremel. We cheated on the top wing rib skin rivet holes. We laid out all the rivet lines on masking tape on the rib top sides between the spars and drilled undersized holes for the rivet locations. The layout masking tape removed from the ribs & the top side skins were mounted. The ribs between the spars were straightened with a straight edge then the skins drilled from the underside with the compact rt angle Dremel using the same undersized bit. The rib hole holds the drill from skidding around with the rivet holes perfectly located every time. The person on the skin side would drill the hole immediately to the final size and cleco. Every rivet is exactly where it needs to be. A simple process with a little time doing the layouts on the ribs but the time is made up with the speed and accuracy of the back drilling the skins through the rib rivet pilot holes. Secondly use the cobalt drill bits as they stay sharp forever and the long 3/32-1/8 bits can be twisted and bent with a guiding hand to a point any regular steel bit would resist or snap. The Walter bits are excellent as well.
            The air drill was used for the first few holes and quickly bounced for the lighter 12v cordless drill.. The cordless drill is infinitely quieter compared to the shriek of an air drill motor and a big compressor running in the shop. There was no advantage to using the air tools compared to the cordless drill and the very compact cordless Dremel with the right angle drill head attachment.
            Last edited by Glenn Patterson; 06-22-2022, 09:35 AM.

            Comment


            • #8
              The MILWAUKEE® M12 FUEL™ Installation Drill/Driver Kit is a 4-in-1 solution with interchangeable heads, unrivaled access and control.


              That is a light weight 12v setup that more or less replaced my air drill, but it comes with a right angle adapter and offset driver adapter.

              For really tight stuff, I'll just bust out this gem:

              ATS 900 Angle Air Drill This is the drill you need to get into those tight spaces. It has a head height of just over an inch, and produces enough torque at 2800 RPM to drill through steel. Excellent speed control, and has a solid, well-bala

              Comment


              • #9
                As long as all you are drilling into is aluminum your bits will last a long time but when you start drilling steel and especially stainless steel, you will have to start buying them 10 at a time. That is unless you get a drill doctor to sharpen them. But that takes time and drill bits are cheap.The line swivel and the right angel attachment are great tools too.

                Comment


                • Bcone1381
                  Bcone1381 commented
                  Editing a comment
                  In addition to davz great advice on drilling stainless....the enemy is heat. Heat kills the drill bit edge. Stainless is hard. The key to drilling SS is go slow and lube the bit and press hard. Force that cutting edge to do its job at a cool temperature. Its not a place to use your 10,000 rpm air drill.

              • #10

                We help each other when we promote places that have proven themselves. If you regularly buy a common drill bit (3/32" or number 40 for example) from a hardware store or home depot, you need to rethink things.

                Cobalt Drill Bits for the toughest aerospace drilling jobs in hard aircraft metals such as steel, chrome, titanium, inconel and stainless steel


                PanAmerican has a $50 minimum order. Colbalt Jobber bits are sold by the dozen and come in a small nice envelope. Every bit is marked with its size....I like that...I seldom use my drill bit index tool.

                A 6$ portion of BoeLube extends life of a drill bit 2X if not more and will last an entire build. No bit will last forever. When in doubt, change it out. If it creeps off target when starting it, it's probably time to change.

                I like to see Boelube melt onto a hot bit for some reason. But it seems to work when cold too.
                https://www.aircraftspruce.com/catal...es/boelube.php
                Last edited by Bcone1381; 06-23-2022, 11:22 AM.
                Brooks Cone
                Southeast Michigan
                Patrol #303, Kit build

                Comment


                • #11
                  One "tip" I learned (the hard way, like always) is that if you're going to throw the dull bits away, do so immediately upon learning it is dull... For a while there, I tried saving them "to sharpen later" only to never get to it. Then I'd pick up one of the dull bits and 10 minutes later I'd realize what I'd done... Can you say "Arghhh"?
                  Jim Parker
                  Farmersville, TX (NE of Dallas)
                  RANS S-6ES (E-LSA) with Rotax 912ULS (100 HP)

                  Comment


                  • #12
                    Originally posted by Bcone1381 View Post
                    We help each other when we promote places that have proven themselves. If you regularly buy a common drill bit (3/32" or number 40 for example) from a hardware store or home depot, you need to rethink things.

                    Cobalt Drill Bits for the toughest aerospace drilling jobs in hard aircraft metals such as steel, chrome, titanium, inconel and stainless steel


                    PanAmerican has a $50 minimum order. Colbalt Jobber bits are sold by the dozen and come in a small nice envelope. Every bit is marked with its size....I like that...I seldom use my drill bit index tool.

                    A 6$ portion of BoeLube extends life of a drill bit 2X if not more and will last an entire build. No bit will last forever. When in doubt, change it out. If it creeps off target when starting it, it's probably time to change.

                    I like to see Boelube melt onto a hot bit for some reason. But it seems to work when cold too.
                    https://www.aircraftspruce.com/catal...es/boelube.php
                    I really second Brooks recommendation for pan American tool. Great quality and great price. That is where I buy all my drill bits. Cheap investment get all the sizes you need early on
                    John Snapp (Started build in Denver, CO) Now KAWO -Arlington Washington Bearhawk Patrol - Plans #255 Scratch built wing and Quickbuild Fuselage as of 11/2021. Working on skinning the left wing! -Ribs : DONE -Spars: DONE, Left wing assembly's: DONE., Top skins : DONE YouTube Videos on my building of patrol :https://m.youtube.com/user/n3uw

                    Comment


                    • #13
                      Our cobalt drill bits came from Brown Tool. They lasted forever and the 12 inch ones were twisted every way to Sunday and took it. The bits are made in the USA which is won of the reasons that we went with Brown Tool for the quality. A 12" bit finally broke near the end of the build and it was amazing they lasted like they did. We bent and tortured the long bits. We had a can of tap and cutting oil that worked well for drilling thicker aluminum and especially steel. The unibits were Irwin cobalt bits. Forstener bits were used for accurately cutting the aileron counter weight holes and for some of the cable fairleads. A jig was made to locate the aileron ribs in the same location under the drill press. Flat pieces to be drilled with the forsteners were clamped the same as using any other drill bit. The forstener cuts a clean circle against a plywood backer and work well even if they are intended for wood. I used the forstener bits on the aluminum and they have been used on many wood projects afterwards.
                      The fractional bits used for steel were Walter bits bought at the local Graingers as they are an industrial quality bit that have a reasonable life. The mill supplied Walter bits to the toolcrib and trades so that experience drove our using the Walter bits. We could buy them as needed so no ordering or waiting. The local Graingers sold to mill employees at the same discount as the mill which was a considerable savings for a lot of the consumables. The important thing to drilling steel is using a good cutting oil and running the drill or drill press slow. Slower speeds with cutting fluid cuts efficiently and it keeps the bit cooler which preserves the drills cutting edge. Run a drill bit fast in steel will heat the bit up and will quickly dull the bit. It is human nature to lean on the drill and go faster if the drill is not cutting fast enough which will in the end take longer or fail.

                      Comment

                      Working...
                      X