Fuel cap lost

Nev

Quick-build 4-place B #25
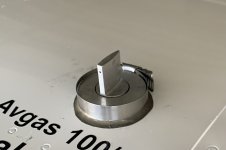
Today I refueled my Bearhawk and replaced the fuel caps. On landing we realized that the left fuel cap was missing. We don't think it had been left at the fuel pump (but if it turns up at the local airfield I'll eat some humble pie and buy a round of beers).

The fuel cap had the O rings lubed with a thin coat of EZ lube. It had been difficult to remove even with the lube and I had problems reinstalling it correctly with the air vent facing forward. Because of this I had removed it again and then reinstalled it. It seemed secure, but may not have been as tight as the right one.

To elaborate further, we searched the (rather remote) landing area for over an hour, thinking it had most likely come off on touchdown. Later, we checked the fuel quantities and realized the left tank (with the cap missing) was showing full, and the right tank (with the cap in place) was showing 60 liters. The short flight had burnt 20 liters, meaning that we were missing an additional 20 liters approximately from the opposite tank. Probably the siphon action from the missing cap has pulled fuel through the fuel selector (in BOTH) to the left tank.

I'm struggling to understand what forces have caused this to happen. I wouldn't think that external forces would be sufficient to pull the fuel cap off. I wonder if some sort of hydraulic action internally has contributed. Any thoughts appreciated. Has anyone else had this happen ?
 
Last edited:
I've done a thread search and found Marks advice from this thread HERE :

Occasionally we hear this. If using some grease on the o rings with the o rings uncompressed - doesn't allow the gas caps to go in and out OK - then there are a couple things. Fuel Lube is usually NOT recommended for the gas caps because it is slippery that normal fitting gas caps can loosen and be lost on a flight. But if the caps are too tight after grease - this Fuel Lube can make them work sometimes.

Other option is to take .005 off the body of the gas cap where the o rings sit. Mark

This goes some way to answering my questions above. I've misunderstood the advice to use EZ turn and put a thin smear onto the O rings,
 
Last edited:
Bob's technique is to smear a little engine oil on the o rings when he gets fuel. I put a little bearing grease into a little zip lock plastic bag that I keep in the plane - and put some grease on the orings every now and then. Not every time I flew. But perhaps every other time.

The EZ lube or Fuel Lube is very slippery stuff. There have been a few fuel caps lost when using it. But like I said - if the fuel caps are still too tight with grease or engine oil - EZ lube can be the best thing to use. Mark
 
Nev.
I have taken to putting the last dribble of fuel out of the pump onto the O rings each time I refuel. Then turn the cap to just start squashing the O rings, and then back off about an eighth of a turn. Push it in and then tighten fully. The fuel makes it easy to push in without being too slippery, and it ends up tight and facing the right way each time. I haven't lost a cap yet ..............

Very interesting commentary on the hydraulics issue. It appears that the missing cap allows the tank to de-pressurize pulling fuel through to the opposite tank. A bit worrying that this would eventually empty both tanks! Maybe a good reason not to fly on BOTH.
 
Very interesting commentary on the hydraulics issue. It appears that the missing cap allows the tank to de-pressurize pulling fuel through to the opposite tank. A bit worrying that this would eventually empty both tanks! Maybe a good reason not to fly on BOTH.

In theory it probably would. I guess in practice if this happened you could then select either L or R tank prevent a further transfer.

If selecting the fullest tank (the one with the missing cap) I'd want to be flying high enough to cope with an engine failure as I suspect the fuel might be reluctant to flow down the fuel lines due to the large pressure differential.

When I thought back on yesterday's flight, I did remember doing a fuel check before landing and thinking "that's odd" when the sight gauges were uneven with the ball centered. In hindsight it was the first indication of an issue, but we landed shortly after that. I think if we'd been on a longer flight, the miss-match between sight gauges, and the miss-match between the total fuel (from the sight gauges) vs the fuel flow transducer, would have alerted us. If I see that again then I'll switch to one tank and prevent further transfer.

One thing I would definitely do differently before getting airborne, having landed out and needing to fly home with a fuel cap missing (thank god for gorilla tape) and a fuel imbalance, I would select BOTH and raise the full wing to allow the fuel to flow into the tank that had the cap (and vent) on.
 
Last edited:
I have had a similar instance and once I saw the uneven feed in the sight gauges, I switched the selector to the full tank and it worked great. I think there may be some low pressure on the open tank side, but there is also definitely positive pressure on the capped side due to the ram air vent. I'm not sure to what degree each factor contributes.
 
The local engineer said he saw an aircraft get airborne once with the fuel cap off, trailing on the chain. He said it looked like a geyser as the fuel shot out the filler neck.
 
Last edited:
Difficulty in removing a loose cap is one of the root issues in this event.

When I loosen my cap the "squeeze pressure" on the O-ring is relaxed, and pressure that holds it in place is released and it should easily come out. But when my caps are "released" it is still quite difficult to remove like Nev's. I dont like it.

I see myself dealing with this on a ladder and I like it even less. Comparison of the tolerances of my caps against the caps engineering diagram including the o-ring in on my todo list. If mine is right, then I've thought about experimenting with a different o-ring. I've often wish I had a different cap, but if I can fix it I will be happy and accommodative. If its always sticky to remove I'll never like it. Extra caps from Mark seems essential.
 
I have had a few caps disappear in flight.
The method that seems to be working for me is the application of some fuel to the O rings when placing the caps in the neck and then tightening the cap tightly using a tool that I made.
Finger tight doesn’t seem to do the job.
The tool is made from UHMW plastic but my original was made from hardwood.
Haven’t lost a cap since. Still carry a spare cap just in case….
 

Attachments

  • photo12013.jpg
    photo12013.jpg
    1.3 MB · Views: 1
It does seem that the fuel caps are coming off with a higher frequency than I first imagined.

On mine, I've struggled with them on many occasions. It's probably "operator error", but the design doesn't really lead to intuitively getting it right. One compounding factor is that it's an awkward position - braced on the strut and reaching out with one hand to fit the caps. So far it's resulted in an inconvenience to us as the operator, but there could be a more serious incident.

I do wonder if we should be collectively working on a better solution.
 
Last edited:
It does seem that the fuel caps are coming off with a higher frequency than I first imagined.

On mine, I've struggled with them on many occasions. It's probably "operator error", but the design doesn't really lead to intuitively getting it right. One compounding factor is that it's an awkward position - braced on the strut and reaching out with one hand to fit the caps. So far it's resulted in an inconvenience to us as the operator, but there could be a more serious incident.

I do wonder if we should be collectively working on a better solution.

Where's Kevin? Bearhawk272
 
Someone at Oshkosh last year was talking about redesigning the fuel caps. I haven't heard anything about that since, but it has been on my mind....
 
The design as it stands doesn’t seem to be a problem. Very straight forward using easily available and replaceable parts; nothing that will be unobtainable due to a specialty manufacturer ceasing business.
The O rings probably can’t be tightened enough to do any damage to the filler neck.
Losing the caps is just a case of not being diligent on my part.
 
Rod,

IO-470 with a little bit of ignition and exhaust magic.
sits up 10 inches from stock, which makes it like a jungle gym to enter….. keeps me in shape.
 
  • Like
Reactions: Nev
I've been thinking further about how the left tank with the missing fuel cap was completely full after we landed, and the right tank (with the cap still on ) was missing 30 liters (over and above the fuel burnt enroute). I had the fuel selector in BOTH the whole time, so it's evident that the low pressure above the left wing was pulling fuel through the fuel selector from the right tank. No surprises.

A question in my mind for a while (from the extensive fuel discussion thread HERE ) was whether fuel could flow from one tank to the other via the fuel selector, and the engine keep running. Obviously it can, because around 30 liters (probably more) flowed across in a very short period of time, yet the engine kept running.

The next step would have been once the right tank was completely empty, whether the low pressure above the left wing would have prevented fuel flowing out of the left tank to the engine. If so, it may mimic what happens when flying out of balance. Thankfully I wasn't the one to test that scenario.

Has anyone who lost a fuel cap in flight seen what happens if a tank is completely drained ? Does the engine stop ?
 
Last edited:
I made my own per the plans and so far seem fine.

But if I was to make another set, I would turn a slight taper on the inside of the filler neck(slightly larger ID at the base then the top) so if the cap did try to "slide up" it would only become a progressively tighter fit in the neck.

Hard to retrofit but would be easy to do when making the filler neck.
 
  • Like
Reactions: Nev
I've lost 3 caps in 4 years. I haven't figured out exactly what the cause is... sucking vs some hydraulic effect. I started using a crescent wrench to tighten them very tight... still lost one after doing that. The only thing I really don't like about my BH is the fuel caps. Hard to get off yet they fly away sometimes.

I used one of Kevins prototype caps and it was heaven!! :-) I know you've got a lot on your plate Kevin, but your caps were great and I would gladly pay a lot for them... even if they aren't perfect yet.
 
Last edited:
Based on my experience................

It has become a huge red flag for me when someone walks up to me while I'm fueling and starts asking me about my Bearhawk. I kinda go to a place of euphoria and a bit of a distracted little kid. I've left a fuel cap on the ladder at KENV and took off across the desert. Pure pilot error, not fuel cap design.

To answer your question Nev. In flight, the tank with no fuel cap will show full and will suck the capped tank down rather quickly with the fuel selector in BOTH. Negative pressure above the wing. The engine will run fine. However, I did not test to one tank completely empty

I did notice the unusual gauge glass readings rather quickly and made a precautionary landing at the next available landing site. Boy, is that a dumb feeling. I put my extra cap on and returned to KENV to retrieve my cap and replace the lost fuel. The only bright spot was fuel was half the cost it is now.
 
  • Like
Reactions: Nev
I'm sure I am in the minority here, but I've had a decade of trouble free service from our caps - I find them easy to use, once I got them set up correctly and 'worn in'. They do need a few drips of fuel on them, or on the filler neck, if temperatures are freezing cold. I have also done a little tinkering with them to make them work smoothly.

You need to have fuel resistant grease inside the cap - on the threaded metal-on-metal parts only. I would not advocate putting any lubricant on the O-rings (other than fuel), based on what I have heard.

We've left a cap off once before, but pilot error not design issues. I have a refueling process which prevents that from ever happening again.
 
I’m mostly with Battson though my experience is much shorter. While I’m not fond of the caps I’m never had any functional issue with them. I put lube on the threads so they don’t gall and if a cap is stiff to remove I get a couple drops of oil from my engine vent tube, smear it on the o-rings then it slides in nicely.

That being said, I don’t let anyone else touch the caps and I’ve had issues with lineman saying they won’t fuel my plane if they can’t remove/install the caps themselves. Some bologna about liability. For that reasons and some personal preferences I can see myself changing out the caps for standard J tube caps should I ever need to remove the tanks for some other reason.
 
I’ve lost one when I first started flying the Bearhawk. I tried the fuel on O rings and it never worked so I use a small amount of plumbing grease. I hate putting on the gas caps…so challenging to get it lined up right. I really hope a new design will come out. I crank them now but keep a spare just in case. Judging by the regularity of this maybe I should buy a few more spares!
 
I like the venting approach, but the chance of "loss in flight" outweighs the "simple to build" in my mind.

The pic shows a rough model I've been playing with and have most of the tolerances figured out. Before I "lean it up" I decided to have on 3D printed this weekend. I'll post better pics when we get it done.

The cap is 1.5" in diameter and retains Bob's vent feature. A threaded flange would weld to the tank, the Body of the unit would thread into it, allowing vertical height adjustment of the cap. There is a lock washer (tab type) that keeps the body and cap from rotating and is captured by the locking ring/nut, which is also safety wired (not shown in the pic).

To open the Cap, you push down on the vent fin slightly and rotate 30 degrees. This allows the "key" to disengage "anti-rotation notches" on the bottom of the body and then clear slots cut in the body to be removed. The Spring pushes up on the cap and key, so once the key is disengaged the cap is pushed vertically. The design in dummy proof (until the make a better one) so you can't partially install it, its either engaged or it sits proud of the top of the body. The Spring is currently at 5.5 lbs which should be more than enough to keep the key engaged even in a dive (150% air pressure margin). O-rings are Viton and found the manufacturer that makes them out of just about everything to be fuel (ethanol) compatible.

With a little luck I'll have a 3D printed "demonstrator" with me at OSH...and looking into a couple local CNC couple shops to build. I would like to get with Mark G to see if he and Bob are interested in them for the production aircraft. more to come...

Andy Johnson
1423B - Scratch
 

Attachments

I've never had an issue of them coming off. Typically they're a pain to take off. If it's properly installed and clocked, there's no way in the world mine would come off.
 
This was my solution, I gave the BH caps I made to a friend and made these. They will have like an inspection plate covering it for access
 

Attachments

  • photo12158.jpg
    photo12158.jpg
    1.4 MB · Views: 1
  • photo12159.jpg
    photo12159.jpg
    1.4 MB · Views: 1
  • photo12160.jpg
    photo12160.jpg
    1.7 MB · Views: 1
2017-02-03 Fuel Tanks 003.jpg2016-12-15 Fuel Tanks 002.jpg2016-12-13 Fuel Tanks 003.jpg Different strokes I bought fuel caps and flanges from Van's same as I had on my RV8. I vented by way of tubing out with three loops in wing then out under wing . Flanges are inverted.and cap installed. It works for me . No lost caps. Stinger LSA 300 hrs
 
I have a question. Not having built a tank with rivets, is the sealing material going to seal the holes in the corners or are the holes for clecos and you are welding the corners and seams.
 
Pro seal does it all, however forming the aluminum in such a way making nice corners . No welding. Stinger
 
Stinger, I did the tanks on my first two Bearhawks in a similiar way. Since I had built an RV previously, I was familiar with the rivet/proseal procedure. I am curious how you did the venting with the loops in the wing. I looped my vent tubing in the tank itself, but still got some fuel out the vents at times. Collin
 
I responded to a similar topic on another thread. Forgive me for repeating myself. A future builder a year from now might appreciate/benfit from my experience.

Before, I wished I had Stinger's or Collin Campbell's caps. My factory fuel cap was very difficult to remove.

Then I replaced the O-rings with a Dash 323 size which is one step smaller. Now I feel the Factory Cap fits just right. Before it was so difficult to remove I felt it was a hazard to me from multiple fronts....lubrication leading to a cap loss, ladder fall risk, damage risk to the cap/tank by using a tool to help pry/removal, etc.

The old O-rings were Dash 324, the new is Dash 323. This change was made through Mark, who consulted Bob. It was a quick, easy mod about the time and cost of a milk shake. I see no need for O-ring lubrication, and once released I gently rock the cab back and forth 2-3 times to work it out of the filler neck. The cap is very secure when I crank it down tight. I like the idea of tool to increase torque of the cap.

Beware, I'm still building so I have an experience issues in this arena.
 
Last edited:
Collin, vent tubing should be on the outside of the tank (if we're talking about the 3 sides and down method) so the fuel can never siphon.
 
Do you remember from where you sourced the rings Brooks? Looks like it’s not a standard size found at my typical shops.
 
Well, I joined the list of those that have lost fuel caps in flight today.

I’d filled to the gunnels for our days exploring. After about an hours flight Nev noticed we were streaming fuel from theRH tank. It seems it’s very tricky to get them tight enough to stay put without needing to be prized open with a screwdriver. I’m in the market for different caps.
 
I think an alternative design would be welcomed by the market schu

While I wouldn't personally be in the market for a new set, I think the demand is definitely there.
 
  • Like
Reactions: Nev
Schu, Based on so many folks losing caps I would be interested in purchasing your caps when they become available.
Tim
 
Schu,

I have caps out there flying. Right now, completing my Bearhawk is my [NODE="1"]Home[/NODE] priority and I am not going to get distracted at the last 3.258 %
I like several features of your design.
If you care, send me your e-mail and I can answer directly some of your questions and share my discoveries.

Kevin

Bearhawk#272@

Drop the # and add Geemale
 
The vent line is indeed outside the tank on the out board side of the wing. The small amount of wing dihedral helps. I placed the three loops of the vent tube two bays out from the tank , putting the tubing as high as possible in the wing.with three loops then ran the tubing further outboard staying high and exit through the bottom of the wing outside the wing strut . Tubing is then bent forward for to capture air flow .. Works for me ! Stinger
 
Here is a sneak peak of the design. I'm missing the o-ring groove in the render and of course I need to build several that will get thrown away while working through the tolerances. One concern is how consistent are the filler necks? Right now the outside diameter is 1.72 which is .0035 smaller than measured in one bearhawk. I'll probably want to take this to 1.71. Perhaps some of you can tell me the diameter of your necks to see how close they are.

As far as safety, the bottom screws will have notches cut and staked like an andair valve to ensure they don't come loose.

Also missing the notch that will indicate them in the filler neck.

I like the mechanism which you have selected. I have been imagining solutions, your design is similar to what I had in mind. I think it's perhaps the most elegant design achievable without changing the filler neck design. Part of me thinks the best solution may be a different filler neck, but I haven't really thought it through.

If there was some way to ensure a good seal with downward pressure.... Perhaps if the O-ring was at the top up against the rim, in a recess, and then the design allowed the mechanism to close and apply a small downward force on the cap (tapered locking arms perhaps?). Just thinking out loud, you probably don't need extra ideas :)
 
schu

I am still working on my fuselage, in the covering process, but will look at the fuel ID when I start on the wings, love your design
 
In measuring one of my tanks, the ID is about 1.725 according to my caliper. The height is hard to determine because of the weld, but if I measure from inside the tank to the top edge, it came out to about 7/8"
 
Mine are ID 1.72 inches. Depth 22 mm. Apologies for the mix of metric/imperial.
 
I'm sorry, let me be more specific. When the ID was measured in one direction, it was 1.72", when turned 90 degrees it was 1.73", thus my statement as an average. My digital caliper only shows measurements in 100ths of inches. In terms of the depth of the neck, you want it from inside the tank? I only have one tank at home, so I'll have to measure the other when I get to the airport where the other wing is currently stored
 
"Machine it, draft it, build it, brake it. Everytime something new gets built the whole world advances." M. Paytey

Experimental aviation has the element of learning ......

If a cap was inserted into into a tube, then hung it from a chain hoist with a "fish scale" maybe we could measure how much force it takes to remove it, then change things around like O-Rings, lubrication, try various torques on the cap.

So far, my take-a-way is from this thread.....torquing it down with a tool like what was posted by mbaerobat in Post #12 and no lubrication seems prudent to me. Our caps stay in place in a large part due to pressure those o-rings apply to the filler neck. Lubrication can only help them sneak out.

I hope to test mine some day. For now I'll build and keep an eye out for a tube similar to our filler neck.
 
Last edited:
  • Like
Reactions: Nev
Looks awesome.

Devil's Advocate:
-are all components large enough to NOT plug a fuel port, if it were to disassemble
-if the profile of the vent is not the same, has the icing propensity changed
-like you said, preventing movement would be great to prevent debris/failure from chaffing

Angel's Advocate:
-You're a genius if you can also resolve fuel spillage from expansion, without breaking any ventilation rules (like no traps)
-Incorporating a key so you don't come back to an empty plane lol
 
Thought I would chime in here with some comments from me and Bob. Just spoke with him about this thread.

First - he and I have no issue at all with someone using a different fuel cap. That is your choice as homebuilders.

But I would like to say again that in 1200 hours on my 4 place with me and a bunch of demo pilots flying - there was never a lost cap. And Bob with cumulative 2,000 hrs + on his planes has never lost a fuel cap. I would say that maybe 10-12 caps have been lost by customers over the 20 years. Bob says he tightens his down and then tries to pull it out by hand. If you can not pull it out by hand pulling hard - Bob feels that there is no way the breeze would loosen a cap and allow it to depart the plane. Sometimes it does take two tries to get the cap tight with the air vent facing forward.

Over the years the biggest complaint I hear some times is that the cap is hard to get out. I then ask if any lubricant was used on the o rings. Maybe half the time the answer is no. Mostly some lubricant solves the issue. I use a little bearing grease I would keep in a zip lock baggy, and Bob uses a little oil from the dip stick. What is usually NOT good to use is Fuel Lube. That is slippery stuff and can allow a gas cap to come out.

In the past I urged the builders with tight caps to turn down the OD of that area .005-.009. Makes a big difference. An easier solution is what Brooks suggested (and Bob approved) to use one size smaller o ring so it compresses the o ring more and can solve a too tight cap issue.

Once Bob looked at a drawing for a fuel cap that he thought would work fine but had one problem with it. If something in the cap broke or the threads galled - you could not get the fuel cap out without destroying the filler neck of the tank. So what I am saying is that the green grass over the hill might or might not be as green as it looks. I know Schu well and how capable a person he is. This cap he is working on might be fantastic. No problem from me or Bob with him designing one and offering it.

I really believe that most issues with the fuel caps are because Bob and I have not provided his guidance on how to use them as he wants. Hopefully soon we will have some written guidance with the caps on how best to use them. Mark
 
Has anyone measured the actual roundness of the fuel tank opening. Welding may well distort the diameter to where one O-Ring size will not work. It would seem a clamping arrangement that seals the upper lip would be a more consistent solution.
 
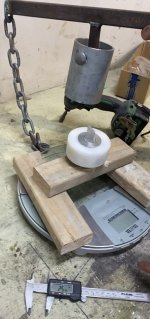
NZ Bearhawk Patrol builder Graham Johnson has a background as a toolmaker. After I told him of the issue, Graham came up with a couple of ideas. His initial thoughts were to try and make the original fuel cap work better. To do this, he made a test rig to check the amount of force required to remove the fuel cap in different scenarios. He also turned a mock filler neck from nylon.

The criteria we used was:
- It had to easy to install and remove with one hand (modest strength), and no tools.
- Simple to get the vent facing forward with sufficient and consistent O ring compression every time.
- To explore Grahams idea we wanted to use the existing fuel cap, and minimal machining.

Original Fuel Cap
We started with the original fuel cap, as it comes with the supplied -324 O rings. The original fuel cap required over 25 kgs of force to pry off when secured properly without lubricant. However the difficulty installing and removing it is why so many of us used a lubricant or a screwdriver to assist.

Using grease as a lubricant, the fuel cap then required such little force to remove that the weight of the test rig provided more than enough force with a reading of around 4 kgs. When we wiped much of the grease off, the friction force increased to 9 kgs. With such little force required, in combination with the hydraulic action of the sloshing fuel, it's easy to see why this is problematic.

Different O Rings
Next, we tried a variety of different sized O rings, looking for a simple solution. We tested each combination with and without a lubricant. After trying many combinations, there were two potential candidates. An imperial -323 (one size down from the supplied -324) showed promise. However the inside diameter of the -323 is lower, so after stretching it to fit the unmodified shank, we were back to the same OD as the -324 and it was difficult to fit and remove by hand,

We then tried a metric 34mm ID in 4.5mm thickness. This worked better, but required quite a lot of force to tighten and compress the O rings out to provide enough engagement. An ideal size would seem to be 34mm ID and 4.75mm thickness, but we haven't sourced one yet.

Filler Neck Groove
Graham then added a very small groove to the inside of the filler neck, to engage with the top O ring. Although not a mechanical lock as such, the groove increased the "friction" in all situations by at least 50%. This made a huge and measurable improvement, but it does require a specialist tool to add a groove. Graham has designed a tool to do this, but at this stage we're still exploring ways to do it without the groove.

Engagement Pin
One thing we noticed is that when lubricating the O rings, we lost friction in the lower fuel cap body, and often it spun as we tried to tighten the cap into position. This meant that we were not able to tighten the fuel cap properly when it has been lubricated, and probably explained why a number of them have departed inflight. Not only did the lubricant reduce the friction between the O rings and the filler neck, it also prevented the same amount of ring compression from being applied, resulting in the cap not being able to be tightened. Another issue was that even without lubricant, it sometimes required more than one attempt to compress the rings sufficiently, with the vent facing to the forward position. It could be too tight, or not tight enough.

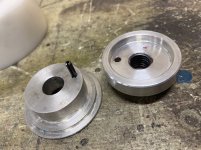
To prevent this, Graham added an engagement pin (in the photos below). This made a significant improvement. Now we were able to fully tighten the cap whether lubricated or not, because the lower body was held firmly in place. It also allowed us to insert the cap, then twist vent fin a precise amount every time (we used 180°), knowing that the lower body was fully engaged. The result is that the vent faces forward every time, with the same amount of thread engagement and ring compression.

Adding the engagement pin is relatively easy. It requires a hole drilled for a press fit of the pin in one part of the body, and a slightly larger hole in the opposite body part.

Reduction in shank diamter
Finally, we decided to try turning the main shank slightly smaller. The reason that this was done last, was because it does require some specialist modification to the fuel cap. It could be done with a file, or done during the manufacturing process. The diameter was reduced about .005". This then allowed the -323 O ring to fit with slight friction both inside and outside. It allows an easy press fit (one hand) into the filler neck. Removal can also be done with one hand and required it to be wiggled out. We then tried this on the real tank, and it worked well. The filler necks we measured are not exactly round, but there was enough tolerance to account for this. We didn't turn the shank down further at this stage, but will first try it in flight before going further. We also tried the original -324 O rings on the narrower shank, but they were still difficult to fit and remove the cap without lubricant.

Where we're at currently, is having the fuel cap shank turned down to fit a -323 O ring, the addition of an engagement pin, no lubrication, no groove. With a 180° turn upon installation and only modest strength required, it currently gives a force of 15 kgs to cause the cap to come off, which we think is likely to be sufficient (60% more than the original -324 rings with grease as lubricant). Anecdotally, we couldn't pull the cap off by hand once it was tight. With the original fuel cap and lubricated rings, we could.

If we decide to add an inside groove to the filler neck it increases the force required to detach the fuel cap to 22-24 kgs - very similar to the force required to remove the original fuel cap when it's used without lubrication. The cap can potentially be done up tighter, but given that you're usually perched on the wing strut with one hand outstretched, we tested with what we thought was a reasonable amount of strength that most people could use.

If the correct size O ring can be found, then we're optimistic we can do without reducing the shank size.
Click image for larger version  Name:	718FD79E-79CB-42FF-9250-2823D0C60783.jpg Views:	0 Size:	163.5 KB ID:	76608

Click image for larger version  Name:	4A847DF8-580E-4A12-B439-4C3F393B7164.jpg Views:	0 Size:	175.4 KB ID:	76609

Click image for larger version  Name:	B03FE3AE-B680-4F2E-8716-D17F3B36F0DA.jpg Views:	0 Size:	308.9 KB ID:	76610

Click image for larger version  Name:	8DF186E3-A7BB-4256-AE9C-10E94AC50A96.jpg Views:	0 Size:	375.7 KB ID:	76611

Click image for larger version  Name:	99088BF4-B2B7-4B73-8ECF-6557689763EF.jpg Views:	0 Size:	385.7 KB ID:	76612
 
Last edited:
6B34C205-92AB-463A-8125-F96F9E3837A1.jpg Until this matter is resolved I’m using a 33-57 mm tridon clamp to ensure the caps stay secure. Despite being agricultural and inelegant it seems to work.
 
  • Like
Reactions: Nev
I forwarded Bob the posting about the testing that you did in NZ. He feels that unless you do the testing with just engine oil on the big o rings - that the results you saw are not really of much use. If you did the testing with Fuel Lube (Easy Turn) - then even less useful results came out of the testing. Bob would like you to try using just engine oil as a lubricant and see how the caps behave. Mark
 
Awesome Write Up, Nev! Wow!!! You guys are very creative and I learned a lot from your testing. Our community will attract and thrive with material like this.

I'm thinking outloud.

-The lower cap body control with the Engagement Pin for positive control the O-ring crush is awesome. I had been accommodating it, but never saw it as a risk like you did. You two codified, exposed and fixed it. Great work.

-You say you removed .005" from the shank surface where the O-rings ride. Would you declare a shank dimension for us? I suspect that slight variations exist (change in venders?)
 
Hey Brooks, Thanks. Mostly Grahams work of course.
Yes I'll get a shank dimension for you. (Left my calipers at the hanger!)
 
Last edited:
Hi Mark, We didn't test aircraft engine oil specifically. I'll get back to you on that. We did use two different oils, and one type of grease. Definitely we noticed a difference in lubricity between them.
EZ-turn wasn't tested, we wouldn't have been able to get a reading, it's reduces the friction too much. (sometimes we were able to remove the cap by hand, even when tightened).
We used the standard supplied fuel cap as a bench mark. We felt that one factor in using any type of lubricant was that fuel is able to thin or dissolve grease and oil, thereby increasing the O ring friction. (Anecdotally, this sometimes made it difficult to remove the caps even when I had used engine oil to help install them on my Bearhawk). With EZ-turn, it isn't dissolved and the "slipperiness" remains.
 
Last edited:
OK, I finally took the fuel caps out of the bubble wrap. I assume the large O-Ring goes on the position I put it, it looks like the white nylon washer goes between the two pieces. Where does the smaller O-Ring go?

8997AE59-EDC7-4B37-894A-4F1612764805.jpg

It seems there is a gap between the O-Ring and the two different threaded pieces.
 
We discovered today that the shanks are not identical in diameter. We have 3 that measure approximately 34.35mm. The one we altered was slightly wider initially, and Graham has now turned it down to 34mm. If we turn it down any further it won't have enough holding friction. We are going to try a couple of other ideas, then will report back.
 
Mark, we tested today using Bob's method of engine out - specifically W100. It held good up to 12 kgs of force. Although that's a significant reduction from the un-lubricated cap, it's still not too bad. The major discovery is that as soon as we added lubricant, the cap could not be fully tightened every time, because the lower body spins. We then reduced the modified cap shank to 34mm and installed -323 rings. The friction decreased significantly, but was still at 12-13 kgs. It's much easier to install and remove. We think it will hold well, however Graham is keen to try a small taper to see if we can improve on it.
 
Last edited:
My wings are still in the crates (coming out in a few months), but this thread got me curious about the fuel caps. After Nev posted the photo the design makes perfect sense. Of course I am clueless having not used one yet, but through some trial and error I would think that one you got the proper index it is a fool proof design. The only think I am surprised a bit about is that there is not a type of “Y” hanging down from a chain in the tank to retain the cap during refueling. IF someone was so inclined it would be an easy addition. But finding the correct cap index and then possibly tweaking the O-Rings the system should be damn good
 
  • Like
Reactions: Nev
There is a little hole at the bottom for a cotter pin that keeps someone from unscrewing it enough to drop the bottom into the tank. The fuel caps were not originally designed with the hole in the bottom. We added 1/4" of length so there was room for that hole for the cotter pin. Bob agreed to let us add the 1/4" of length even though it adds weight.. Mark
 
I've been thinking about this and wondering why I've never lost a cap. There has to be something uncommon between those that have lost caps and those that haven't.

My procedure for refueling is basically:

1. Twist cap 180 deg to loosen. Always 180 deg so I know where to position the cap so it faces forward when tightened.
2. Gently rock cam back and forth while lifting up to remove the cap.
3. Add fuel to the bottom of the filler neck. I don't like the cap sitting in fuel, it happens sometimes but I prefer it not.
4. If the cap was difficult to remove then I take a couple of drops of oil from the engine breather tube and apply it to the o rings.
5. Install cap with vent facing to the rear and the top lip against the filler neck.
6. Tighten cap. Should be the same 180 deg turn to make it tight and clocked correctly facing forward.

Perhaps some fill the tanks fuller and the hydraulic pressure from fuel expansion pushes the caps out. The seems pretty unlikely to me as the fuel would just flow out the vent holes unless it expands quickly or the vent is constricted.

The only issue I've had with the caps is the threads on one galled. I was able to get the cap off, chase the threads and then applied anti-seize to the threads on both caps. No issues since.
 
This is interesting Whee. I never had any issue with my caps staying on initially. The problem was I couldn't get them off. I was having to use a screw driver. It was also difficult to install. I could only ever get a 90° twist out of the threads (not 180°). Sometimes it would turn further, but that turned out to be the lower body turning with the threads and wasn't actually tightening it further.I suspect that the small variation in shaft size might be affecting how consistent they are to do up.

It was because of the difficulty installing and removing it that I added a lubricant to the O rings. But as a result, the lower body spins even more. Grahams idea of adding a pin completely stops this and a 180° twist always provides exactly the same amount of compression every time. Currently we have a cap that is much easier to install and remove, and can be tightened to remain secure. It does need to be tightened properly, but the force to remove it now is very similar to the original fuel caps with engine oil on the rings.

One thing I discovered yesterday is that the addition of fuel on the O rings after installation and tightening, significantly reduces the locking friction. It appears that the lower ring is keeping the upper ring relatively dry.

Graham has ordered some more tooling for his lathe and next week we are going to try a couple of small changes.

So far what I've learn't Is that every change we make causes a couple of other things to change. There seem to be pros and cons to each possible solution. One example is I made up some locking tabs so that a 30° twist of the cap itself locks the tabs into place, before tightening the threads. It stops the cap coming off mechanically. However when fixing the tabs to the cap, you need to have them in the correct spot so the threads can then be tightened the right amount. If the O rings subsequently compress over time, the vent will have to turn past the forward position to fully compress the rings.
 
Hi Whee, my experience was pretty similar, except like Nev and others I was having to pry the caps off with a screwdriver. I think Marks advice of turning the shaft of the cap down a sniff would have helped this but both Nev and I were advised to lube the caps with EZ lube which we did. It made the caps much better to put on and off but reduced the locking friction in the filler neck. In hindsight I probably overfilled the tank (I usually leave a little headroom in the tank) and with a bit of turbulence I suspect the slosh hydraulics the cap out. It’s interesting to see that others have been working on solutions to this problem in the past, I’m sure we will soon get at least one and maybe more ways to address this. Until it happened to me I thought Nev hadn’t put his cap on properly.
 
I have had a few caps disappear in flight.
The method that seems to be working for me is the application of some fuel to the O rings when placing the caps in the neck and then tightening the cap tightly using a tool that I made.
Finger tight doesn’t seem to do the job.
The tool is made from UHMW plastic but my original was made from hardwood.
Haven’t lost a cap since. Still carry a spare cap just in case….

I'm going to try the tool idea. We've currently got a cap that installs and removes very easily, if a 180° turn is used. But we're not sure if that's tight enough. The tool might be an easy way to solve that.

I'm thinking especially if the tool had a bottle opener on the other end. Every self respecting Bearhawker would want one in their survival kit :rolleyes:
 
Actually I've got 3 fuel caps sitting in front of me and all 3 are different. The smaller vent hole size has an inlet area of 1.75 ²/mm. The larger vent hole size has an inlet area of 9.0 ²/mm.

5CE3D0D0-F696-4C87-87A1-8E61ED6FCC60.jpg

A45853DB-83F0-4BC5-8EDB-6A492AF54CFD.jpg
 
Last edited:
I used the tool method. A flathead screwdriver to get the cap started so I can rock it back and forth for removal. Then I use an aluminum adjustable wrench (fuel fitting tool) to tighten the cap back on. 1/2 turn doesn't get it for me, so I go 3/4 turn for a snug fit.
 
Rob we now have them working so they can be dropped into the filler neck very easily, and removed easily with one hand. I'll post a short video once we're confident they're working consistently. Using a tool to tighten and loosen certainly ensures they're tight enough. Having a pin to stop the lower from rotating inside the neck makes a huge difference.
 
Here's a short video showing where we're at with the fuel caps.


This isn't a mechanical lock, and it does benefit from using a tool to help tighten and loosen the cap. However, they are now very easy to install and remove, and appear to be quite secure in position.

We also think that when mechanically locking caps are available they should prove extremely popular.

We had hoped to avoid specialist machining, but after trying so many ideas and combinations, the solution we've got at this stage used a lathe to reduce the shank size from 34.35mm to 33.35mm, size -323 O rings, and the installation of a pin to prevent the lower body from turning. The pin made a significant difference, and would be a great addition even if you didn't change anything else. When loosened, the fuel cap inserts easily inside the filler neck with no resistance, and is lifted out with no resistance. We expect that after sitting in place for a week or two, there may be some slight friction to remove the cap, but it should be minimal.

Obviously time in use will be needed to highlight any issues. I'm very interested to see if there's any changes with the larger vent hole and the increase in tank pressure. I plan to test them inflight later this week.

Update: These caps worked well over many hours. The one downside was they required a tool of sorts to tighten and loosen them. I used a U shaped piece of plastic. However they were very secure, and very easy to install and remove. Once another set of fuel caps arrived, we modified them in a similar fashion but only turned the shank down to 34mm. These ones are easily installed and removed by hand (with no tool). See Bissetg's post below. Grant found he had a slightly different fit on each side, and didn't need to reduce the cap shank size at all. Simply by replacing the O rings with a smaller size (-323) he got a good fit. Others have reported this worked for them too, Due to the variation in filler neck Inside Diameter, and the variation in fuel cap shank Outside Diameter, you may or may not need to reduce the shank diameter.
 
Last edited:
Kevin kindly used my BH as a test bed for his personally designed fuel caps for the last several years, including several mods which improved an already functional design.

I cannot describe the pleasure of refueling now as opposed to four letter word blood pressure raising experiences with the original. I did lose two of the old ones.

Kevin has a box of the fuel cap parts but no time to organize assembly or order parts from machine shops. Full attention goes to his aircraft completion.

It will be worth the wait and he should be flying in time for Bob's BBQ.

Scott Williamson
924PL
 
Nev kindly sourced some O rings of the smaller size. My ID on the filler necks is 44mm, the fuel cap inserts are 34.2 mm, by going to the smaller size O ring I can now very comfortably insert and remove the caps by hand. However I could only get one cap to lock as the base kept turning with the vent spigot, the other cap worked flawlessly. As a result at Nev’s suggestion we have put pins in the caps connecting the base to the top to ensure that turning the vent spigot at the top compresses the O rings.

The result is two fuel caps that are firm but not difficult to use, and lock effectively with a tightening of about 210 degrees consistently. The caps now work far better than I thought they would.
 
Today is Thanksgiving in the U.S. and I am thankful to Nev and any others who have contributed to this investigation into improved fuel caps. Today was the first use of my recently modified caps and the experience was so much more pleasant! I installed O-rings that were one size smaller in diameter and engagement pins on all 4 of my caps. What an amazing improvement!!
 

Attachments

  • photo13043.jpg
    photo13043.jpg
    1.2 MB · Views: 1
  • photo13044.jpg
    photo13044.jpg
    1.2 MB · Views: 1
  • photo13045.jpg
    photo13045.jpg
    1.7 MB · Views: 1
  • photo13047.jpg
    photo13047.jpg
    2.2 MB · Views: 1
  • photo13046.jpg
    photo13046.jpg
    1.6 MB · Views: 1
I did the fuel cap mod to my caps yesterday. I used the Dewalt "portable shop lathe" method. 1/2-13 bolt thru the cap, chucked into a 18v drill, held by my vise. 100-150-220-400 wet/dry sandpaper. My caps measured 1.35" before the mod and were nearly impossible to insert. Both are about 1.30 and still snug, but slide in. The roll pin was easy with the same drill. I thru drilled the. Thru drill the bottom, and drilled 1/4" into the top. Drill out the bottom about 8-10 numbered bits bigger. Very easy to do.

Great idea, whosever it was.
 
I had caps made for me and added the vent to the filler, because of the aux tanks made them 4 inches high to help not to spill fuel when parked
 
Back
Top