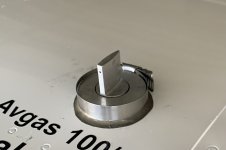
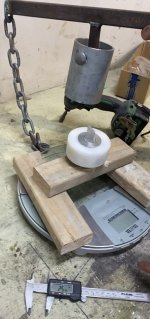
NZ Bearhawk Patrol builder Graham Johnson has a background as a toolmaker. After I told him of the issue, Graham came up with a couple of ideas. His initial thoughts were to try and make the original fuel cap work better. To do this, he made a test rig to check the amount of force required to remove the fuel cap in different scenarios. He also turned a mock filler neck from nylon.
The criteria we used was:
- It had to easy to install and remove with one hand (modest strength), and no tools.
- Simple to get the vent facing forward with sufficient and consistent O ring compression every time.
- To explore Grahams idea we wanted to use the existing fuel cap, and minimal machining.
Original Fuel Cap
We started with the original fuel cap, as it comes with the supplied -324 O rings. The original fuel cap required over 25 kgs of force to pry off when secured properly without lubricant. However the difficulty installing and removing it is why so many of us used a lubricant or a screwdriver to assist.
Using grease as a lubricant, the fuel cap then required such little force to remove that the weight of the test rig provided more than enough force with a reading of around 4 kgs. When we wiped much of the grease off, the friction force increased to 9 kgs. With such little force required, in combination with the hydraulic action of the sloshing fuel, it's easy to see why this is problematic.
Different O Rings
Next, we tried a variety of different sized O rings, looking for a simple solution. We tested each combination with and without a lubricant. After trying many combinations, there were two potential candidates. An imperial -323 (one size down from the supplied -324) showed promise. However the inside diameter of the -323 is lower, so after stretching it to fit the unmodified shank, we were back to the same OD as the -324 and it was difficult to fit and remove by hand,
We then tried a metric 34mm ID in 4.5mm thickness. This worked better, but required quite a lot of force to tighten and compress the O rings out to provide enough engagement. An ideal size would seem to be 34mm ID and 4.75mm thickness, but we haven't sourced one yet.
Filler Neck Groove
Graham then added a very small
groove to the inside of the filler neck, to engage with the top O ring. Although not a mechanical lock as such, the groove increased the "friction" in all situations by at least 50%. This made a huge and measurable improvement, but it does require a specialist tool to add a groove. Graham has designed a tool to do this, but at this stage we're still exploring ways to do it without the groove.
Engagement Pin
One thing we noticed is that when lubricating the O rings, we lost friction in the lower fuel cap body, and often it spun as we tried to tighten the cap into position. This meant that we were not able to tighten the fuel cap properly when it has been lubricated, and probably explained why a number of them have departed inflight. Not only did the lubricant reduce the friction between the O rings and the filler neck, it also prevented the same amount of ring compression from being applied, resulting in the cap not being able to be tightened. Another issue was that even without lubricant, it sometimes required more than one attempt to compress the rings sufficiently, with the vent facing to the forward position. It could be too tight, or not tight enough.
To prevent this, Graham
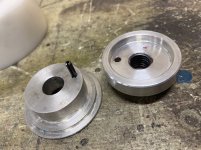
added an engagement pin (in the photos below). This made a significant improvement. Now we were able to fully tighten the cap whether lubricated or not, because the lower body was held firmly in place. It also allowed us to insert the cap, then twist vent fin a precise amount every time (we used 180°), knowing that the lower body was fully engaged. The result is that the vent faces forward every time, with the same amount of thread engagement and ring compression.
Adding the engagement pin is relatively easy. It requires a hole drilled for a press fit of the pin in one part of the body, and a slightly larger hole in the opposite body part.
Reduction in shank diamter
Finally, we decided to try turning the main shank slightly smaller. The reason that this was done last, was because it does require some specialist modification to the fuel cap. It could be done with a file, or done during the manufacturing process. The diameter was reduced about .005". This then allowed the -323 O ring to fit with slight friction both inside and outside. It allows an easy press fit (one hand) into the filler neck. Removal can also be done with one hand and required it to be wiggled out. We then tried this on the real tank, and it worked well. The filler necks we measured are not exactly round, but there was enough tolerance to account for this. We didn't turn the shank down further at this stage, but will first try it in flight before going further. We also tried the original -324 O rings on the narrower shank, but they were still difficult to fit and remove the cap without lubricant.
Where we're at currently, is having the fuel cap shank turned down to fit a -323 O ring, the addition of an engagement pin, no lubrication, no groove. With a 180° turn upon installation and only modest strength required, it currently gives a force of 15 kgs to cause the cap to come off, which we think is likely to be sufficient (60% more than the original -324 rings with grease as lubricant). Anecdotally, we couldn't pull the cap off by hand once it was tight. With the original fuel cap and lubricated rings, we could.
If we decide to add an inside groove to the filler neck it increases the force required to detach the fuel cap to 22-24 kgs - very similar to the force required to remove the original fuel cap when it's used
without lubrication. The cap can potentially be done up tighter, but given that you're usually perched on the wing strut with one hand outstretched, we tested with what we thought was a reasonable amount of strength that most people could use.
If the correct size O ring can be found, then we're optimistic we can do without reducing the shank size.



 I know you've got a lot on your plate Kevin, but your caps were great and I would gladly pay a lot for them... even if they aren't perfect yet.