

 Tweet
Tweet
@BravoGulf I used a thick sheet of poster board and cast the carbon fiber in place.
-
Rob Caldwell
Lake Norman Airpark (14A), North Carolina
EAA Chapter 309
Model B Quick Build Kit Serial # 11B-24B / 25B
YouTube Channel: http://bearhawklife.video
1st Flight May 18, 2021 -
I trashed oil cooler plenum version 4.0 with the rivet gun. The good news is I am getting faster making oil cooler plenums.
Also closing avionics harness connectors. I hope it all works!Last edited by svyolo; 09-02-2019, 06:41 PM.Comment
-
Very nice Rob. I’ve recently been watching Mike Patey’s YouTube videos on how to do this.
Will you make the cowl from Carbon Fiber as well ?Nev Bailey
Christchurch, NZ
BearhawkBlog.com - Safety & Maintenance Notes
YouTube - Build and flying channel
Builders Log - We build planesComment
-
Rob,
What type of epoxy did you use?Comment
-
I used a high heat resistant epoxy resin from Polymer composites. https://theepoxyexperts.com/shop/adh...-glue-casting/
-
-
Finished the initial cover of the rudder with Oratex. Probably a lot more time consuming than regular fabric, but no painting when you are done. I like it. I should finish the gear legs tomorrow and start on the elevators and horizontal stab.Comment
-
Nice! I covered my Rans S7 in Oratex and thoroughly enjoyed the process. Like you mention, it’s more time consuming regarding the attaching of the fabric but it’s airworthy a heck of a lot sooner. The most laborious job was attaching Oratex scrap as anti chafe vs. the standard adhesive tape used on conventional fabric processes.
-
-
I haven't posted many progress reports, but I figured this milestone was worth mentioning considering I hammered out the first rib nearly nine years ago. Yesterday--after four kids, three pets, six moves, and cumulative years of work-related travel--the scratch-built wings met the VR3-built fuselage right in my back yard. Ambient temperature started at 10F, but most importantly there was zero wind or precipitation. I will add a complete description of the day's events on my new EAA build log and add the link to this post at a later date.
Fun facts: my Bearhawk is already an avid traveler. Ribs were flanged in the DC area, stiffener angles were drilled in New Mexico, attach angles were deburred in northern Africa, and other odds and ends found their way to Europe and S. Korea.
We had a run-in with Physics along the way, as water levels are commonly used to set dihedral, and most water levels are inop in sub-freezing temperatures. We used a solution containing water, blue food coloring, dish soap, and loads of salt. As we set the dihedral of the second wing, we dropped an end and lost some fluid, so I just topped it off with fresh water as the temp had risen to the mid 20's F. We then completed the dihedral measurement and stepped back to admire the work. We immediately noticed the dihedral of the second wing was substantially off. After double checking all measurements and scratching our heads (and breaking for breakfast), we held both ends of the water level together and discovered one side was several inches higher than the other. No freezing had occurred and there were no bubbles. As a guy who does physics for a living, I was stumped. Finally, I realized the saltwater had not really mixed with the fresh water that I added to one side, and the very salty water was significantly more dense than the fresh water, causing a noticeable error. We cleaned out the tube and used only fresh water and finally had a working water level again. We rechecked all measurements and always held the tubing ends together to check functionality prior to making every measurement thenceforth. We also backed up all measurements with a digital level.
Much thanks to my father-in-law for his help (wearing the "cousin Eddy" hat in the photos), and to my wife for providing a constant stream of hot drinks served up in my brand new Bearhawk cup (thanks Jared!). Now it's time to pack up the project for safekeeping as I have another ~6 months of work travel coming up in January =(.
20191113_074232.jpgIMG_20191113_083107475_HDR.jpg
IMG_20191113_110321398_HDR.jpgIMG_20191113_144019101.jpgIMG_20191113_145545977_HDR.jpgLast edited by nichzimmerman; 11-14-2019, 11:05 AM.Comment
-
I have completed the installation of my engine cowling. And posted an update on my YouTube Channel:
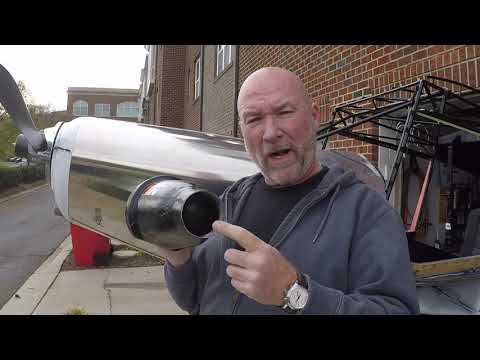 Rob Caldwell
Lake Norman Airpark (14A), North Carolina
EAA Chapter 309
Model B Quick Build Kit Serial # 11B-24B / 25B
YouTube Channel: http://bearhawklife.video
1st Flight May 18, 2021Comment
-
loved the video Rob! I definitely appreciated the talk about the lower lip you had to do it fiberglass. Slowly learning more and more about aluminum (or in this case, metalwork in general) and figuring out how to spot complex curves is definitely something I’m learning, and this was a great example of some great troubleshooting. Thanks for sharing!Originally posted by robcaldwell View PostJohn Wiltberger
Model B - #1544B
Maricopa, AZComment
-
Great video as always Rob! My air induction is nearly identical to your, I also used the James Aircraft inlet filter housing. I don't know if this would work for you, I bought a connection piece from K&N. It is a rubber like material and smooth inside and out unlike scat tube. It is about 3" long. The gap from my filter housing to the inlet on the cowling is about an inch. its not easy to clamp in place but doable and provides a flexible connection.Comment
-
Great vid! Good idea about the cowl straps, I'm also wondering how I'll do that.Originally posted by robcaldwell View PostComment
-
Great video, Rob. It is clear that you will have a fine Bearhawk when you are finished. Your craftsmanship is tops.
Regarding your air inlet, I could be all wrong, but you may want to explore Rodsmith’s flexible union between the air box and lower cowl. My 360 with an 80†aluminum prop really rocks on starting. Perhaps your prop, which looks like it may be carbon fiber, may not have so much inertia. I think there is a video on Vetterman’s website which shows how much an engine can rock on starting...beyond what one might expect. Perhaps some other builder/flyers have additional insight.
I look forward to seeing your bird fly. Best wishes.Comment
-
I'm still in the prep stage. Getting a couple walls built in my shop, gotta get a car out of there, etc... today is building walls to separate my gym from my shop and right now I'm getting all my plans into an art portfolio to protect and organize them.https://www.youtube.com/user/fastfox23
Patrol plans #398Comment
-
Finished up my extended floor-level baggage compartment... Pretty close to how I pictured it but not perfect. Being floor level keeps allows me to put longer things on the floor and away from head height in case they become missiles. It goes about as far back as it can, while avoiding cables etc., which allows me to store a 6 foot longbow back there with the rear seat installed (4’ in the extension, 2’ on the floor.)You do not have permission to view this gallery.
This gallery has 3 photos.Almost flying!Comment
-
I thought about putting it down low, but how many times would I have to empty out the whole plane to get something out? Or how many times would I load up and then realize I forgot to load the long stuff, and have to empty it all out again.
As long as I remember to duck when I hit the brakes I should be OK.........
-
-
0FBD632B-AE15-4443-8F2C-A238FE966CEE.jpeg69E9FAE4-0D97-4BD3-967C-64DE8702CFB2.jpeg Made a start on covering my ailerons.Comment
-
I flew to New Orleans with my brother then rented a car to drive to Mobile, Alabama where the Continental/Titan engine factory is. There the sales rep, JB, took us on a GREAT tour of the facility. It was worth the trip. Due to some security and proprietary process secrecy needs we weren’t able to film the tour, but I was allowed to take some pictures and I incorporated them into a little post-tour video where my brother and I talk about what we saw. It would have been better if we could have captured more on film but I thought it might be somewhat interesting regardless... The takeaway for me was that these are very high quality American engines made by American workers - even if they are now owned by China. Funny enough there is a little plaque in the lobby that says something to the effect of this company being in the top 5 “business units†of China! Such is life. Still, After learning about how things are done and who does them I feel great about ordering my Titan engine - and Mark got me a great deal on it too.
Here is the vid: https://m.youtube.com/watch?v=CDTFdj1o6KE
Almost flying!Comment

Comment