Bearhawk Aircraft Bearhawk Tailwheels LLC Eric Newton's Builder Manuals Bearhawk Plans Bearhawk Store

Announcement

Collapse
No announcement yet.

Aileron rigging

Collapse
X
 
  • Filter
  • Time
  • Show
Clear All
new posts

  • Aileron rigging

    I tried to find an existing topic about this, but couldn't. So I'll start one.

    We originally had our ailerons lined up with the flaps and wingtips in flight. In our case, this has them about 1/4 inch below the line of the bottom wing skin, measured at the trailing edge.
    The consequence of this, I now realise, was:
    • heavy ailerons in flight at moderate airspeed
    • necessary to use a LOT of leading rudder to initiate rolls.
    • high rate rolls are almost entirely done with rudder, ailerons only follow
    • very stiff ailerons at high speeds, particularly in dives above Vo where the ailerons are almost locked.
    I know several other builders who have their planes rigged the same. 4 place and Patrol. I just assumed this is how all Bearhawks were. I could never understand why people lauded the nicely balanced controls... (facepalm)
    On advice from Mark, made a change:

    Rigged the ailerons up about 1/4 inch, measured at the trailing edge relative to the line of the bottom wing skin.

    With flight air load, this makes more like 1/2" or 3/4" up at the tip, in flight. Visually it's a lot less attractive because it doesn't align with the flaps and wing tips exactly, but it works.
    The results are:
    • Aileron control forces nicely balanced with rudder and elevator
    • No need for leading rudder during a slow roll
    • High speed rolls are a mix of rudder and aileron
    • Aileron control forces do not increase in a dive, they remain balanced throughout the airspeed range.
    • Overall my Bearhawk feels like a very different (better) aeroplane in flight.
    I highly recommend the bold technique above for aileron rigging. Thanks to Mark Goldberg for the tip.

  • #2
    Great advice, thankyou for posting

    Comment


    • #3
      Thanks Battson! That’s opposite from what I’m told is typical aileron rigging (1/4” drooped). I’ll make sure I set mine IAW Marks recommendation.
      Scratch Built 4-place Bearhawk. Continental IO-360, 88" C203 McCauley prop.

      Comment


      • #4
        I had never heard of this until Mark posted it. I always thought you did the same thing by differential control horns/bellcranks, and did it a few times on RC gliders many moons ago. More up than down for a given stick deflection. I thought about what Mark said and it seemed definitely plausible. Sounds like more than plausible now.

        Dropped slightly might help a bit with stall speed, reflexed might cost you a similar amount, but maybe add a slight amount in cruise. Sounds like a good compromise if it flies better.

        Comment


        • #5
          I have recommended to builders to rig their ailerons both a little "UP" on the ground. This was based on my experience that doing this reduced adverse yaw quite a bit. I really had no idea that it might produce other benefits like Jonathan mentions. But over the years on occasion other BH pilots have felt my ailerons were softer or less stiff than theirs. Perhaps this rigging contributes, as Jonathan says, to softer aileron forces.

          When I built my RV8 I was very focused on getting a straight line from my wingtips inboard to the flaps. Visually it is very pleasing. But I decided that the better flying qualities of rigging the ailerons UP was more important on my BH.

          From this discussion - it makes me wonder whether this beneficial rigging technique is also applicable to the new Model B wing. I will ask Bob his thoughts and report back. I do not have enough hours with the new wings to really comment whether the same thing exists.

          FYI - this is all quite easy to play with once you are flying. Just a few turns of the rod end bearings on the aileron pushrods. Hopefully this discussion will prompt a few of you flying to try it both ways and see if you come to the conclusions Jonathan did. Mark

          Comment


          • #6
            I just spoke with Bob about this issue. He believes the same result will happen on Model B wings as what is seen on the original 4412 wings. But he reminded me there is one drawback. He says any time you rig both ailerons up like this - it will reduce the plane's ability to slip. But he said the planes are likely even after rigging the ailerons up to still have more slipping ability than anyone will ever need or use. Mark

            Comment


            • #7
              To be clear, is the recommendation to align the trailing edge of the aileron so that the bottom skin of the aileron is basically in the same plane as the bottom skin of the wing...aka, it would all sit flat on a table?

              I wonder​​​​​r what would happen to cruise speed if one were to rig the flaps that way as well...

              Comment


              • #8
                Nic, the recommendation is to rig your ailerons so the trailing edge is UP a little on the ground on BOTH sides. In relation to the wingtips and flaps. MG

                Comment


                • #9
                  This was posted when I was in a sprint to build and complete. Even a tortoise thinks he is sprinting!!!! I had forgotten the details of the post and re-discovered when doing a search for aileron rigging. THIS WORKS for the Model A wing for sure. I had discussed a heavy left wing with Mark G and was about to start shimming that when I came back across this post. DESERVES A REFRESH.

                  Like Jonathan, after about 160 hours, I had come to accept "stiff" stick in cruise was a normal thing for a Bearhawk 4 place A Model. The great thing about the Bearhawk is it's wide speed envelope. I had taken the path of least resistance and accepted that hands off trim for the whole range of speeds was not within my ability. I was hands off below 90 KIAS and liked that. I had a passenger recently on another trip to southern Utah and he complained about the stiffness of the stick in cruise. I replied to that complaint with "Man up, this is a Bearhawk!!" He was right, I was wrong again.

                  Don't need to shim the left aileron down now and the stick forces in cruise are a whole lot lighter.

                  Thanks Jonathan and Mark G, again.

                  TEASER for post coming soon hopefully - Stolspeed VG's BROKE my Airspeed Indicator!!!!
                  I've pretty much completed my testing without and with VG's. I have to do a little video work to post the results. The simple conclusion is my airspeed/pitot/static system is not accurate in the low 30's and 20's KIAS. I'm 99.9% sure that the speeds I'm indicating stall now defy all laws of physics, aerodynamics, and religion. I have to have the video complete to post cus'n it is truly unbelievable !!!! More details to come.

                  Got a new Bearhawk and very, very happy.

                  Fly safe.
                  Last edited by John Bickham; 05-27-2021, 07:46 AM.
                  Thanks too much,
                  John Bickham

                  Los Lunas, NM Mid Valley Airpark E98
                  BH Plans #1117
                  Avipro wings/Scratch
                  http://www.mykitlog.com/users/index....er&project=882

                  Comment


                  • PaulSA
                    PaulSA commented
                    Editing a comment
                    I haven't flown anything that slow but, from what I understand, the ASI will be considerably in error on the low side because of the very large AoA. Mathematically, I think it will read actual IAS x Cos(AoA) - although the effect may be more exaggerated due to the air spilling over the edges and therefore not all the molecules actually going down the tube.

                • #10
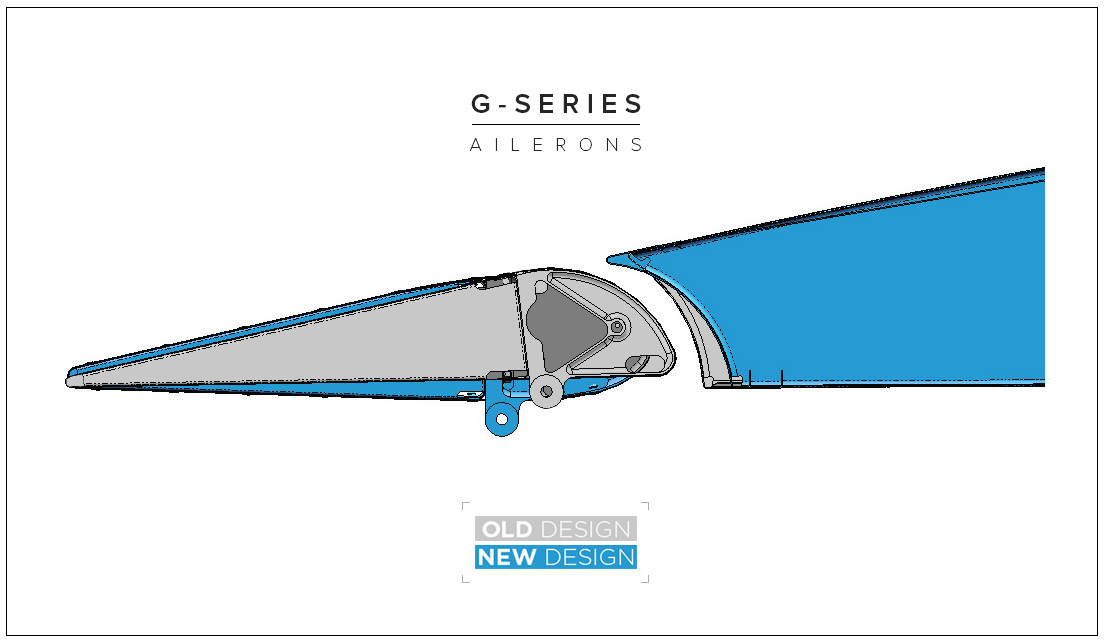
                  I've read that Cub Crafters redesigned their ailerons to accommodate the same problem.

                      CubCrafters G-Series Flaps and Ailerons are provided as standard equipment on Carbon Cub FX, EX-2 kit and XCub, . They have been commended for their improved performance and... Read more »

                  Paragraph two...indicates high aileron loads above 130mph.

                  It looks like a fat aileron...many donuts for breakfast!! The gap between the aileron and wing is larger, the TE is a tad bit higher, looks like both the upper and lower skins sit proud to the wing's airfoil.....Why??? does it get the control into higher energy airflow maybe?
                  Screen Shot 2021-05-27 at 8.00.41 AM.png
                  Brooks Cone
                  Southeast Michigan
                  Patrol #303, Kit build

                  Comment


                  • #11
                    Originally posted by Bcone1381 View Post
                    I've read that Cub Crafters redesigned their ailerons to accommodate the same problem.

                        CubCrafters G-Series Flaps and Ailerons are provided as standard equipment on Carbon Cub FX, EX-2 kit and XCub, . They have been commended for their improved performance and... Read more »

                    Paragraph two...indicates high aileron loads above 130mph.

                    It looks like a fat aileron...many donuts for breakfast!! The gap between the aileron and wing is larger, the TE is a tad bit higher, looks like both the upper and lower skins sit proud to the wing's airfoil.....Why??? does it get the control into higher energy airflow maybe?
                    Screen Shot 2021-05-27 at 8.00.41 AM.png
                    Harry Riblett recommended that both ailerons and flaps have a curved top surface slightly above the airfoil profile. He didn't specify how much but from the diagram looked like it could be 3/8th of an inch on the Model B / Patrol airfoil. He said this made them more effective but didn't go into much detail.

                    Comment


                    • #12
                      Originally posted by rodsmith View Post

                      Harry Riblett recommended that both ailerons and flaps have a curved top surface slightly above the airfoil profile. He didn't specify how much but from the diagram looked like it could be 3/8th of an inch on the Model B / Patrol airfoil. He said this made them more effective but didn't go into much detail.
                      Ok good! I thought I screwed something up when I saw my ailerons sitting slightly proud of the top skin, but totally flush on the bottom... Whew!
                      Rob Caldwell
                      Lake Norman Airpark (14A), North Carolina
                      EAA Chapter 309
                      Model B Quick Build Kit Serial # 11B-24B / 25B
                      YouTube Channel: http://bearhawklife.video
                      1st Flight May 18, 2021

                      Comment


                      • Gerhard Rieger
                        Gerhard Rieger commented
                        Editing a comment
                        I just checked mine the other day and saw the same thing, really good to hear its ok that way.

                    • #13
                      Back when I was into RC gliders (70's early 80's) we did differential ailerons, at first mechanically, and as electronics got more advanced, electronically. At least 2 to 1, or more, was required differential to eliminate adverse yaw. Bob uses offset control horns to get a bit of differential, but not enough.

                      When I first read Marks' recommendation of rigging the ailerons both "up", or "reflexed", it was an "aha" moment. I never thought of it, or heard of it. But it makes sense. The only negative might be a slight increase in stall speed.

                      An easier and cheaper method of reducing stall speed, and increasing cruising speed, than double slotted flaps, might be reflexing the ailerons (and maybe flaps) for cruise, and drooping the ailerons for approach.

                      My ailerons will be rigged "reflected"

                      Comment


                      • #14
                        Aileron Differential

                        This thread and discussions with other builders got me thinking about the amount of differential aileron in the Bearhawk.

                        What effect (if any) would rigging the ailerons as below have - lengthening the aft aileron cable slightly, and shortening the forward strut cables, by a small amount. Will this introduce a small amount of differential ? Has anyone tried it ?

                        It may cause the cables to tighten towards center stick, and loosen as bank is applied. Not sure. I believe that welding the bellcranks to a tighter than 90° angle will achieve differential, but wondering if this will also work.

                        Obviously full control range still needs to be achieved, and if taken too far the bellcrank to aileron linkages will bind on the sides of the hinge.

                        D0A78627-E876-46D8-89F5-71DA11729AAD.jpeg
                        Nev Bailey
                        Christchurch, NZ

                        BearhawkBlog.com - Safety & Maintenance Notes
                        YouTube - Build and flying channel
                        Builders Log - We build planes

                        Comment


                        • svyolo
                          svyolo commented
                          Editing a comment
                          I can't remember ever seeing it done that way, but that doesn't mean it won't work. I also never saw it done the way Bob does it with an offset control horn. I always saw it with an offset bell crank, either more or less than 90 degrees.

                      • #15
                        Nev,

                        With respect to the photo and your post on differential rigging.
                        Yes, I have done this on at least 4 Bearhawk riggings. It works best in conjunction with raising the trailing edge of the aileron up a bit as previously noted.

                        That said, the amount of offset in your bench setup photo is way much, my experience is that if the distance from the rear spar to the point of stick cable attachment is CLOSER to the spar by
                        .125 of an inch than the center of the pivot to the spar. ( which is approx 4.5 in ) This means that the cross connect cable will be SHORTER than that illustrated in your bench top setup.
                        I like the setup and see the little marks of measurement. All good there. Try rigging so the cross connect cable is shorter than Nominal Squared Up and see what happens with your marks.......
                        And is everything moving the correct direction?

                        The objective here is, in a right turn for example, right aileron goes up more, a bit sooner that the left aileron goes down.......
                        I see differential angle at the aileron of Upward going at 25 Deg and the Downward going aileron at 20 deg at full stick travel. Not all of this comes from the bell crank offset rigging.
                        This is not a problem for cable tensions and slacking as long as the cable is reasonable tensioned 25 - 40 lbs.

                        Kevin D
                        #272
                        KCHD

                        Comment


                        • AKKen07
                          AKKen07 commented
                          Editing a comment
                          What am I missing here? Aren't the ailerons already getting differential when rigged "squared up?" Mine are doing so on the ground anyway. Pretty close to "book" numbers, 23 up and 17 down plus or minus a degree. Why do you want more differential?

                        • Nev
                          Nev commented
                          Editing a comment
                          Ken, you’re not missing anything, and you’re completely right as I understand it.
                          However, you may also have an additional way to fine the differential to your liking should you choose.
                      Working...
                      X